Love this? Save it for later!
Share the inspiration with your friends
My neighbor, Mrs. Kowalski, watched me struggle with a batch of royal icing for what felt like an hour. She didn’t say anything at first. Then she just slid a single black cat cookie across the counter toward me, its whiskers painted with a steady hand I could only dream of having. I was twenty-three, living in my first apartment, and desperately trying to impress my niece with homemade Halloween treats. The cookies looked like a disaster zone. But that cat cookie—it was perfect. She shrugged when I asked how she did it. “You just have to stop fighting the dough,” she said, and walked back to her side of the duplex.
I didn’t get the recipe from her that day. It came a week later, written on a torn piece of brown paper bag, tucked under my door with a note that said, “For the next time you need to be the cool aunt.” I’ve made these Perfect Black Cat Sugar Cookies every Halloween since, and honestly, I think of her every single time. The dough is forgiving, the decorating is forgiving, and the whole process feels less like baking and more like catching up with an old friend. Maybe you’ve been there—staring at a Pinterest-perfect cookie and wondering how anyone gets those tiny cat ears so symmetrical. Let me tell you, this recipe is the one that finally made me feel like I could do it too.
These cookies have become my Halloween signature. They’re the ones I bring to parties, the ones my niece now makes alongside me, and the ones that disappear fastest from the platter. There’s something about a black cat cookie that just feels right for October, you know? A little spooky, a little sweet, and completely irresistible.
Why You’ll Love This Recipe
I’ve tested this recipe more times than I care to admit, and I can tell you with confidence—these cookies work every single time. They’re not just another sugar cookie. They’re the sugar cookie that actually holds its shape, tastes amazing, and doesn’t make you want to throw your rolling pin across the kitchen. Here’s why you’ll fall for them too:
- Perfect for Halloween: The black cat shape is instantly recognizable and so fun to decorate. Kids and adults both light up when they see these on the dessert table.
- Easy to Decorate: You don’t need pastry school to make these look good. A simple black royal icing and a few white details create cookies that look professional with minimal effort.
- Holds Shape Beautifully: This dough doesn’t spread or lose its edges during baking. Your cat cookies will come out of the oven looking exactly like cat cookies, not blobs with ears.
- Simple Ingredients: Everything in this recipe is a pantry staple. No weird specialty items, no last-minute grocery store runs for obscure extracts.
- Make-Ahead Friendly: The dough freezes beautifully, and the baked cookies stay fresh for over a week. You can spread out the work over several days.
What makes this recipe different from every other sugar cookie out there? It’s the balance of butter and shortening. I know, shortening sounds old-fashioned, but trust me on this one. The combination gives you the buttery flavor you crave with the structural stability you need for cut-out cookies. I spent an entire October testing ratios, and this is the one that finally worked. The cookies are tender but not crumbly, sweet but not cloying, and sturdy enough to hold royal icing without bending or breaking.
This recipe isn’t just good—it’s the kind that makes you close your eyes after the first bite. It’s Halloween comfort food at its finest. Perfect for impressing guests at your spooky gathering, or turning a regular Tuesday in October into something memorable with the kids.
What Ingredients You Will Need
This recipe uses simple, wholesome ingredients to deliver bold flavor and satisfying texture without the fuss. Most of these are already sitting in your kitchen, waiting for their moment to shine.
For the Cookies:
- 1 cup unsalted butter, softened (I use Land O’Lakes for consistent results—the butter quality really matters here)
- ½ cup vegetable shortening (Crisco is my go-to; it gives the cookies that perfect tender-but-sturdy texture)
- 1 ½ cups granulated sugar
- 2 large eggs, room temperature (cold eggs can make the dough seize up, so let them sit out for 30 minutes first)
- 2 teaspoons vanilla extract (pure vanilla, not imitation—you’ll taste the difference)
- 4 cups all-purpose flour (spoon and level it—don’t scoop directly from the bag or you’ll get too much)
- 2 teaspoons baking powder
- 1 teaspoon salt
For the Royal Icing:
- 4 cups powdered sugar (sift it first to avoid lumps)
- 3 tablespoons meringue powder (I prefer Wilton brand for its reliable consistency)
- 5-6 tablespoons warm water
- Black gel food coloring (Americolor Super Black works best—liquid coloring won’t give you that deep, true black)
- White gel food coloring (for the eyes and whiskers)
Ingredient Tips and Substitutions:
The butter-shortening combo is non-negotiable for the best texture, but if you’re dairy-free, you can use all shortening. The cookies won’t be quite as rich, but they’ll still hold their shape well. For the eggs, flax eggs work in a pinch (1 tablespoon ground flaxseed mixed with 3 tablespoons water per egg, let sit for 5 minutes). Just know the texture will be slightly denser.
If you can’t find meringue powder, you can use 3 large egg whites instead. But honestly, meringue powder is more stable and safer since you’re not using raw eggs. It’s worth keeping a container in your pantry during cookie season.
For the black food coloring, be patient. It takes more than you think to get true black. I usually add about half a teaspoon at a time and keep stirring until I’m happy with the color. The icing will darken slightly as it sits, so don’t panic if it looks more gray at first.
Equipment Needed
You don’t need a professional bakery setup for these cookies, but a few key tools make the process much smoother. Here’s what you’ll need:
- Cat-shaped cookie cutter (about 3-4 inches is the perfect size—big enough to decorate easily, small enough to get multiple cookies per batch)
- Rolling pin with thickness guides (I use a wooden one with adjustable rings, but even a regular rolling pin works if you’re careful)
- Parchment paper or silicone baking mats (Silpat mats are my favorite—they prevent spreading and make cleanup a breeze)
- Stand mixer or hand mixer (I’ve made this dough with both; the stand mixer is easier for the creaming step, but hand mixer works fine)
- Large baking sheets (heavy-duty ones that don’t warp in the oven)
- Piping bags or squeeze bottles (I prefer squeeze bottles for flooding icing—less mess, more control)
- Small round piping tip (#2 or #3) (for outlining and detail work)
- Cooling rack (wire rack is essential for letting icing set properly)
- Offset spatula (for smoothing icing, though a butter knife works in a pinch)
If you don’t have a cat cookie cutter, don’t worry. You can freehand the shape using a paring knife and a paper template. I’ve done it before when I lost my cutter mid-baking frenzy. It takes a little longer, but the cookies look wonderfully rustic and homemade.
One tip about piping bags—the disposable plastic ones are fine, but reusable silicone bags are more eco-friendly and less likely to burst at the seams. I learned that lesson the hard way when a bag split open mid-pipe and I ended up with black icing all over my counter. And my apron. And my face.
Preparation Method
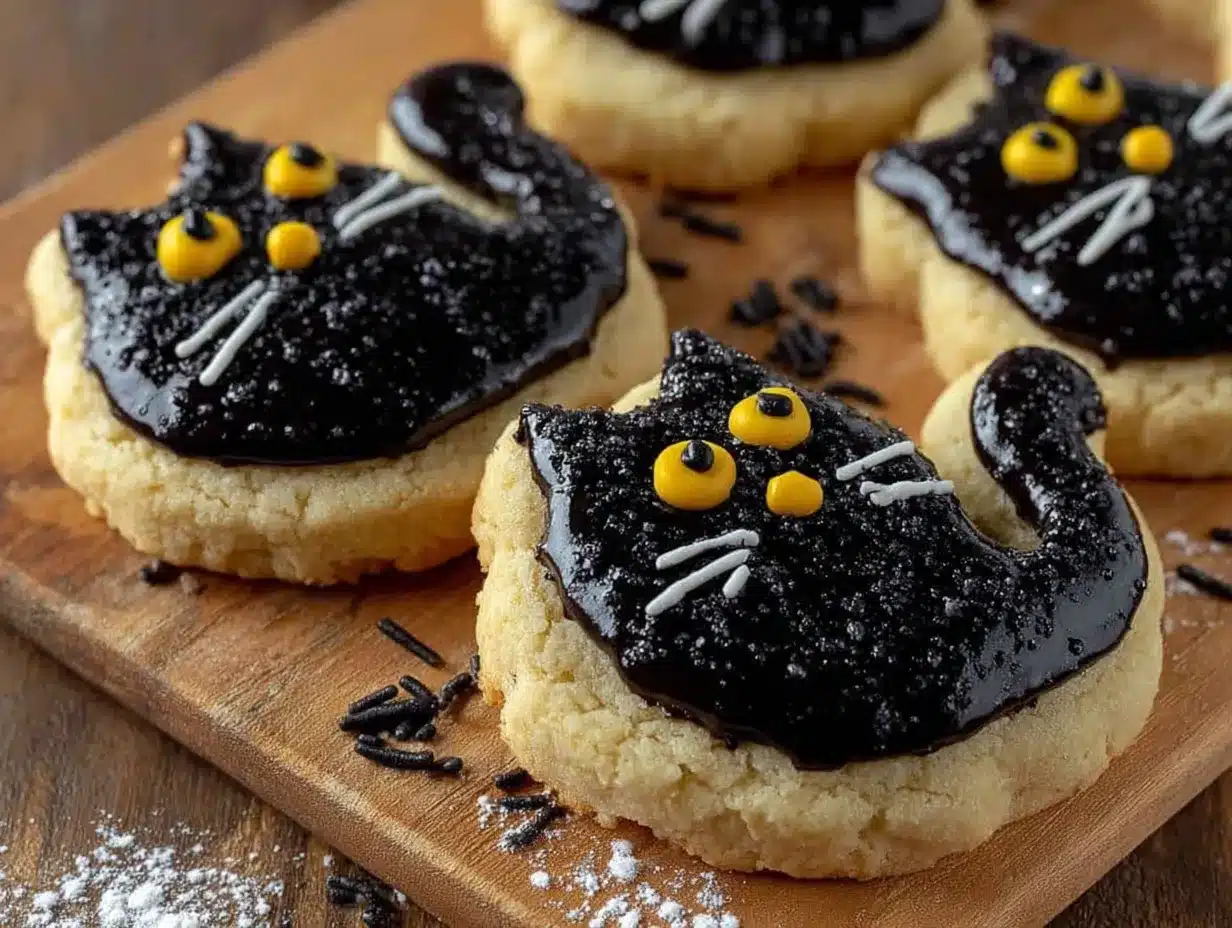
Let’s get baking! I’ve broken this down into manageable steps so you don’t feel overwhelmed. Take your time, especially if this is your first time making decorated sugar cookies.
Step 1: Make the Cookie Dough (15 minutes)
In your stand mixer fitted with the paddle attachment, cream together the softened butter, shortening, and sugar on medium speed until light and fluffy. This takes about 3-4 minutes. Scrape down the sides of the bowl halfway through. You want the mixture to look pale and airy—this is what gives the cookies their tender texture.
Add the eggs one at a time, beating well after each addition. Stir in the vanilla extract. The mixture might look a little curdled at this point, but that’s totally normal. Don’t panic.
In a separate bowl, whisk together the flour, baking powder, and salt. Gradually add the dry ingredients to the wet mixture, mixing on low speed until just combined. Overmixing here will make your cookies tough, so stop as soon as you don’t see any more streaks of flour. The dough will be soft but not sticky.
Step 2: Chill the Dough (2 hours minimum)
Divide the dough into two discs, wrap each tightly in plastic wrap, and refrigerate for at least 2 hours. I know, waiting is the worst part. But this step is absolutely crucial. Chilled dough doesn’t spread, holds its shape during baking, and is much easier to roll out. If you skip this, your cat cookies will come out looking more like blobs with ears. Trust me, I learned this the hard way during a particularly impatient Halloween baking session.
You can refrigerate the dough for up to 3 days, or freeze it for up to 3 months. Just thaw it in the fridge overnight before rolling.
Step 3: Roll and Cut (20 minutes)
Preheat your oven to 350°F (175°C). Line your baking sheets with parchment paper or silicone mats.
Lightly flour your work surface and rolling pin. Roll out one disc of dough to about ¼-inch thickness. If you have thickness guides, use them—they ensure even baking. If not, just do your best to keep the dough uniform. I use two wooden dowels as makeshift guides when I’m traveling and don’t have my regular tools.
Cut out your cat shapes and transfer them to the prepared baking sheets, leaving about 2 inches between each cookie. Gather the scraps, re-roll, and cut again. The dough can be re-rolled up to three times before it gets tough.
Step 4: Bake (10-12 minutes)
Bake for 10-12 minutes, or until the edges are just barely golden. The centers should look set but not browned. Remember, they continue to bake on the hot sheet for a minute after you pull them out.
Let the cookies cool on the baking sheet for 5 minutes, then transfer to a wire rack to cool completely. Do not even think about icing them while they’re warm—the icing will melt and slide right off. I’ve made that mistake exactly once.
Step 5: Make the Royal Icing (10 minutes)
In your stand mixer or using a hand mixer, combine the powdered sugar, meringue powder, and 5 tablespoons of warm water. Beat on low speed until combined, then increase to medium-high and beat for 5-7 minutes. The icing should be thick, glossy, and hold stiff peaks when you lift the beater.
Divide the icing into two bowls. Color one bowl with black gel food coloring, adding it gradually until you reach your desired shade. Leave the other bowl white, or add a tiny drop of white gel coloring to brighten it.
To make the flooding consistency, add water a teaspoon at a time to each colored icing until it flows like thick honey. You want it to spread smoothly but not run off the edges of the cookie. Test it by lifting your spoon—the icing should ribbon back into the bowl and disappear within 10 seconds.
Step 6: Decorate the Cookies (30-45 minutes)
Fit your piping bags with small round tips. Outline each cookie with the black icing, then flood the center with the thinner black icing. Use a toothpick to help spread it into the corners and pop any air bubbles. Let the black icing dry completely—this takes about 2-4 hours depending on humidity.
Once the black icing is dry, use the white icing to pipe on eyes and whiskers. I like to make little dots for eyes and three curved lines on each cheek for whiskers. You can also add a tiny pink nose if you’re feeling extra creative.
Let the decorated cookies dry overnight before stacking or packaging. The icing needs at least 8 hours to fully harden.
Cooking Tips & Techniques
After making these cookies more times than I can count, I’ve collected a few tricks that make the process smoother. Let me share what I’ve learned through trial and error.
The Temperature Trap: Butter that’s too soft is the number one reason sugar cookies spread. It should be cool to the touch but give slightly when you press it—think of it like a stress ball that’s been sitting in an air-conditioned room. If your butter is greasy or shiny, it’s too warm. Pop it back in the fridge for 10 minutes.
The Rolling Hack: Roll your dough between two sheets of parchment paper. No flour needed, no sticking, and you can slide the whole thing onto a baking sheet to chill. This was a game-changer for me. I used to fight with sticky dough and countertops dusted with flour, and I’d end up with dry, overworked cookies. Not anymore.
The Chilling Secret: After you cut out your cookies, pop the baking sheet in the freezer for 10 minutes before baking. This extra chill time guarantees sharp edges and minimal spreading. I do this every single time now, even when I’m in a hurry.
The Icing Consistency Test: This is the part most people get wrong. Your flooding icing should be thin enough that it spreads on its own, but thick enough that it doesn’t drip off the cookie. The perfect test: lift your spatula and let the icing fall back into the bowl. Count to ten. If the surface of the icing is smooth by the time you hit ten, you’ve got the right consistency. If it still has ridges, add more water. If it’s completely flat before five seconds, add more powdered sugar.
The Color Patience: Black icing is notoriously tricky. It takes more gel coloring than you think, and it darkens as it sits. I usually mix my black icing and let it rest for 30 minutes before I start decorating. The color deepens beautifully during that time, and I end up using less coloring overall.
My Biggest Failure: One year, I tried to speed things up by skipping the second chill before baking. The cookies spread into amorphous blobs that looked nothing like cats. My niece asked if they were supposed to be potatoes. I wanted to cry. Now I never skip the chill step, and I remind myself that patience in baking always pays off.
Variations & Adaptations
One of the best things about this recipe is how adaptable it is. Here are some variations I’ve tried and loved:
Dietary Adaptations:
- Gluten-Free: Substitute the all-purpose flour with a 1:1 gluten-free baking flour blend. I’ve used Bob’s Red Mill with great results. The cookies are slightly more delicate, so handle them gently.
- Vegan: Use all shortening instead of butter, and replace the eggs with flax eggs. The texture is a bit different—more tender, less rich—but they still taste fantastic.
- Low-Sugar: Replace half the granulated sugar with a granulated monk fruit sweetener. The cookies won’t brown as much, so watch them carefully toward the end of baking.
Flavor Variations:
- Chocolate Black Cats: Replace ½ cup of the flour with unsweetened cocoa powder. The cookies will be darker, so you can skip the black icing and just use white icing for the eyes and whiskers.
- Lemon-Infused: Add the zest of one lemon to the butter-sugar mixture and replace the vanilla with lemon extract. The bright citrus flavor is unexpected and wonderful with the black icing.
- Cinnamon-Spiced: Add 1 teaspoon of cinnamon and ¼ teaspoon of nutmeg to the dry ingredients. It gives the cookies a warm, cozy fall flavor that pairs beautifully with a cup of hot apple cider.
Shape Variations:
Don’t limit yourself to cats! This dough works beautifully with any Halloween-themed cutter—pumpkins, ghosts, bats, and moons all hold their shape perfectly. I’ve even used it for Christmas cookies with equally good results. The recipe is versatile enough to carry you through the entire holiday season.
My Personal Favorite Variation:
I once made a batch of these cookies and decorated half as black cats and half as white ghosts. I used the same royal icing recipe but left the ghosts white and added tiny black eyes. They looked adorable together on the platter, and it gave people options. Now I rarely make just one design—mixing it up makes the cookie tray feel more festive and fun.
Serving & Storage Suggestions
These cookies are best served at room temperature, and they actually improve after a day or two. The flavors meld together, and the icing sets perfectly. Here’s everything you need to know about serving and storing them.
Serving:
Arrange the cookies on a decorative platter or cake stand. They look stunning arranged in a circle with the cats facing outward, or stacked in a pyramid on a tiered tray. For Halloween parties, I like to place them on a black or orange platter with some fake cobwebs and plastic spiders scattered around for effect.
These cookies pair beautifully with hot apple cider, pumpkin spice lattes, or a simple glass of cold milk. If you’re serving them at a party, consider setting up a small cookie-decorating station so guests can customize their own cats. It’s always a hit with kids.
Storage:
- Room Temperature: Store undecorated cookies in an airtight container at room temperature for up to 2 weeks. Decorated cookies will keep for 1-2 weeks, but the icing may start to soften if the weather is humid.
- Freezer: You can freeze the baked, undecorated cookies for up to 3 months. Layer them between sheets of parchment paper in a freezer-safe container. Thaw at room temperature before decorating. I always keep a stash in my freezer for unexpected Halloween guests.
- Dough: The unbaked dough freezes beautifully for up to 3 months. Wrap it tightly in plastic wrap and then foil. Thaw overnight in the refrigerator before rolling and cutting.
Reheating:
These cookies don’t need reheating, but if you prefer a slightly warm cookie, pop one in a 300°F oven for 3-4 minutes. Don’t microwave them—the icing will melt and become sticky.
Flavor Development:
Honestly, these cookies taste better on day two or three. The vanilla flavor deepens, and the texture becomes perfectly tender. If you have the patience, bake them a few days before you plan to serve them. Your taste buds will thank you.
Nutritional Information & Benefits
Let’s be real—these are cookies, not health food. But here’s the nutritional breakdown so you can plan accordingly. Per cookie (based on 24 cookies, including royal icing):
- Calories: 210
- Total Fat: 10g
- Saturated Fat: 5g
- Cholesterol: 30mg
- Sodium: 115mg
- Total Carbohydrates: 29g
- Sugars: 18g
- Protein: 2g
Health Highlights:
While these are definitely a treat, they do have a few redeeming qualities. The butter provides vitamin A and healthy fats (in moderation, of course). The eggs add protein and choline, which is important for brain health. And honestly, there’s something to be said for the mental health benefits of baking and decorating—it’s meditative, creative, and brings people together.
Dietary Considerations:
This recipe contains wheat, dairy, and eggs. For gluten-free, dairy-free, or vegan options, check the variations section above. The cookies are nut-free as written, making them safe for school parties and events where nut allergies are a concern.
My personal philosophy? Life is short. Eat the cookie. Enjoy the process. Share with the people you love. That’s the real nutritional benefit.
Conclusion
These Perfect Black Cat Sugar Cookies have become my Halloween tradition, and I hope they become yours too. They’re more than just a recipe—they’re a way to slow down, get creative, and make something special for the people you care about. Whether you’re baking for a costume party, a school event, or just because it’s October and you feel like making something spooky, these cookies deliver every single time.
Don’t be afraid to make them your own. Change up the decorations, try different flavors, experiment with shapes. That’s the beauty of a good sugar cookie recipe—it’s a blank canvas waiting for your imagination. And if your first batch doesn’t look perfect? That’s okay. Mrs. Kowalski’s first cat cookie probably wasn’t perfect either. But she kept making them, and so should you.
I’d love to see your creations! Share your black cat cookies on social media and tag me so I can admire them. Leave a comment below and tell me about your Halloween baking traditions. And if you have questions, don’t hesitate to ask—I’m here to help. Now go preheat that oven and make some magic happen!
Frequently Asked Questions
Can I use all butter instead of the butter-shortening combination?
You can, but the cookies will spread more and won’t hold their shape as well. The shortening gives the dough stability and prevents spreading. If you use all butter, chill the dough for at least 3 hours and freeze the cut cookies for 15 minutes before baking to minimize spreading.
How do I get my royal icing to be perfectly black?
Use gel food coloring, not liquid. Start with about ½ teaspoon of black gel coloring per batch of icing, then add more gradually. Let the icing sit for 30 minutes after mixing—the color will deepen as it rests. If it’s still not dark enough, add a tiny drop of purple or blue gel coloring to intensify the black.
Can I freeze the decorated cookies?
Yes, but with caution. Freeze the decorated cookies in a single layer on a baking sheet until the icing is completely hard (about 2 hours), then transfer to an airtight container with parchment paper between layers. Thaw in the refrigerator overnight to prevent condensation from ruining the icing. The cookies will keep for up to 3 months frozen.
Why did my cookies spread and lose their shape?
This usually happens for one of three reasons: the dough wasn’t chilled long enough, the butter was too soft, or the baking sheets were too warm. Make sure your dough chills for at least 2 hours, use butter that’s softened but not greasy, and always start with cool baking sheets. Between batches, run your baking sheets under cold water and dry them before adding more cookies.
How far in advance can I make these cookies?
You have options! The dough can be made up to 3 days ahead and refrigerated, or frozen for up to 3 months. Baked, undecorated cookies will keep for 2 weeks in an airtight container. Decorated cookies are best within 1 week, but they’ll stay fresh for up to 2 weeks if stored properly. I usually bake the cookies a week before Halloween and decorate them a day or two before the party.
Pin This Recipe!

Perfect Black Cat Sugar Cookies: Easy Halloween Treat

These Perfect Black Cat Sugar Cookies are a Halloween tradition—forgiving dough, easy decorating, and a buttery-shortening combo that holds its shape beautifully. Perfect for parties, school events, or a cozy October baking session.
- Prep Time: 15 minutes
- Cook Time: 10-12 minutes
- Total Time: 2 hours 25 minutes (includes chilling and decorating time)
- Yield: 24 servings 1x
- Category: Dessert
- Cuisine: American
Ingredients
- 1 cup unsalted butter, softened
- ½ cup vegetable shortening
- 1 ½ cups granulated sugar
- 2 large eggs, room temperature
- 2 teaspoons vanilla extract
- 4 cups all-purpose flour
- 2 teaspoons baking powder
- 1 teaspoon salt
- 4 cups powdered sugar
- 3 tablespoons meringue powder
- 5–6 tablespoons warm water
- Black gel food coloring
- White gel food coloring
Instructions
- Make the Cookie Dough: In a stand mixer with paddle attachment, cream together softened butter, shortening, and sugar on medium speed until light and fluffy (3-4 minutes). Scrape down sides halfway through.
- Add eggs one at a time, beating well after each. Stir in vanilla extract. Mixture may look curdled—that’s normal.
- In a separate bowl, whisk together flour, baking powder, and salt. Gradually add dry ingredients to wet mixture on low speed until just combined. Do not overmix.
- Chill the Dough: Divide dough into two discs, wrap tightly in plastic wrap, and refrigerate for at least 2 hours (up to 3 days). Can freeze for up to 3 months.
- Roll and Cut: Preheat oven to 350°F (175°C). Line baking sheets with parchment or silicone mats. Lightly flour surface and rolling pin. Roll one disc to ¼-inch thickness. Cut out cat shapes and transfer to prepared sheets, leaving 2 inches between cookies. Gather scraps, re-roll, and cut again (up to 3 times).
- Bake: Bake for 10-12 minutes until edges are just barely golden. Centers should look set but not browned. Cool on baking sheet for 5 minutes, then transfer to wire rack to cool completely.
- Make Royal Icing: In stand mixer or with hand mixer, combine powdered sugar, meringue powder, and 5 tablespoons warm water. Beat on low until combined, then medium-high for 5-7 minutes until thick, glossy, and holds stiff peaks.
- Divide icing into two bowls. Color one bowl with black gel food coloring gradually. Leave other bowl white (or add tiny drop of white gel coloring). Add water a teaspoon at a time to each until it flows like thick honey (ribbons back into bowl and disappears within 10 seconds).
- Decorate: Fit piping bags with small round tips. Outline each cookie with black icing, then flood center with thinner black icing. Use toothpick to spread into corners and pop air bubbles. Let black icing dry completely (2-4 hours).
- Once black icing is dry, use white icing to pipe on eyes (dots) and whiskers (three curved lines on each cheek). Let decorated cookies dry overnight (at least 8 hours) before stacking or packaging.
Notes
The butter-shortening combo is key for shape retention. Chill dough at least 2 hours. For black icing, use gel coloring and let rest 30 minutes for deeper color. Freeze cut cookies 10 minutes before baking for sharp edges. Cookies taste better on day 2-3.
Nutrition
- Serving Size: 1 cookie
- Calories: 210
- Sugar: 18
- Sodium: 115
- Fat: 10
- Saturated Fat: 5
- Carbohydrates: 29
- Protein: 2
Keywords: black cat cookies, Halloween sugar cookies, cut-out cookies, royal icing cookies, easy Halloween treats


