Love this? Save it for later!
Share the inspiration with your friends
This was supposed to be a completely different dinner. I had a chicken thawing in the sink, a bag of apples waiting for a pie, and a butternut squash that I bought on a whim because it was on clearance for 89 cents. The plan was a simple roast chicken with a side of something respectable—maybe some roasted vegetables, maybe some rice. But then my youngest came down with a fever, the school called about early pickup, and somewhere between the pediatrician’s waiting room and the grocery store run for Pedialyte, the chicken got forgotten in the fridge. By the time I remembered it, the chicken was past its prime. I was tired, the budget was already stretched thin from the unexpected pharmacy stop, and I had a squash staring at me from the counter like it knew something I didn’t.
I grabbed the squash, a stale loaf of bread that was two days from the trash, and a half-empty tube of sausage that was hiding in the back of the fridge. Honestly, I was just trying to make something—anything—that would fill four bellies without another trip to the store. I tossed the cubed squash in the oven, crumbled the sausage into a hot pan, and started tearing bread with a kind of desperate energy. My kitchen looked like a disaster zone, and I was already bracing for the complaints. But then something happened. The squash caramelized in a way that smelled like autumn in a jar, the sausage rendered its fat into little crispy bits of flavor, and the whole thing came together in one pan like it was always meant to be. Maybe you’ve been there—when a recipe saves you instead of the other way around.
That night, my family ate every last bite. My husband asked for the recipe. My picky eater asked for seconds. And I sat there, fork in hand, realizing that the best meals don’t come from a perfect plan. They come from a clearance squash, a stale loaf, and a little bit of luck. This stuffing has been on our Thanksgiving table and our regular Tuesday dinner rotation ever since. It’s the recipe I make when I need to stretch a dollar and still get a standing ovation from the dinner table.
Why You’ll Love This Recipe
Let me tell you why this stuffing has earned a permanent spot in my kitchen rotation. I’ve tested this recipe at least a dozen times—on busy weeknights, for holiday potlucks, and even for a neighbor who just had a baby. Every single time, it delivers. Here’s what makes it stand out:
- Budget-Friendly: This whole dish costs under $10 to make, and most of the ingredients are pantry staples. The butternut squash is the priciest item, but even that is usually on sale this time of year.
- Quick & Easy: From start to table, you’re looking at about 45 minutes. The oven does most of the work while you relax or tackle the rest of dinner.
- Simple Ingredients: No fancy grocery trips needed. Bread, sausage, squash, onion, and a few spices—that’s it. You probably have most of this in your kitchen right now.
- Crowd-Pleaser: I’ve served this to kids who “don’t like squash” and adults who usually skip the stuffing. It disappears every time. The sausage does the heavy lifting here, making the squash feel familiar and approachable.
- Perfect for Meal Prep: This stuffing reheats beautifully. The flavors actually get better overnight, so it’s a great make-ahead option for busy weeks or holiday prep.
What really makes this recipe different is the technique. Instead of boiling the squash or mixing it raw into the bread, I roast it first until it’s golden and caramelized. This step brings out the natural sweetness and gives the stuffing a texture that’s both tender and slightly crispy. The sausage adds a savory, salty punch that balances everything perfectly. It’s comfort food that doesn’t break the bank—and honestly, that’s the kind of recipe every home cook needs in their back pocket.
What Ingredients You Will Need
This recipe uses simple, wholesome ingredients that work together to create something truly special. The beauty of this dish is that you don’t need anything exotic or expensive—just good, honest food that does its job.
For the Roasted Butternut Squash
- 1 medium butternut squash (about 2 pounds) — peeled, seeded, and cut into ½-inch cubes. Look for a squash that feels heavy for its size and has a firm, unblemished skin. I usually grab mine from the discount bin at the grocery store—they’re often perfectly good, just oddly shaped.
- 2 tablespoons olive oil — helps the squash caramelize and get those gorgeous browned edges. You can use avocado oil if that’s what you have.
- ½ teaspoon salt — I prefer kosher salt for its clean flavor.
- ¼ teaspoon black pepper — freshly ground if you can manage it.
For the Stuffing
- 1 pound mild Italian sausage — casings removed. I like using turkey sausage for a lighter option, but pork sausage gives a richer flavor. Johnsonville or any store brand works great here.
- 1 medium yellow onion — diced. About 1 cup. Onion adds that savory backbone that makes stuffing taste like comfort.
- 3 celery stalks — diced. About 1 cup. Celery gives the stuffing that classic crunch and freshness.
- 3 cloves garlic — minced. Fresh garlic is non-negotiable here—jarred stuff just doesn’t hit the same.
- 1 loaf day-old French bread or sourdough — cut into 1-inch cubes (about 6 cups). Stale bread is actually better here because it absorbs the liquid without turning into mush. If your bread is fresh, toast the cubes in a 300°F oven for 10 minutes first.
- 1 cup chicken broth — low-sodium so you can control the salt. Homemade is lovely, but boxed broth works perfectly.
- 1 teaspoon dried sage — the classic stuffing herb. It pairs beautifully with both the squash and the sausage.
- ½ teaspoon dried thyme — adds an earthy, slightly floral note.
- ½ teaspoon dried rosemary — crushed between your fingers to release the oils.
- 2 tablespoons unsalted butter — cut into small pieces and dotted over the top before baking. This adds richness and helps the top get golden and crispy.
Optional Add-Ins
- ½ cup dried cranberries — for a pop of sweetness. I add these when I’m feeling fancy or when they’re on sale after the holidays.
- ¼ cup chopped fresh parsley — stirred in at the end for a fresh finish.
- ½ cup chopped pecans or walnuts — toasted, for extra crunch. Watch them closely—nuts burn fast!
Equipment Needed
You don’t need a professional kitchen to make this stuffing. Here’s what you’ll need:
- Large baking sheet — for roasting the squash. A rimmed sheet pan works best to catch any juices.
- Large skillet or Dutch oven — for cooking the sausage and vegetables. I use my trusty cast iron skillet, but any heavy-bottomed pan will do.
- Large mixing bowl — for combining everything. You need enough room to toss without making a mess.
- 9×13-inch baking dish — for the final bake. A 3-quart casserole dish also works.
- Chef’s knife and cutting board — for prepping the squash, onion, and celery. A sharp knife makes the squash much easier to handle.
- Vegetable peeler — for peeling the squash. A Y-shaped peeler is my favorite—it glides right over the curves.
- Measuring cups and spoons — for accuracy, especially with the broth and spices.
If you don’t have a 9×13-inch dish, you can use a 10-inch cast iron skillet for the whole thing—just cook the sausage and veggies in it, then stir in the bread and squash directly. It saves a dish and looks pretty on the table, too. Budget-friendly tip: check your local thrift store for baking dishes. I found my favorite casserole dish for $3.
Preparation Method
Let’s get cooking. This recipe comes together in three main stages: roast the squash, cook the sausage mixture, and bake everything together. Here’s how to do it without stress.
Step 1: Preheat and Prep
Preheat your oven to 400°F (200°C). While it heats up, peel the butternut squash using a vegetable peeler. Cut off the top and bottom, slice it in half lengthwise, and scoop out the seeds with a spoon. Cut the squash into ½-inch cubes—try to keep them uniform so they cook evenly. Don’t worry if they’re not perfect; rustic is fine.
Step 2: Roast the Squash
Toss the cubed squash with 2 tablespoons olive oil, ½ teaspoon salt, and ¼ teaspoon pepper on a large baking sheet. Spread it out in a single layer—crowding the pan will steam the squash instead of roasting it. Roast for 20-25 minutes, flipping halfway through, until the squash is tender and the edges are golden brown. You’ll know it’s done when a fork slides in easily but the cubes still hold their shape. Set aside to cool slightly.
Step 3: Cook the Sausage and Vegetables
While the squash roasts, heat a large skillet over medium-high heat. Add the sausage, breaking it up with a wooden spoon as it cooks. Cook for 5-7 minutes until browned and cooked through. Use a slotted spoon to transfer the sausage to a plate, leaving about 1 tablespoon of rendered fat in the pan. If there’s too much fat, pour off the excess—you want just enough to cook the vegetables.
Add the diced onion and celery to the same skillet. Cook over medium heat for 5-6 minutes, stirring occasionally, until the onion is translucent and the celery is tender. Add the minced garlic and cook for 1 more minute until fragrant. The smell at this point is incredible—earthy and savory and exactly what stuffing should smell like.
Step 4: Combine the Ingredients
In a large mixing bowl, combine the bread cubes, roasted squash, cooked sausage, and the onion-celery mixture. Sprinkle the dried sage, thyme, and rosemary over the top. Pour the chicken broth over everything and toss gently with your hands or a spatula until well combined. The bread should be moist but not soggy—if it looks dry, add a splash more broth.
Step 5: Bake the Stuffing
Transfer the mixture to a greased 9×13-inch baking dish. Dot the top with the small pieces of butter—this is what gives you that gorgeous golden crust. Cover the dish with foil and bake at 375°F (190°C) for 20 minutes. Uncover and bake for another 10-15 minutes until the top is crispy and the stuffing is heated through. Let it rest for 5 minutes before serving. I know it’s hard to wait, but that rest time lets the flavors settle.
Cooking Tips & Techniques
After making this stuffing more times than I can count, I’ve picked up a few tricks that make a real difference. Here are the ones I wish someone had told me sooner.
Don’t skip roasting the squash. I tried skipping this step once when I was in a hurry, and the result was a sad, soggy stuffing. Roasting concentrates the flavor and gives the squash a caramelized sweetness that you just can’t get from steaming or boiling. It also helps the squash hold its shape in the final dish instead of turning into mush.
Use stale bread. Fresh bread absorbs liquid too quickly and turns into paste. Day-old bread is ideal because it’s dry enough to soak up the broth without falling apart. If you only have fresh bread, cube it and spread it on a baking sheet in a 300°F oven for 10 minutes. You want it dry but not toasted—just enough to stale it up.
Watch your salt. Sausage and broth both contain salt, so be careful when seasoning. I always use low-sodium broth and taste the sausage before adding extra salt. You can always add more later, but you can’t take it out.
Make it ahead. This stuffing is actually better when made a day ahead. Assemble the dish completely, cover it, and refrigerate overnight. The flavors meld together beautifully. When you’re ready to bake, add 10-15 minutes to the covered baking time since you’re starting from cold.
My biggest failure: The first time I made this, I forgot to cover the dish while baking. The top burned, the bottom was dry, and I had to scrape the whole thing into the trash. Covering with foil traps steam and keeps the stuffing moist while it heats through. The uncovered time at the end is just for crisping the top—don’t skip the foil step.
Variations & Adaptations
This recipe is wonderfully flexible. Here are some ways to make it your own.
Dietary Adaptations
- Vegetarian Version: Skip the sausage and add 1 can of drained and rinsed chickpeas or 8 ounces of sautéed mushrooms. The mushrooms give that same savory, meaty texture.
- Gluten-Free Option: Use gluten-free bread cubes. I like the Udi’s or Schar brands for stuffing—they hold up well. You may need to add a little extra broth since gluten-free bread absorbs liquid differently.
- Dairy-Free: Use olive oil or vegan butter instead of regular butter for the topping. The dish still gets golden and delicious.
Flavor Twists
- Apple and Sage: Add 1 diced apple (Honeycrisp or Granny Smith) to the onion and celery mixture. The sweetness pairs beautifully with the squash and sausage.
- Cranberry Pecan: Stir in ½ cup dried cranberries and ½ cup toasted pecans before baking. This is my go-to for Thanksgiving—it looks festive and tastes incredible.
- Spicy Kick: Use hot Italian sausage instead of mild, or add ½ teaspoon red pepper flakes with the garlic. A little heat wakes up the whole dish.
Cooking Method Variations
- Slow Cooker: Assemble everything in a greased slow cooker, dot with butter, and cook on low for 3-4 hours. Remove the lid for the last 30 minutes to let the top dry out slightly.
- Stovetop: Cook everything in a large skillet or Dutch oven, cover, and simmer on low for 15 minutes. This works in a pinch but won’t give you the crispy top.
Serving & Storage Suggestions
This stuffing is a star on its own, but here’s how to serve it like a pro.
Serving Temperature: Serve hot, straight from the oven. The contrast between the crispy top and the moist, tender interior is the whole point. Let it rest for 5 minutes so it holds its shape when you scoop it out.
What to Serve With It: This stuffing pairs beautifully with roast chicken, turkey, or pork chops. For a vegetarian meal, serve it alongside a simple green salad with a tangy vinaigrette—the acidity cuts through the richness. A dollop of cranberry sauce on the side is never a bad idea.
Storage: Leftovers keep in an airtight container in the refrigerator for up to 4 days. The flavors actually deepen overnight, so don’t be surprised if it tastes even better the next day.
Reheating: The best way to reheat is in the oven at 350°F for 10-15 minutes, covered with foil to prevent drying. You can also microwave individual portions for 1-2 minutes, but the top won’t be crispy. For a quick fix, reheat in a skillet over medium heat with a splash of broth—this brings back the moisture and gives you some crispy edges.
Freezing: This stuffing freezes beautifully. Assemble the dish completely but don’t bake it. Wrap tightly in plastic wrap and foil, then freeze for up to 3 months. To bake from frozen, add 20-30 minutes to the covered baking time. I always make a double batch and freeze one for busy nights.
Nutritional Information & Benefits
This stuffing is comfort food that actually has some redeeming qualities. Here’s the breakdown per serving (based on 8 servings):
| Nutrient | Amount |
|---|---|
| Calories | 320 |
| Protein | 14g |
| Fat | 16g |
| Saturated Fat | 5g |
| Carbohydrates | 32g |
| Fiber | 5g |
| Sugar | 8g |
| Sodium | 620mg |
Butternut squash is packed with vitamin A, vitamin C, and fiber—good for your eyes, your immune system, and your digestion. Sausage adds protein to make this a satisfying main dish or a hearty side. The whole wheat bread (if you use it) adds extra fiber and B vitamins. This isn’t diet food, but it’s real food made with real ingredients. I feel good serving it to my family because I know exactly what’s in it.
Dietary Considerations: This recipe can be made gluten-free (use GF bread), dairy-free (use olive oil), and vegetarian (skip the sausage and add mushrooms or chickpeas). It contains gluten and dairy in the standard version.
Conclusion
This budget-friendly roasted butternut squash and sausage stuffing is proof that you don’t need a big budget or a perfect plan to make something unforgettable. It started as a kitchen accident—a forgotten chicken, a clearance squash, and a stale loaf of bread—and turned into the recipe my family requests more than any other. It’s the dish I bring to potlucks, the one I make for Thanksgiving when I want to save money without sacrificing flavor, and the one I turn to on busy weeknights when I need dinner on the table without a fuss.
I hope you make this stuffing your own. Add the cranberries if you’re feeling festive. Skip the sausage and load up on mushrooms if that’s your style. Use whatever bread you have on hand—sourdough, whole wheat, even leftover hot dog buns in a pinch (yes, I’ve done it). The beauty of this recipe is that it’s forgiving. It wants you to succeed.
So go ahead—grab that squash from the clearance bin, dig out that stale bread, and make something that’ll have your family asking for seconds. And when you do, come back and tell me about it. I’d love to hear how it turned out, what you changed, and who asked for the recipe. Drop a comment below or tag me in your photos. Happy cooking, friend!
Frequently Asked Questions
Can I use frozen butternut squash instead of fresh?
Yes, you can! Frozen butternut squash works in a pinch, but you’ll need to adjust the roasting time. Thaw the squash first and pat it dry with paper towels to remove excess moisture. Roast at 400°F for 15-20 minutes, or until tender. The texture won’t be quite as caramelized as fresh, but it’s still delicious.
What’s the best bread to use for stuffing?
Day-old French bread or sourdough is my top choice. They have a firm texture that holds up well and a neutral flavor that lets the other ingredients shine. You can also use whole wheat, Italian bread, or even cornbread for a Southern twist. Just make sure the bread is dry before you start—fresh bread will turn mushy.
Can I make this stuffing ahead of time?
Absolutely! Assemble the stuffing completely, cover it, and refrigerate for up to 24 hours before baking. When you’re ready to bake, add 10-15 minutes to the covered baking time since you’re starting from cold. This is a lifesaver for holiday meals or busy weeknights.
How do I prevent the stuffing from being too dry or too soggy?
The key is the bread-to-broth ratio. Start with 1 cup of broth and toss gently. The bread should be moist but not swimming in liquid. If it looks dry, add broth 2 tablespoons at a time. If it looks wet, add a handful more bread cubes. Also, make sure to cover the dish for the first part of baking—this traps steam and keeps everything moist.
Can I freeze this stuffing?
Yes, and it freezes beautifully! Assemble the dish completely but don’t bake it. Wrap tightly in plastic wrap and foil, then freeze for up to 3 months. To bake from frozen, remove the plastic wrap, cover with foil, and bake at 375°F for 40-45 minutes. Uncover and bake for another 10-15 minutes until golden and heated through.
Pin This Recipe!

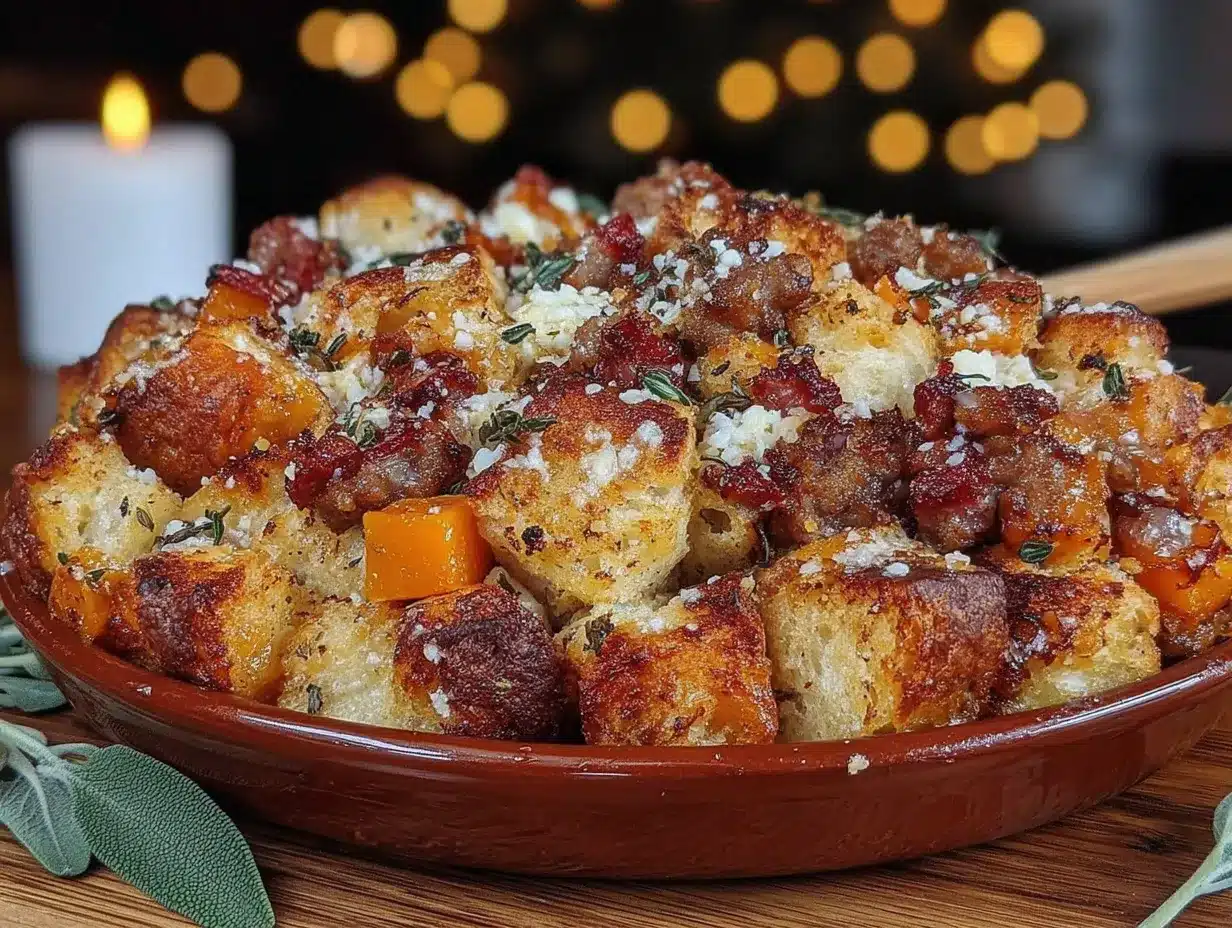
Budget-Friendly Butternut Squash and Sausage Stuffing

A budget-friendly, quick, and easy stuffing made with roasted butternut squash, sausage, and stale bread. Perfect for weeknight dinners or holiday feasts, this recipe is a crowd-pleaser that costs under $10 to make.
- Prep Time: 15 minutes
- Cook Time: 45 minutes
- Total Time: 1 hour
- Yield: 8 servings 1x
- Category: Side Dish
- Cuisine: American
Ingredients
- 1 medium butternut squash (about 2 pounds), peeled, seeded, and cut into ½-inch cubes
- 2 tablespoons olive oil
- ½ teaspoon salt
- ¼ teaspoon black pepper
- 1 pound mild Italian sausage, casings removed
- 1 medium yellow onion, diced (about 1 cup)
- 3 celery stalks, diced (about 1 cup)
- 3 cloves garlic, minced
- 1 loaf day-old French bread or sourdough, cut into 1-inch cubes (about 6 cups)
- 1 cup low-sodium chicken broth
- 1 teaspoon dried sage
- ½ teaspoon dried thyme
- ½ teaspoon dried rosemary, crushed
- 2 tablespoons unsalted butter, cut into small pieces
- ½ cup dried cranberries (optional)
- ¼ cup chopped fresh parsley (optional)
- ½ cup chopped pecans or walnuts, toasted (optional)
Instructions
- Preheat oven to 400°F (200°C). Peel the butternut squash, cut off the top and bottom, slice in half lengthwise, and scoop out the seeds. Cut into ½-inch cubes.
- Toss the cubed squash with 2 tablespoons olive oil, ½ teaspoon salt, and ¼ teaspoon pepper on a large baking sheet. Spread in a single layer and roast for 20-25 minutes, flipping halfway, until tender and golden brown. Set aside.
- While the squash roasts, heat a large skillet over medium-high heat. Add the sausage, breaking it up with a wooden spoon. Cook for 5-7 minutes until browned and cooked through. Transfer to a plate with a slotted spoon, leaving about 1 tablespoon of rendered fat in the pan.
- Add the diced onion and celery to the same skillet. Cook over medium heat for 5-6 minutes until onion is translucent and celery is tender. Add the minced garlic and cook for 1 more minute until fragrant.
- In a large mixing bowl, combine the bread cubes, roasted squash, cooked sausage, and onion-celery mixture. Sprinkle with dried sage, thyme, and rosemary. Pour the chicken broth over everything and toss gently until well combined. The bread should be moist but not soggy.
- Transfer the mixture to a greased 9×13-inch baking dish. Dot the top with the small pieces of butter. Cover with foil and bake at 375°F (190°C) for 20 minutes. Uncover and bake for another 10-15 minutes until the top is crispy and the stuffing is heated through. Let rest for 5 minutes before serving.
Notes
For best results, use day-old bread. If using fresh bread, cube and toast in a 300°F oven for 10 minutes. To make ahead, assemble the dish, cover, and refrigerate for up to 24 hours. Add 10-15 minutes to covered baking time when starting from cold. This stuffing freezes well for up to 3 months.
Nutrition
- Serving Size: 1 serving
- Calories: 320
- Sugar: 8
- Sodium: 620
- Fat: 16
- Saturated Fat: 5
- Carbohydrates: 32
- Fiber: 5
- Protein: 14
Keywords: butternut squash stuffing, sausage stuffing, budget-friendly stuffing, easy stuffing recipe, Thanksgiving stuffing, fall side dish


