Love this? Save it for later!
Share the inspiration with your friends
This was supposed to be a simple Tuesday night dinner. I had ground turkey thawing on the counter, a box of rice in the pantry, and absolutely zero intention of making anything remotely festive. But then my five-year-old neighbor, Leo, knocked on the door holding a pumpkin he’d carved with his dad. It was lopsided and grinning, and honestly, it was the cutest thing I’d seen all week. I looked at the orange bell peppers sitting in my produce drawer, and a very stupid, very distracting idea popped into my head. “What if I carved faces into the peppers?” I muttered to myself, already grabbing a paring knife. My husband walked in, saw me staring intensely at a pepper, and slowly backed out of the kitchen. I was already in too deep.
The first pepper I carved looked less like a jack-o-lantern and more like a confused ghost. The second one lost an eye. I was running out of peppers, the rice was almost done, and I was starting to think this whole idea was a disaster. Maybe you’ve been there—a vision in your head that just won’t translate to reality. But I stuffed them anyway, baked them anyway, and set the pan on the table. When Leo saw them, his face lit up like, well, a jack-o-lantern. He ate two whole peppers without coming up for air. That night, I realized something. The best recipes aren’t the ones you plan perfectly. They’re the ones you almost give up on. These Halloween Jack-o-Lantern Stuffed Bell Peppers are proof that a little bit of crazy in the kitchen pays off. I’ve been making them every October since, and they never last long.
Why You’ll Love This Recipe
Let’s be real for a second. Halloween dinner is usually a chaotic mess of candy and pizza. These stuffed peppers change the game. They give you a real, hearty meal that still feels fun and spooky. It’s the kind of recipe that makes you look like a kitchen genius without actually having to be one.
- Fun for the Whole Family: Kids go absolutely wild for the carved faces. It turns dinner into an activity. You can even let them help scoop the seeds!
- Healthy-ish & Filling: Packed with protein, veggies, and rice, these peppers are a complete meal in one. No side dishes needed, unless you want some.
- Easy to Customize: Don’t eat meat? Swap in black beans and corn. Need it gluten-free? Use quinoa instead of rice. This recipe bends to your will.
- Make-Ahead Friendly: You can stuff these bad boys a day in advance. Just pop them in the oven when you’re ready. Perfect for busy Halloween nights.
- Seriously Impressive: When you bring a tray of jack-o-lantern peppers to the table, people lose their minds. It’s a guaranteed conversation starter.
I’ve tested this recipe about six times to get the carving technique just right. You don’t want the peppers to collapse, but you also want the faces to be visible after baking. I found that using a small, sharp paring knife and cutting on the flatter sides of the pepper works best. This isn’t just another stuffed pepper recipe—it’s a Halloween tradition waiting to happen.
What Ingredients You Will Need
This recipe uses simple, wholesome ingredients to deliver bold flavor and satisfying texture without the fuss. Most of these are pantry staples, which makes this an easy last-minute dinner idea.
For the Peppers
- 4 large orange bell peppers (Look for ones that are squat and round, not tall and skinny. They hold the face shape better. I like the ones from the farmers market in early October.)
- 1 tablespoon olive oil (For sautéing. A good quality extra virgin olive oil adds a nice depth.)
For the Filling
- 1 pound ground beef or ground turkey (I use 85/15 ground beef for the best flavor. If using turkey, add a splash of Worcestershire sauce for moisture.)
- 1 cup cooked white or brown rice (Leftover rice works perfectly here. It actually holds up better.)
- 1 small yellow onion, diced (About 1 cup. Sweet onion works too.)
- 2 cloves garlic, minced (Fresh is best. Don’t use the jarred stuff for this.)
- 1 can (14.5 ounces) diced tomatoes, drained (Fire-roasted tomatoes add a smoky flavor I love.)
- 1 cup shredded cheddar cheese, divided (Sharp cheddar adds the most punch. Reserve half for topping.)
- 1 teaspoon chili powder (For warmth and a little kick.)
- ½ teaspoon cumin (Adds that earthy, cozy flavor.)
- ½ teaspoon smoked paprika (Trust me on this one. It makes the filling taste like it cooked all day.)
- Salt and black pepper to taste
- 2 tablespoons chopped fresh parsley or cilantro (For garnish. Optional, but pretty.)
For the Faces (Optional but Fun)
- Small pieces of black olives or sliced cheese (To create eyes and mouths if you want extra definition. I usually just carve the pepper itself.)
I recommend using Hunt’s Fire-Roasted Diced Tomatoes for this recipe. They have a great texture and don’t turn into mush. For the cheese, Kraft Sharp Cheddar melts beautifully, but any block cheddar you shred yourself will work better than pre-shredded (it melts smoother). If you want a vegetarian version, swap the meat for one can of drained and rinsed black beans and half a cup of frozen corn. No other adjustments needed!
Equipment Needed
You don’t need a fancy kitchen to pull this off. Here’s what you’ll need:
- Large baking dish (9×13-inch): This fits four peppers perfectly. A glass dish lets you see the juices bubbling.
- Sharp paring knife: This is the most important tool. A dull knife will tear the pepper skin. I use a Victorinox paring knife—it’s cheap and stays sharp.
- Large skillet: For browning the meat and sautéing the onions. A cast-iron skillet works great here.
- Cutting board: Use a stable one. You’ll be doing some precision cutting.
- Small spoon or melon baller: For scooping out the pepper seeds and membranes. A melon baller makes it super quick.
- Mixing bowl: For combining the filling ingredients.
- Aluminum foil: To cover the peppers while they bake so they steam and soften without burning.
If you don’t have a paring knife, a small serrated knife works okay, but it makes the carved edges a little ragged. That can actually look cool for a spooky effect! I’ve used a steak knife in a pinch, and it worked fine. No need to buy anything special.
Preparation Method
Take your time with this. The carving part is the most fun, but the filling is what makes it memorable. Here’s how to do it step by step.
- Preheat your oven to 375°F (190°C). Get this going first so it’s ready when you are.
- Cook the rice. If you don’t have leftover rice, cook ⅓ cup of uncooked rice in ⅔ cup of water. Bring to a boil, cover, and simmer for 15 minutes. Fluff with a fork. Set aside to cool slightly.
- Prepare the bell peppers. Wash the peppers and pat them dry. Using your sharp paring knife, carefully cut a “cap” off the top of each pepper (about ½ inch down from the stem). Don’t throw the caps away! You can chop them up and add them to the filling for extra veg. Use your spoon to scoop out all the seeds and white membranes from inside the peppers. Rinse them out if needed, then pat dry again.
- Carve the faces. This is the fun part. Using the tip of your paring knife, lightly score a face design onto the flattest side of each pepper. Start with simple triangles for eyes and a jagged mouth. Cut all the way through the pepper skin. Gently push the cut-out pieces inward or pull them out completely. Don’t worry if the cuts aren’t perfect—imperfect faces look more Halloween-y. I always mess up one eye, and it ends up being my favorite pepper.
- Brown the meat. Heat the olive oil in your large skillet over medium-high heat. Add the ground beef (or turkey) and break it apart with a wooden spoon. Cook for 5-7 minutes, until browned and no longer pink. If there’s a lot of fat, drain it off, leaving about a tablespoon in the pan for flavor.
- Sauté the aromatics. Add the diced onion to the skillet with the meat. Cook for 3-4 minutes, until the onion is soft and translucent. Stir in the minced garlic and cook for 30 seconds, until fragrant. You’ll smell it immediately—that’s your cue.
- Build the filling. Reduce the heat to low. Add the drained diced tomatoes, cooked rice, chili powder, cumin, smoked paprika, and a generous pinch of salt and pepper. Stir everything together until well combined. Let it cook for 2-3 minutes, allowing the flavors to meld. Taste it and adjust the seasoning. I always add a little more salt here.
- Add the cheese. Remove the skillet from the heat. Stir in ½ cup of the shredded cheddar cheese. The residual heat will melt it into the filling, making it extra gooey and delicious.
- Stuff the peppers. Place the carved peppers upright in your baking dish. Using a spoon, carefully fill each pepper with the meat and rice mixture. Pack it in gently but firmly—you want it full. Don’t overstuff, or the pepper might split. Top each pepper with the remaining ½ cup of shredded cheese.
- Bake. Cover the baking dish loosely with aluminum foil. Bake for 25 minutes. Then, remove the foil and bake for another 10-15 minutes, until the peppers are tender and the cheese is bubbly and golden. The peppers should be easy to pierce with a fork but still hold their shape.
- Rest and serve. Let the peppers sit in the dish for 5 minutes before serving. This helps them set and makes them easier to handle. Garnish with fresh parsley or cilantro if you’re feeling fancy.
Important note: If you’re making these ahead of time, stop after step 9. Cover the stuffed peppers and refrigerate for up to 24 hours. When you’re ready to eat, add 10 minutes to the covered baking time.
Cooking Tips & Techniques
I’ve made these peppers about a dozen times now, and I’ve learned a few things the hard way. Let me save you the trouble.
Don’t overbake the peppers. The first time I made these, I left them in the oven for 45 minutes because I got distracted folding laundry. The peppers turned into sad, wrinkled blobs. The faces were unrecognizable. Aim for that 35-40 minute mark, and check them at 30 minutes if your oven runs hot.
Carve on the flatter side. Bell peppers are lumpy. Find the side that sits most flat against the cutting board. That’s your canvas. Carving on a curved side makes the face look distorted after baking.
Use a toothpick for details. If you want to add a little nose or eyebrows, use a toothpick to poke small holes in the pepper skin. It’s a tiny detail, but it makes the faces look more expressive.
Keep the caps. After you cut the tops off, don’t throw them away. Chop them up and sauté them with the onions. It adds more vegetable bulk to the filling and reduces food waste. Plus, it makes you feel like a responsible adult.
Toast the rice first. If you’re cooking rice from scratch for this recipe, try toasting the dry grains in a little butter or oil before adding the water. It gives the rice a nutty flavor that pairs beautifully with the smoky paprika.
Watch the cheese. If you add the cheese topping too early, it can burn before the peppers are done. That’s why I add it at the end of the baking time. If you want an extra crispy cheese crust, switch the oven to broil for the last 2 minutes. But don’t walk away—broil can go from perfect to charcoal in seconds.
I once forgot to drain the diced tomatoes and the filling turned out soupy. The peppers were swimming in liquid. Now I always drain them in a fine-mesh strainer and give them a gentle shake. That one change made a huge difference.
Variations & Adaptations
This recipe is super flexible. Here are some ways to make it your own.
- Vegetarian Black Bean & Corn: Skip the meat entirely. Use one can of drained black beans and ½ cup of frozen corn (thawed) as the base. Add an extra ½ teaspoon of cumin and a squeeze of lime juice to brighten it up. My sister-in-law made this version last year, and even the meat-eaters at the party went back for seconds.
- Spicy Chorizo Version: Swap the ground beef for Mexican chorizo (remove the casing first). Omit the chili powder and cumin since the chorizo is already heavily spiced. Add a diced jalapeño to the onion mixture for extra heat. This version is not for the faint of heart, but it is incredible.
- Southwest Quinoa: Replace the rice with cooked quinoa for a protein-packed, gluten-free option. Add ½ cup of fire-roasted corn and ¼ cup of chopped pickled jalapeños to the filling. Top with pepper jack cheese instead of cheddar. I tried this on a whim and now I make it at least once a month.
- Kid-Friendly Mild: If you’re feeding picky eaters, use ground chicken and mild cheddar. Skip the chili powder and cumin, and use a little garlic powder and onion powder instead. Carve the faces into happy smiles instead of scary ones. My nephew Max calls these “happy peppers.”
- Air Fryer Method: If you’re short on time, you can cook these in an air fryer. Preheat to 350°F (175°C). Place the stuffed peppers in the air fryer basket (work in batches if needed). Cook for 12-15 minutes, then add the cheese and cook for 2 more minutes. The peppers get a slightly crispier skin, which I actually prefer.
Serving & Storage Suggestions
These peppers are a meal in themselves, but they pair beautifully with a few simple sides.
Serving: Serve them hot, right out of the oven. Place each pepper on a plate and spoon a little of the pan juices over the top. A dollop of sour cream or Greek yogurt balances the smokiness. A simple side salad with a lime vinaigrette cuts through the richness. For a truly festive table, serve them alongside a bowl of tortilla soup or some crispy black bean taquitos.
Storage: Leftover stuffed peppers keep beautifully. Store them in an airtight container in the refrigerator for up to 4 days. The flavors actually get better as they sit—the spices meld together and the peppers soften even more. I often make a double batch just for leftovers.
Freezing: These peppers freeze wonderfully. Let them cool completely, then wrap each pepper individually in plastic wrap and place them in a freezer-safe bag. They’ll keep for up to 3 months. To reheat, thaw in the refrigerator overnight, then bake at 350°F (175°C) for 15-20 minutes, covered.
Reheating: The microwave works in a pinch (2 minutes on high), but the oven is better. The peppers lose their texture in the microwave. If you’re reheating just one, use a toaster oven at 350°F for 10 minutes. The cheese gets melty again, and the pepper stays slightly firm.
Flavor development: Honestly, these peppers taste even better the next day. The filling absorbs all the juices from the pepper, and the spices settle into something deeper and more complex. Don’t be afraid to make them a day ahead for a party. Your future self will thank you.
Nutritional Information & Benefits
Here’s a rough estimate for one stuffed pepper (using ground beef and cheddar cheese):
- Calories: 385
- Protein: 28g
- Fat: 18g
- Carbohydrates: 22g
- Fiber: 4g
- Sugar: 8g
These numbers will vary based on your specific ingredients and portion sizes. If you use ground turkey, you’ll drop the calories and fat significantly. The quinoa version adds more fiber and protein.
Health benefits: Bell peppers are packed with vitamin C—one pepper provides more than 150% of your daily needs. They’re also a great source of vitamin A, which is good for your eyes and immune system. The combination of protein, fiber, and healthy fats makes this a balanced meal that keeps you full for hours. Plus, the act of carving and stuffing peppers is oddly meditative. I find it helps me unwind after a long day.
Dietary considerations: This recipe can easily be made gluten-free (use quinoa or certified gluten-free rice) and dairy-free (skip the cheese or use a plant-based alternative). It’s naturally nut-free and egg-free. If you’re watching your sodium, use low-sodium diced tomatoes and go easy on the added salt.
Conclusion
These Halloween Jack-o-Lantern Stuffed Bell Peppers are the kind of recipe that makes you look forward to dinner. They’re fun without being fussy, festive without being complicated, and they taste like genuine comfort food. I love how they bring a little bit of magic to an ordinary weeknight. The faces make everyone smile, and the filling keeps everyone full.
I want you to try this recipe and make it your own. Maybe you’ll add extra spice, or maybe you’ll carve a cat face instead of a pumpkin. That’s the beauty of cooking—you get to decide. Don’t stress about perfection. My first batch looked like a horror movie, and they were still delicious. That’s the whole point.
If you make these, come back and tell me how they turned out. Leave a comment below or tag me in your photos. I genuinely love seeing your creations. Happy Halloween, and happy cooking!
Frequently Asked Questions
Can I use green bell peppers instead of orange?
You can, but green peppers are less sweet and slightly more bitter. The orange color really sells the jack-o-lantern look. If you use green, consider adding a teaspoon of honey or brown sugar to the filling to balance the bitterness.
How do I keep the peppers from falling over in the baking dish?
If your peppers are wobbly, slice a tiny bit off the bottom to create a flat surface. Just be careful not to cut through the bottom, or the filling will leak out. You can also nestle them together in the dish so they support each other.
Can I make these in a slow cooker?
Yes! Stuff the peppers and place them upright in the slow cooker. Add about ¼ cup of water or broth to the bottom. Cook on low for 4-5 hours or on high for 2-3 hours. Add the cheese in the last 15 minutes. The peppers will be very soft, so handle them gently.
My carving looked great before baking, but the faces closed up in the oven. What happened?
This happens when the cuts aren’t deep enough. You need to cut all the way through the pepper flesh. Also, make sure you remove the cut-out pieces completely. If you leave them sitting in the holes, they’ll shrink and close up as the pepper cooks.
Can I prep the peppers the night before Halloween?
Absolutely. Carve and hollow the peppers, prepare the filling, and store them separately in the refrigerator. Stuff them just before baking. This saves you a ton of time on the day of, especially if you’re juggling trick-or-treaters and last-minute costume fixes.
Pin This Recipe!
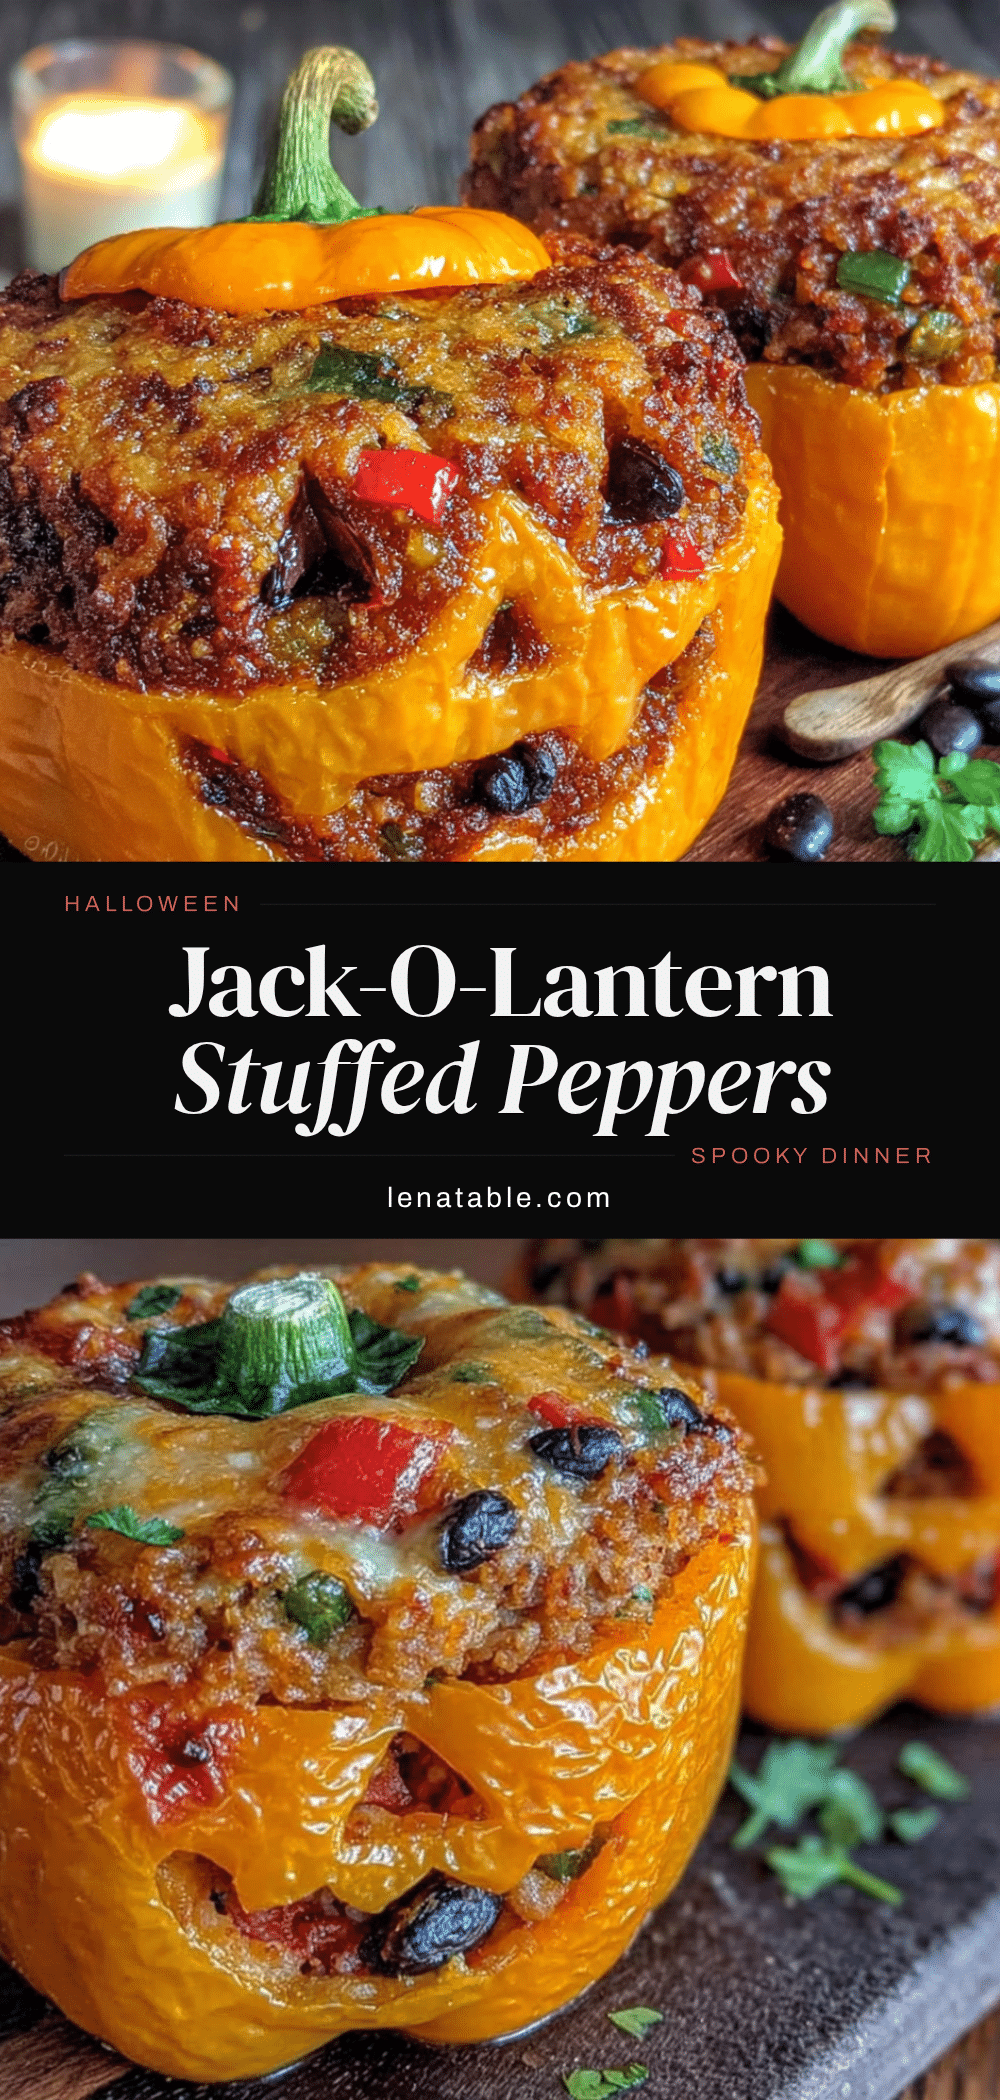
Best Halloween Jack-o-Lantern Stuffed Bell Peppers Recipe
These Halloween Jack-o-Lantern Stuffed Bell Peppers are a fun, festive, and hearty dinner that turns an ordinary weeknight into a spooky celebration. Carved orange bell peppers are filled with a savory meat and rice mixture, topped with melted cheese, and baked to perfection.
- Prep Time: 20 minutes
- Cook Time: 35 minutes
- Total Time: 55 minutes
- Yield: 4 servings 1x
- Category: Main Course
- Cuisine: American
Ingredients
- 4 large orange bell peppers
- 1 tablespoon olive oil
- 1 pound ground beef or ground turkey (85/15 recommended)
- 1 cup cooked white or brown rice
- 1 small yellow onion, diced (about 1 cup)
- 2 cloves garlic, minced
- 1 can (14.5 ounces) diced tomatoes, drained (fire-roasted preferred)
- 1 cup shredded cheddar cheese, divided
- 1 teaspoon chili powder
- ½ teaspoon cumin
- ½ teaspoon smoked paprika
- Salt and black pepper to taste
- 2 tablespoons chopped fresh parsley or cilantro (for garnish, optional)
- Small pieces of black olives or sliced cheese (for faces, optional)
Instructions
- Preheat your oven to 375°F (190°C).
- If you don’t have leftover rice, cook ⅓ cup of uncooked rice in ⅔ cup of water. Bring to a boil, cover, and simmer for 15 minutes. Fluff with a fork and set aside to cool slightly.
- Wash the bell peppers and pat them dry. Using a sharp paring knife, carefully cut a ‘cap’ off the top of each pepper (about ½ inch down from the stem). Reserve the caps for the filling if desired. Use a spoon to scoop out all the seeds and white membranes from inside the peppers. Rinse and pat dry.
- Using the tip of your paring knife, lightly score a face design onto the flattest side of each pepper. Cut all the way through the pepper skin to create eyes and a mouth. Gently push the cut-out pieces inward or remove them completely.
- Heat the olive oil in a large skillet over medium-high heat. Add the ground beef (or turkey) and cook for 5-7 minutes, until browned and no longer pink. Drain excess fat, leaving about 1 tablespoon in the pan.
- Add the diced onion to the skillet and cook for 3-4 minutes, until soft and translucent. Stir in the minced garlic and cook for 30 seconds until fragrant.
- Reduce heat to low. Add the drained diced tomatoes, cooked rice, chili powder, cumin, smoked paprika, and a generous pinch of salt and pepper. Stir to combine and cook for 2-3 minutes. Adjust seasoning to taste.
- Remove the skillet from heat. Stir in ½ cup of the shredded cheddar cheese until melted.
- Place the carved peppers upright in a 9×13-inch baking dish. Carefully fill each pepper with the meat and rice mixture, packing gently. Top each pepper with the remaining ½ cup of shredded cheese.
- Cover the baking dish loosely with aluminum foil. Bake for 25 minutes. Remove the foil and bake for another 10-15 minutes, until the peppers are tender and the cheese is bubbly and golden.
- Let the peppers rest in the dish for 5 minutes before serving. Garnish with fresh parsley or cilantro if desired.
Notes
For best results, carve on the flatter side of the pepper. Don’t overbake; check at 30 minutes if your oven runs hot. To make ahead, stop after stuffing the peppers, cover, and refrigerate for up to 24 hours; add 10 minutes to covered baking time. For a vegetarian version, swap meat for 1 can of drained black beans and ½ cup frozen corn.
Nutrition
- Serving Size: 1 stuffed pepper
- Calories: 385
- Sugar: 8
- Sodium: 580
- Fat: 18
- Saturated Fat: 8
- Carbohydrates: 22
- Fiber: 4
- Protein: 28
Keywords: Halloween, stuffed bell peppers, jack-o-lantern, ground beef, ground turkey, festive dinner, fall recipe, spooky dinner


