Love this? Save it for later!
Share the inspiration with your friends
“You’ve got to try this,” my neighbor Mark called out one sunny July afternoon, waving a suspiciously colorful dessert from his porch. It was the kind of summer day when the smell of barbecue floats through the air, and kids chase each other with water guns. Mark wasn’t usually one to fuss over desserts, but this Flavorful Red White and Blue Ice Cream Sandwich Cake with Oreo Crust stopped me in my tracks. Honestly, I was skeptical at first—ice cream sandwiches layered into a cake? It sounded like a gimmick.
But then there was this moment when I took a bite—the crunch of the Oreo crust, the creamy cold swirl of red, white, and blue layers, and that perfect balance of patriotic sweetness. You know that feeling when a simple idea turns out to be a total game-changer? I’m telling you, this recipe has stayed with me ever since that afternoon. I mean, I had forgotten to grab the whipped cream topping at the store and still, it was a hit. Maybe you’ve been there—pulling off something unexpectedly delicious with what’s on hand.
This ice cream sandwich cake isn’t just a dessert; it’s a celebration in every bite. Whether you’re gearing up for the Fourth of July, Labor Day, or just craving a festive treat, this cake brings a burst of flavor and fun to your table. And with the rich Oreo crust grounding the layers, it’s the kind of easy, no-bake dessert that somehow feels both luxurious and laid-back. Let me tell you, once you try it, you’ll find yourself making it again and again.
Why You’ll Love This Recipe
After testing out countless versions of ice cream cakes, this Flavorful Red White and Blue Ice Cream Sandwich Cake with Oreo Crust stands out for so many reasons. I’ve made it for block parties, family picnics, and even last-minute potlucks—and it never disappoints. Here’s why it might just become your new go-to dessert:
- Quick & Easy: Comes together in under 30 minutes with minimal prep, perfect for busy summer days or last-minute celebrations.
- Simple Ingredients: No need to hunt down specialty items; if you have ice cream sandwiches, Oreos, and a few basics, you’re good to go.
- Perfect for Patriotic Occasions: Ideal for Independence Day, Memorial Day, or any time you want to bring a little red, white, and blue to the table.
- Crowd-Pleaser: Kids love it. Adults adore it. It’s that rare dessert that bridges generations effortlessly.
- Unbelievably Delicious: The creamy layers contrast beautifully with the crunchy Oreo crust, making every bite a delightful texture experience.
This cake isn’t just another ice cream dessert. The secret lies in layering colorful, flavorful ice cream sandwiches with fresh berries and whipped cream, creating a dessert that’s festive but not overly sweet. Plus, using an Oreo crust adds a rich, chocolaty depth that complements the vanilla and berry flavors perfectly. I’ve found that blending a bit of cream cheese into the topping adds a subtle tang that really brightens the whole thing up—trust me, it’s a game-changer.
Honestly, if you’re aiming to impress guests without sweating over complicated steps, this recipe has your back. It’s the kind of dessert that lets you enjoy the party just as much as everyone else.
What Ingredients You Will Need
To make this Flavorful Red White and Blue Ice Cream Sandwich Cake with Oreo Crust, you’ll use straightforward ingredients that come together to create a memorable dessert. Most are pantry staples or easy to find at your local grocery store, making this recipe super accessible.
- For the Oreo Crust:
- 24 Oreo cookies (about 1 ½ cups crushed) – I prefer Original Oreos for their classic flavor
- 5 tablespoons unsalted butter, melted (adds richness and binds the crust)
- For the Ice Cream Layers:
- 1 package (8 count) vanilla ice cream sandwiches, slightly softened
- 1 pint fresh strawberries, hulled and sliced (for the red layer, fresh is best in season)
- 1 cup fresh blueberries (for the blue layer)
- For the Whipped Topping:
- 2 cups heavy whipping cream, cold
- 1/3 cup powdered sugar
- 4 ounces cream cheese, softened (optional, for a tangy creaminess)
- 1 teaspoon vanilla extract
- Optional Garnishes:
- Extra berries for decoration
- Red, white, and blue sprinkles or edible glitter for a festive touch
If you want a dairy-free option, swapping the heavy cream for canned coconut cream and using dairy-free ice cream sandwiches works pretty well, though the texture shifts slightly. And if Oreos aren’t your thing, any chocolate sandwich cookie will do, but I find the classic Oreo balance is hard to beat here.
Equipment Needed
- 9×13 inch baking dish or pan – glass or metal works fine
- Food processor or a heavy-duty plastic bag and rolling pin (for crushing Oreos)
- Mixing bowls – one large bowl for whipped topping, another for mixing crust
- Electric mixer or hand whisk – electric mixer makes whipping cream easier and fluffier
- Rubber spatula – for folding whipped cream gently
- Measuring cups and spoons – accurate measurements matter for the crust and topping balance
If you don’t have a food processor, I’ve crushed Oreos with a rolling pin inside a sealed plastic bag plenty of times—it’s a bit messier but totally doable. Also, using a stand mixer for the whipped cream is a nice time saver, but a good whisk and some elbow grease get you there just fine.
Preparation Method
- Prepare the Oreo Crust: Preheat your oven to 350°F (175°C). Crush the Oreo cookies finely using a food processor or place them in a sealed plastic bag and crush with a rolling pin. In a bowl, combine the crushed Oreos with melted butter until the mixture is well coated and feels like damp sand.
- Form the Crust: Press the Oreo mixture evenly into the bottom of your 9×13 inch pan. Use the back of a spoon or the bottom of a flat glass to compact it firmly. Bake for 8-10 minutes to set the crust. Let it cool completely while you prepare the layers. (This step helps avoid a soggy bottom—don’t skip it!)
- Make the Whipped Topping: In a large bowl, beat the cold heavy cream with powdered sugar, softened cream cheese, and vanilla extract on medium-high speed until stiff peaks form. This usually takes about 3-5 minutes. Be careful not to overbeat or it will turn grainy.
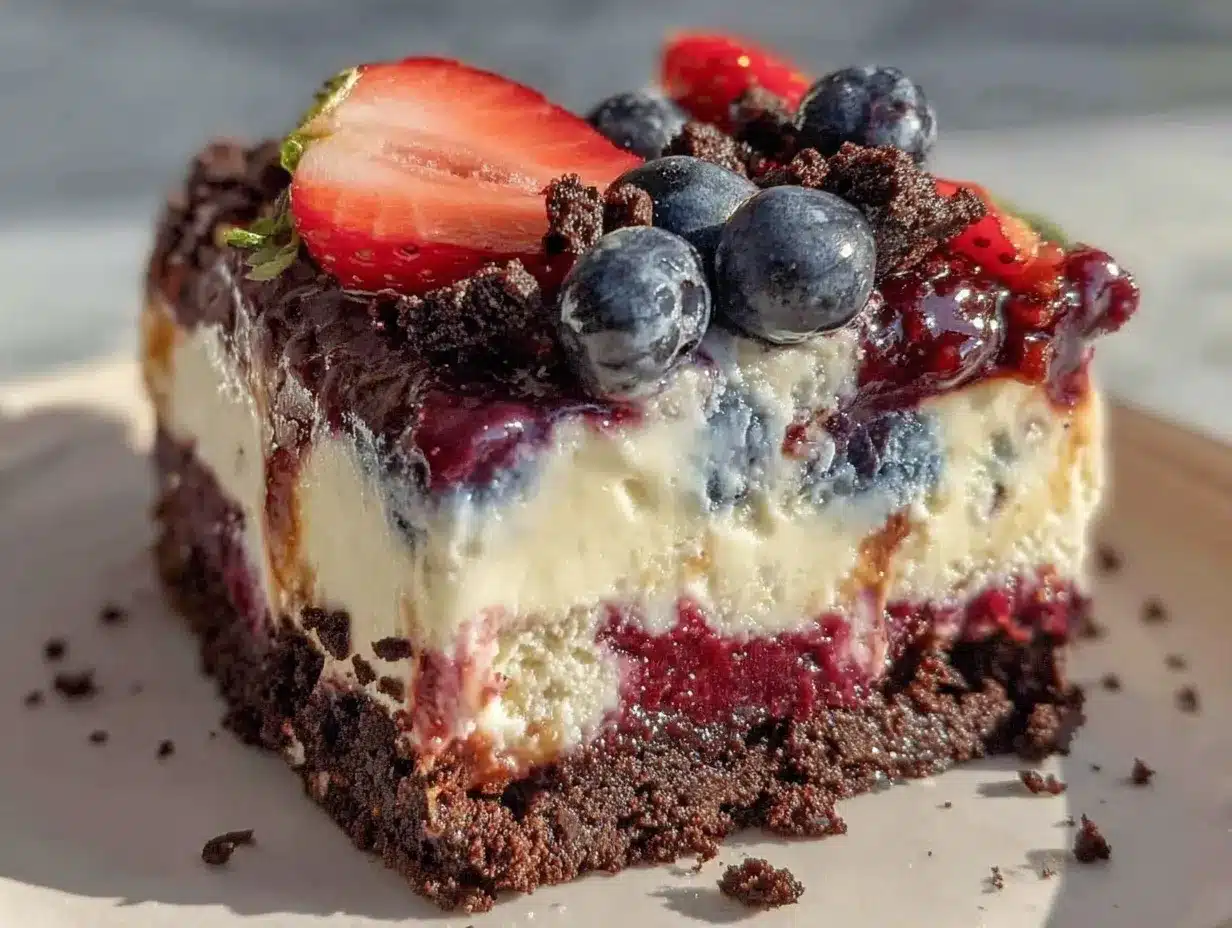
- Assemble the Cake Layers: Spread a thin layer of whipped topping over the cooled Oreo crust. Next, arrange a layer of softened vanilla ice cream sandwiches side-by-side to cover the surface. Spread a layer of the whipped topping gently over the ice cream sandwiches.
- Add the Red Layer: Scatter the sliced strawberries evenly over the whipped topping. Then add another layer of ice cream sandwiches, spreading more whipped topping on top.
- Add the Blue Layer: Scatter fresh blueberries evenly over the whipped topping. Finish with a final layer of whipped topping, smoothing it nicely with a spatula.
- Chill the Cake: Cover the cake tightly with plastic wrap and freeze for at least 4 hours, preferably overnight. This helps the layers meld together and the whipped topping to set perfectly.
- Serve: Before serving, let the cake sit at room temperature for about 10 minutes for easier slicing. Garnish with extra berries and festive sprinkles if desired.
Pro tip: If your whipped topping softens too much while spreading, pop the bowl back in the fridge for 10 minutes. And if the ice cream sandwiches are too hard to slice into neat layers, a quick warm knife swipe helps. I learned this the hard way during my first attempt!
Cooking Tips & Techniques
Making an ice cream sandwich cake might sound quirky, but it’s surprisingly straightforward once you know a few tricks. Let me share some tips I’ve picked up along the way:
- Soften ice cream sandwiches slightly: About 5-10 minutes on the counter makes them pliable without melting.
- Use cold heavy cream for whipping: It whips faster and holds shape better. I keep my bowl chilled too when possible.
- Press the Oreo crust firmly: This prevents crumbling when slicing and gives a satisfying crunch.
- Don’t skip chilling the assembled cake: It’s tempting to dig in, but the flavors blend best after a good freeze.
- Slice with a warm, sharp knife: Run your knife under hot water and dry it before slicing for smooth, clean pieces.
I once forgot to bake the crust first, and let me tell you, the bottom was a soggy mess—not a vibe. Also, whipping the cream with cream cheese adds a bit of tang and firmness that stops your topping from melting too quickly. Honestly, it makes a big difference in texture and taste.
Variations & Adaptations
This Flavorful Red White and Blue Ice Cream Sandwich Cake is a great canvas for customization. Here are some ideas to make it your own:
- Dietary Adaptation: For a gluten-free version, swap Oreos for gluten-free chocolate sandwich cookies or crushed gluten-free chocolate graham crackers.
- Seasonal Twist: In winter, try swapping strawberries and blueberries for pomegranate arils and kiwi slices for a festive red, white, and green palette.
- Flavor Swap: Use chocolate or mint ice cream sandwiches for a different flavor base. I once replaced vanilla with cookies and cream sandwiches for a double chocolate berry delight.
- Non-Dairy Option: Use coconut whipped cream and dairy-free ice cream sandwiches to suit vegan or lactose-intolerant diets.
One time, I made a version using a graham cracker crust and layered in crushed pineapple and mango slices for a tropical feel. It was a hit at a summer barbecue, showing how flexible this recipe can be to your mood or pantry.
Serving & Storage Suggestions
Serve this ice cream sandwich cake straight from the freezer, letting it rest for about 10 minutes at room temperature for easier slicing. A sharp knife warmed under hot water works wonders for neat slices without dragging through the layers.
This cake pairs beautifully with a crisp lemonade or iced tea, balancing the creamy sweetness with a refreshing drink. For a boozy twist, a splash of berry-flavored liqueur in the whipped topping can add a grown-up touch.
Store leftovers tightly covered in the freezer for up to 5 days. The flavors actually meld better after a day or two, making it an excellent make-ahead dessert. To re-serve, thaw for about 10 minutes and serve chilled.
Nutritional Information & Benefits
Each serving of this ice cream sandwich cake offers a delightful balance of indulgence and fresh fruit goodness. The fresh berries provide antioxidants and vitamin C, while the cream cheese in the topping adds protein and calcium.
Keep in mind, this is a treat with moderate sugar and fat content, mainly from the ice cream and Oreos. For those watching carbs or dairy, substitutions like almond flour crust or dairy-free ice creams can lighten it up a bit.
From a wellness perspective, I appreciate that this dessert encourages enjoying sweets mindfully with fresh, natural ingredients. It’s a perfect example of how comfort food can be both fun and a little nourishing.
Conclusion
Making this Flavorful Red White and Blue Ice Cream Sandwich Cake with Oreo Crust is like adding a burst of celebration to your dessert table without the fuss. It’s fun, easy, and honestly, a total crowd-pleaser that’s perfect for any summer gathering or patriotic holiday.
Feel free to personalize the layers, swap in your favorite fruits, and tweak the toppings to match your taste. I love this cake because it reminds me of those carefree summer afternoons spent chatting with neighbors and sharing something sweet and simple.
If you give this recipe a try, I’d love to hear how you made it yours—drop a comment below or share your favorite variations. Here’s to making your dessert moments memorable and delicious!
Frequently Asked Questions
Can I make this ice cream sandwich cake ahead of time?
Absolutely! It’s best made a day ahead to allow the flavors to meld and the cake to set nicely. Just keep it tightly covered in the freezer.
What if I can’t find ice cream sandwiches?
You can substitute with your favorite ice cream bars or even layer softened ice cream scoops between the crust and toppings. Just freeze well between layers.
How do I store leftovers?
Store leftovers in the freezer covered tightly with plastic wrap or foil for up to 5 days. Thaw for about 10 minutes before serving.
Can I use frozen berries instead of fresh?
Fresh berries work best for texture, but if you use frozen, thaw and drain excess liquid before layering to avoid sogginess.
Is there a way to make this recipe vegan?
Yes! Use dairy-free ice cream sandwiches, coconut whipped cream, and a dairy-free cookie crust alternative to make it vegan-friendly.
Pin This Recipe!
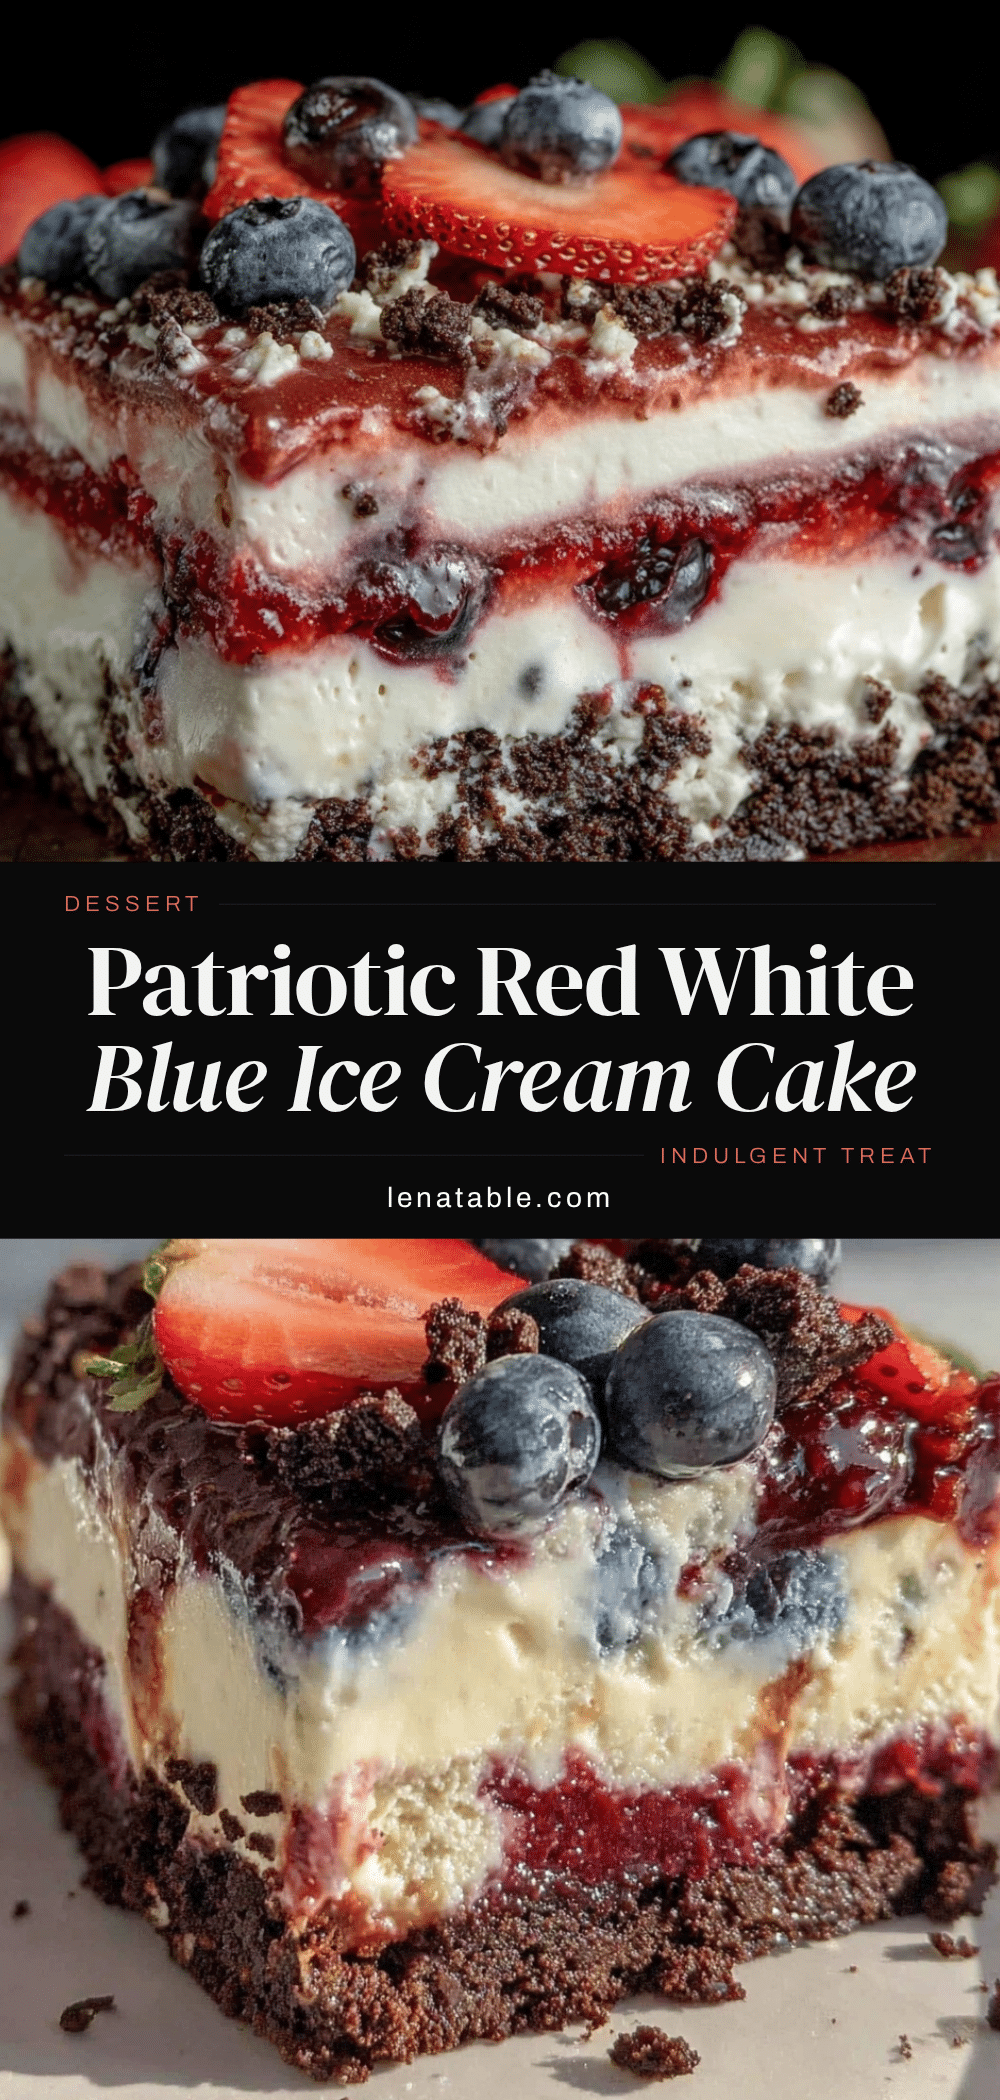
Flavorful Red White and Blue Ice Cream Sandwich Cake Recipe Easy Patriotic Dessert with Oreo Crust

A festive and easy no-bake ice cream sandwich cake featuring layers of red strawberries, white whipped cream, and blue blueberries on a crunchy Oreo crust. Perfect for patriotic celebrations and summer gatherings.
- Prep Time: 15 minutes
- Cook Time: 10 minutes
- Total Time: 4 hours 25 minutes
- Yield: 12 servings 1x
- Category: Dessert
- Cuisine: American
Ingredients
- 24 Oreo cookies (about 1 ½ cups crushed)
- 5 tablespoons unsalted butter, melted
- 1 package (8 count) vanilla ice cream sandwiches, slightly softened
- 1 pint fresh strawberries, hulled and sliced
- 1 cup fresh blueberries
- 2 cups heavy whipping cream, cold
- 1/3 cup powdered sugar
- 4 ounces cream cheese, softened (optional)
- 1 teaspoon vanilla extract
- Optional garnishes: extra berries, red white and blue sprinkles or edible glitter
Instructions
- Preheat oven to 350°F (175°C). Crush Oreo cookies finely using a food processor or place in a sealed plastic bag and crush with a rolling pin.
- In a bowl, combine crushed Oreos with melted butter until mixture is well coated and feels like damp sand.
- Press Oreo mixture evenly into the bottom of a 9×13 inch pan. Compact firmly with the back of a spoon or flat glass.
- Bake crust for 8-10 minutes to set. Let cool completely.
- In a large bowl, beat cold heavy cream with powdered sugar, softened cream cheese, and vanilla extract on medium-high speed until stiff peaks form (3-5 minutes).
- Spread a thin layer of whipped topping over cooled Oreo crust.
- Arrange a layer of softened vanilla ice cream sandwiches side-by-side to cover the surface.
- Spread a layer of whipped topping gently over the ice cream sandwiches.
- Scatter sliced strawberries evenly over the whipped topping.
- Add another layer of ice cream sandwiches, then spread more whipped topping on top.
- Scatter fresh blueberries evenly over the whipped topping.
- Finish with a final layer of whipped topping, smoothing it nicely with a spatula.
- Cover cake tightly with plastic wrap and freeze for at least 4 hours, preferably overnight.
- Before serving, let cake sit at room temperature for about 10 minutes for easier slicing.
- Garnish with extra berries and festive sprinkles if desired.
Notes
Soften ice cream sandwiches for 5-10 minutes before assembling to make layering easier. Use cold heavy cream and chilled bowl for best whipped cream results. Bake the Oreo crust to avoid sogginess. Chill assembled cake at least 4 hours or overnight for best flavor melding. Use a warm knife for clean slicing. Cream cheese in whipped topping adds tang and firmness.
Nutrition
- Serving Size: 1 slice (1/12th of c
- Calories: 320
- Sugar: 22
- Sodium: 210
- Fat: 20
- Saturated Fat: 12
- Carbohydrates: 30
- Fiber: 2
- Protein: 4
Keywords: ice cream sandwich cake, Oreo crust, patriotic dessert, red white and blue dessert, no bake cake, summer dessert, Fourth of July dessert