Love this? Save it for later!
Share the inspiration with your friends
This was supposed to be a simple batch of roasted tomato soup. I had the tomatoes lined up, the garlic ready to go, and a nice chunk of ginger waiting to be grated into something warm and comforting. But the power flickered, sputtered, and died just as I was about to turn on the oven. There I was, standing in a dark kitchen with a pile of ingredients that suddenly had no purpose. I grabbed the wrong thing out of frustration—the horseradish root instead of the ginger—and before I knew it, I was chopping and grating and pouring apple cider vinegar over everything like a mad scientist. What came out was nothing like the plan—and better. Honestly, that first jar of homemade fire cider shots was born from a moment of total kitchen chaos, and I have never looked back.
I mean, let me tell you, that first sip was a revelation. It was spicy, pungent, and made my eyes water, but I felt something shift. A warmth spread through my chest, and I swear, my sinuses cleared up in seconds. I kept making batch after batch that winter, tweaking the ratios, adding a little more garlic here, a little more turmeric there. It became my secret weapon against every sniffle and cough that tried to take me down. Maybe you’ve been there—reaching for another cup of tea, hoping for something that actually works. This is that something.
Now, I don’t wait for a power outage to make this stuff. I keep a jar of these homemade fire cider shots in my fridge at all times. It’s not just a recipe; it’s my insurance policy against cold season. And the best part? It tastes like you’re doing something good for yourself—because you are.
Why You’ll Love This Recipe
Let’s be real for a second. There are a lot of immune-boosting tonics out there, and most of them taste like regret. Not this one. These homemade fire cider shots are the real deal—tested through multiple winters, shared with skeptical friends, and approved by my neighbor who swore she’d never drink anything with horseradish in it. Here’s why this recipe stands out:
- Quick & Easy: Comes together in under 20 minutes of active prep time. The hardest part is waiting for it to steep, but that’s hands-off.
- Simple Ingredients: No fancy superfood powders or hard-to-find extracts. You likely already have most of these in your kitchen or can grab them at any grocery store.
- Perfect for Cold Season: Great for fighting off winter bugs, soothing sore throats, or just giving your immune system a daily boost.
- Crowd-Pleaser (Seriously): I know it sounds wild, but even people who hate spicy things end up loving this. It’s got a kick, but it’s balanced.
- Unbelievably Effective: The texture and flavor combo is next-level comfort food for your immune system. It’s warming, zingy, and leaves you feeling invincible.
What makes this different from every other fire cider recipe out there? It’s the ratio. I spent a whole winter tweaking the balance of horseradish, garlic, and ginger so that no single ingredient overpowers the others. It’s not just a bunch of stuff thrown in a jar—it’s a carefully crafted blend that actually tastes good to sip. Plus, I add a touch of raw honey at the end for sweetness and extra immune support. This isn’t just another version; it’s my best version.
Honestly, this recipe is the kind that makes you close your eyes after the first sip. It’s comfort for your insides—healthier, faster, but with the same soul-soothing satisfaction as a bowl of hot soup. Perfect for impressing your family with your kitchen wizardry, or turning a simple morning ritual into something that makes you feel like a superhero.
What Ingredients You Will Need
This recipe uses simple, whole ingredients that work together to create a potent, flavorful tonic. Most of these are pantry staples or easy to find at your local market. Here’s what you’ll need:
For the Fire Cider Base
- Raw apple cider vinegar, 2 cups (with the mother—I recommend Bragg’s for best results)
- Fresh horseradish root, 1/2 cup, peeled and finely grated (this is the backbone of the heat)
- Fresh ginger root, 1/2 cup, peeled and thinly sliced or grated
- Fresh turmeric root, 1/4 cup, peeled and thinly sliced (adds a beautiful golden color and earthy flavor)
- Garlic cloves, 6-8, peeled and crushed (the more, the merrier for immune support)
- Yellow onion, 1 medium, thinly sliced (adds depth and natural sweetness)
- Fresh jalapeño, 1 small, sliced (optional, for extra heat)
- Fresh rosemary sprig, 1 (adds an aromatic, piney note)
- Fresh thyme sprigs, 2-3 (earthy and grounding)
- Black peppercorns, 1 teaspoon (helps activate the turmeric)
- Ground cayenne pepper, 1/2 teaspoon (optional, for an extra kick)
For Finishing
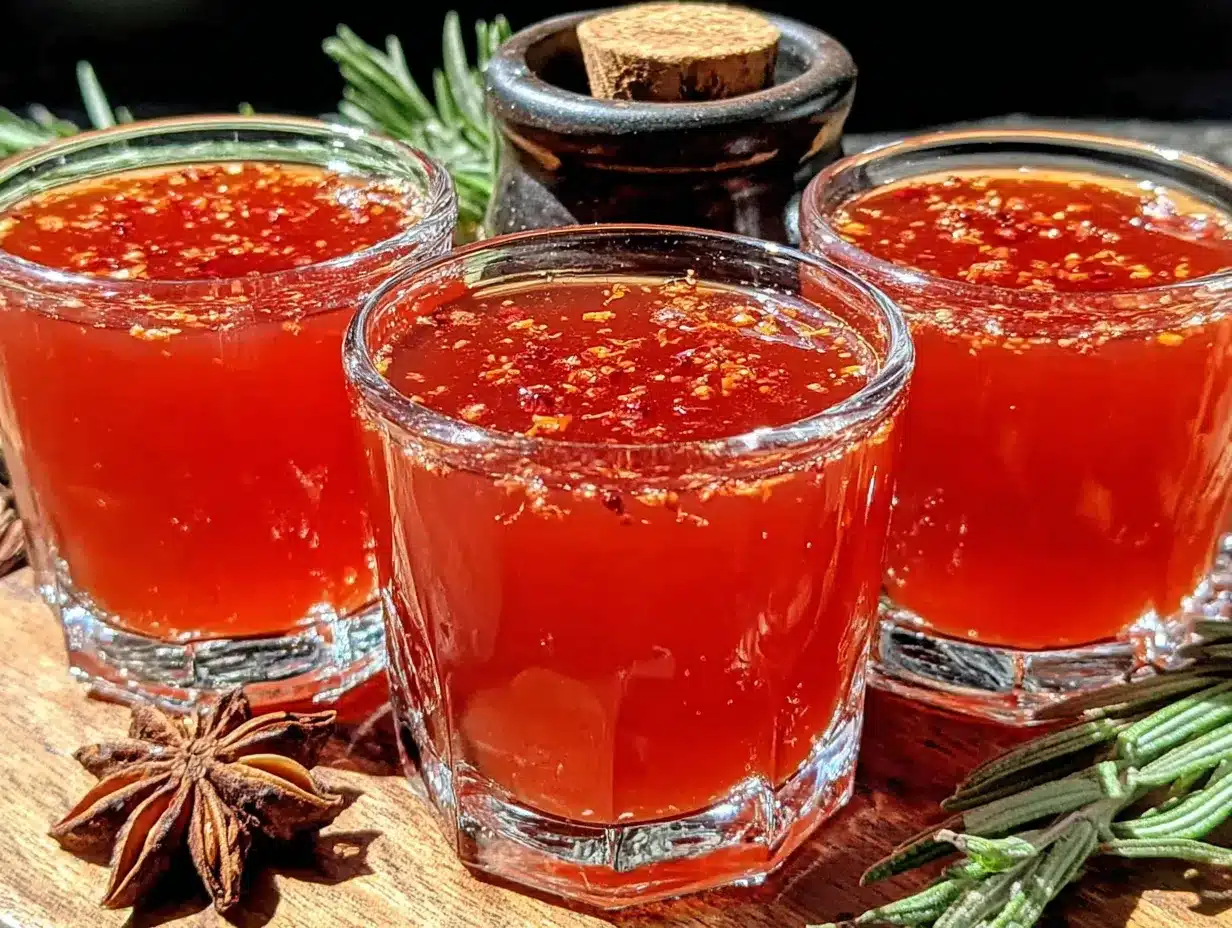
- Raw honey, 2-4 tablespoons (to taste—adds sweetness and additional immune benefits)
Ingredient Tips: Look for firm, unblemished horseradish and ginger roots. The fresher they are, the more potent your fire cider will be. If you can’t find fresh turmeric, you can use 1 tablespoon of dried turmeric powder, but the flavor won’t be as bright. I’ve tried this with both, and fresh is definitely better. For a milder version, skip the jalapeño and cayenne—you’ll still get plenty of warmth from the horseradish and ginger.
Substitution Guidance: Use local honey if possible for extra allergy benefits. If you’re avoiding sugar, you can omit the honey entirely, but the taste will be very sharp. I’ve also made this with white wine vinegar in a pinch, but apple cider vinegar is really the star here.
Equipment Needed
You don’t need a fancy kitchen to make this. Here’s what you’ll need:
- Quart-sized glass jar (Mason jar works perfectly) with a tight-fitting lid
- Cutting board and sharp knife
- Box grater or microplane (for grating horseradish and ginger)
- Vegetable peeler (for the turmeric and ginger)
- Measuring cups and spoons
- Fine-mesh strainer or cheesecloth (for straining after steeping)
- Small funnel (for transferring to storage bottles)
- Dark glass bottles or smaller jars (for storing the finished fire cider)
I’ve made this with a regular box grater and a cheap Mason jar, and it works perfectly. If you don’t have a microplane, just chop everything finely. The only thing I’d recommend splurging on is a good glass jar—plastic can absorb the strong flavors and odors. Trust me, you don’t want your next batch of iced tea tasting like horseradish.
Preparation Method
Making homemade fire cider shots is incredibly simple, but there are a few tricks to get the best flavor. Follow these steps, and you’ll have a jar of liquid gold ready in no time.
- Prep your ingredients (10 minutes): Wash and peel the horseradish, ginger, and turmeric. Grate the horseradish finely—this releases the most flavor. Slice the ginger and turmeric into thin coins or matchsticks. Crush the garlic cloves with the flat side of your knife to release their oils. Slice the onion into thin rings. If using jalapeño, slice it into thin rounds (remove seeds for less heat).
- Layer in the jar (5 minutes): Start with the horseradish and ginger at the bottom of your clean glass jar. Add the turmeric, garlic, onion, and jalapeño. Tuck in the rosemary and thyme sprigs. Add the black peppercorns and cayenne if using. Don’t pack it too tightly—you want the vinegar to be able to circulate around everything.
- Add the vinegar (2 minutes): Pour the raw apple cider vinegar over the ingredients until they are completely submerged. Make sure there are no air pockets—use a chopstick or butter knife to gently poke around and release any trapped bubbles. The vinegar should cover everything by about an inch.
- Seal and shake (1 minute): Screw the lid on tightly and give the jar a good shake. Label it with the date. I like to write “FIRE CIDER” in big letters so nobody mistakes it for pickles.
- Steep (2-4 weeks): Store the jar in a cool, dark place like a pantry or cupboard. Shake it every day when you remember—this helps distribute the flavors. I keep mine on the counter and give it a shake every time I walk by. After about 2 weeks, start tasting it. You want it to be pungent, spicy, and slightly sour. Some people like it stronger and let it go for 4 weeks.
- Strain and sweeten (10 minutes): Once it’s reached your desired strength, strain the liquid through a fine-mesh strainer or cheesecloth into a clean bowl or large measuring cup. Discard the solids (or compost them—they’re great for the garden). Stir in the raw honey to taste. Start with 2 tablespoons and add more if you want it sweeter.
- Bottle and store (5 minutes): Using a funnel, pour the finished fire cider into dark glass bottles or smaller jars. Store in the refrigerator. It will keep for up to 6 months, though honestly, mine never lasts that long.
Pro tip: The first time I made this, I forgot to shake it for a whole week. I thought I’d ruined it, but it was actually fine—just a little less integrated. Don’t stress if you miss a day. This recipe is forgiving.
Cooking Tips & Techniques
I’ve made this recipe more times than I can count, and I’ve learned a few things the hard way. Here are my best tips:
Don’t skip the daily shake. I know it seems like a small thing, but shaking the jar daily helps the flavors meld together. I once left a batch sitting undisturbed for three weeks, and the top layer was noticeably weaker than the bottom. A quick daily shake prevents that.
Taste as you go. After two weeks, start tasting your fire cider every few days. Everyone’s palate is different—I like mine aggressively spicy, but my sister prefers it milder. You do you. Once it hits your sweet spot, strain it.
Watch out for the horseradish fumes. I’m not kidding. When you grate fresh horseradish, it releases compounds that can make your eyes water and your nose burn. Open a window or work near a fan. I learned this the hard way and ended up crying over my cutting board like I was chopping onions for an hour.
Use the mother. Raw apple cider vinegar with the mother contains beneficial bacteria and enzymes that add to the health benefits. It also gives the cider a slightly cloudy appearance, which is totally normal.
Don’t use metal lids long-term. The vinegar can corrode metal over time. If you’re storing it for a while, use plastic lids or put a layer of wax paper between the jar and the metal lid. I learned this after finding a rusted lid on a batch I’d forgotten about.
Variations & Adaptations
One of the best things about this recipe is how customizable it is. Here are some variations I’ve tried and loved:
Citrus Boost: Add the zest and juice of one lemon and one orange to the jar before steeping. It adds a bright, citrusy note that pairs beautifully with the spice. I do this in the summer when I want something a little fresher.
Herbal Twist: Swap the rosemary and thyme for other immune-supporting herbs like echinacea, elderberry, or astragalus. I’ve done a version with fresh sage and oregano that was incredible for sore throats.
Milder Version: If you’re sensitive to heat, skip the jalapeño and cayenne, and use only half the horseradish. You’ll still get the immune benefits without the fire. My kids actually like this version—they call it “gentle cider.”
Sweet and Spicy: Add a cinnamon stick and a star anise to the jar. The warmth of the spices complements the heat of the horseradish and ginger beautifully. This is my go-to fall version.
No-Honey Option: If you’re vegan or avoiding sugar, you can skip the honey entirely. The fire cider will be very tart and pungent, but some people prefer it that way. You can also add a few drops of stevia for sweetness without the sugar.
Serving & Storage Suggestions
This fire cider is best enjoyed as a daily wellness shot. Here’s how I serve it:
As a daily shot: Take 1-2 tablespoons straight from the fridge each morning. It’s a wake-up call for your taste buds and your immune system. I chase mine with a glass of water, but some people love the burn.
In warm water: Add 1 tablespoon to a mug of hot water with a squeeze of lemon. It makes a soothing, spicy tea that’s perfect for sore throats or cold mornings.
In salad dressings: Use it in place of regular vinegar in vinaigrettes. It adds an incredible depth of flavor to simple salads. I love it on a kale salad with roasted sweet potatoes.
Storage: Keep your fire cider in the refrigerator. It will stay good for up to 6 months, though the flavor may mellow over time. I’ve kept bottles for almost a year and they were still fine, but the potency definitely decreases. For best results, use within 3-4 months.
Freezing: You can freeze fire cider in ice cube trays for individual portions. Pop out a cube and thaw it in the fridge overnight. It’s perfect for travel or for when you don’t want to commit to a whole bottle.
Flavor development: The flavors will continue to meld and mellow over the first few weeks in the fridge. Don’t be alarmed if it tastes different on day one than it does on day thirty—it’s supposed to. The heat will soften slightly, and the honey will integrate more fully.
Nutritional Information & Benefits
While I’m not a nutritionist, I can tell you what this recipe does for me. Here’s a rough estimate per 1-tablespoon serving:
| Nutrient | Amount |
|---|---|
| Calories | 15-20 |
| Total Carbohydrates | 4g |
| Sugars | 3g (from honey) |
| Vitamin C | 2% DV |
| Iron | 1% DV |
Health Highlights: The star ingredients here are all known for their immune-supporting properties. Garlic contains allicin, a compound with antimicrobial effects. Ginger and turmeric are powerful anti-inflammatories. Horseradish is a natural decongestant. Raw apple cider vinegar supports gut health, and raw honey provides antioxidants and soothing properties for sore throats.
Dietary Considerations: This recipe is naturally gluten-free, dairy-free, and vegan if you skip the honey. It’s also low in calories and sugar compared to most commercial wellness shots. Just be aware that the vinegar can be harsh on tooth enamel—rinse your mouth with water after taking a shot, or drink it through a straw.
Personal Note: I started taking this daily during flu season two years ago, and I honestly believe it’s made a difference. I used to get every cold that went around, but now I either skip them entirely or recover in half the time. Is it a miracle cure? No. But it’s a delicious, natural way to support your body’s defenses.
Conclusion
Look, I know making your own fire cider sounds a little intimidating. It’s got a lot of ingredients, and it takes a few weeks to steep. But honestly, it’s one of the easiest and most rewarding things you can do for your health. The active prep time is maybe 20 minutes, and then it just sits there getting more and more delicious.
This recipe has become a staple in my kitchen, and I hope it becomes one in yours too. Play with the ingredients, make it your own, and don’t be afraid to experiment. The first batch I made was technically a mistake, and it turned out to be the best thing I ever did for my immune system.
I’d love to hear how yours turns out! Leave a comment below and tell me what variations you tried. Did you add extra garlic? Skip the honey? Make it so spicy it made your eyes water? Share your fire cider stories—I read every single one. And if you found this helpful, share it with a friend who’s always getting sick. Trust me, they’ll thank you later.
Stay healthy, friends. Your immune system is about to get a serious upgrade.
Frequently Asked Questions
Can I drink fire cider every day?
Yes, 1-2 tablespoons daily is a common and safe amount. It’s a great way to support your immune system, especially during cold and flu season. Just remember to dilute it in water or take it as a shot, and rinse your mouth afterward to protect your teeth.
How long does homemade fire cider last?
Stored in the refrigerator, your fire cider will stay good for up to 6 months. The flavor may mellow over time, but it’s still perfectly safe to consume. I usually make a fresh batch every 3-4 months for the best taste and potency.
Can I use dried herbs instead of fresh?
Absolutely. If you don’t have fresh horseradish, ginger, or turmeric, you can use dried versions. Use about 1/3 of the amount called for fresh, as dried herbs are more concentrated. The flavor won’t be as bright, but it will still work beautifully.
Is fire cider safe for children?
In small amounts, yes. I give my kids a teaspoon mixed into warm water or juice when they feel a cold coming on. For younger children, start with a very small amount to see how they handle the spice. You can also make a milder version by reducing the horseradish and skipping the cayenne.
Can I reuse the solids after straining?
Yes! The strained solids are still packed with flavor and nutrients. I use them in salad dressings, mix them into roasted vegetables, or add them to soups and stews. They’re also great in a compost pile if you’re into gardening. Just don’t eat them straight—they’re very strong!
Pin This Recipe!

Best Homemade Fire Cider Shots for Immune Support
A potent, spicy, and immune-boosting tonic made from fresh horseradish, ginger, turmeric, garlic, and apple cider vinegar. This DIY fire cider is perfect for cold season and can be taken as a daily wellness shot.
- Prep Time: 20 minutes
- Cook Time: 0 minutes
- Total Time: 20 minutes (plus 2-4 weeks steeping time)
- Yield: Approximately 2 cups (32 servings of 1 tablespoon each) 1x
- Category: Wellness Tonic
- Cuisine: American
Ingredients
- 2 cups raw apple cider vinegar (with the mother, like Bragg’s)
- 1/2 cup fresh horseradish root, peeled and finely grated
- 1/2 cup fresh ginger root, peeled and thinly sliced or grated
- 1/4 cup fresh turmeric root, peeled and thinly sliced
- 6–8 garlic cloves, peeled and crushed
- 1 medium yellow onion, thinly sliced
- 1 small fresh jalapeño, sliced (optional, for extra heat)
- 1 fresh rosemary sprig
- 2–3 fresh thyme sprigs
- 1 teaspoon black peppercorns
- 1/2 teaspoon ground cayenne pepper (optional, for extra kick)
- 2–4 tablespoons raw honey (to taste)
Instructions
- Wash and peel the horseradish, ginger, and turmeric. Grate the horseradish finely. Slice the ginger and turmeric into thin coins or matchsticks. Crush the garlic cloves with the flat side of a knife. Slice the onion into thin rings. If using jalapeño, slice it into thin rounds (remove seeds for less heat).
- Layer the horseradish and ginger at the bottom of a clean quart-sized glass jar. Add the turmeric, garlic, onion, and jalapeño. Tuck in the rosemary and thyme sprigs. Add the black peppercorns and cayenne if using. Do not pack too tightly.
- Pour the raw apple cider vinegar over the ingredients until they are completely submerged. Use a chopstick or butter knife to release any trapped air bubbles. The vinegar should cover everything by about an inch.
- Screw the lid on tightly and shake the jar well. Label with the date.
- Store the jar in a cool, dark place (like a pantry) for 2-4 weeks. Shake daily to distribute flavors. Start tasting after 2 weeks; steep longer for a stronger flavor.
- Once desired strength is reached, strain the liquid through a fine-mesh strainer or cheesecloth into a clean bowl. Discard the solids.
- Stir in raw honey to taste (start with 2 tablespoons, add more if desired).
- Using a funnel, pour the finished fire cider into dark glass bottles or smaller jars. Store in the refrigerator for up to 6 months.
Notes
Grate horseradish in a well-ventilated area to avoid eye irritation. Shake the jar daily for best flavor integration. Use raw apple cider vinegar with the mother for added health benefits. Avoid metal lids long-term as vinegar can corrode them; use plastic lids or wax paper. The fire cider will keep in the refrigerator for up to 6 months, but flavor is best within 3-4 months. For a milder version, skip jalapeño and cayenne and use half the horseradish.
Nutrition
- Serving Size: 1 tablespoon
- Calories: 1520
- Sugar: 3
- Sodium: 5
- Carbohydrates: 4
Keywords: fire cider, immune support, wellness shots, homemade tonic, apple cider vinegar, horseradish, ginger, turmeric, garlic, cold season, natural remedy


