Love this? Save it for later!
Share the inspiration with your friends
The neighborhood potluck was in four hours and I’d completely forgotten. I mean, completely. I was standing in my kitchen at 2 PM, staring into the fridge like it might magically produce a show-stopping dish. Everyone else would be bringing their signature casseroles, elaborate salads, and those desserts that take three days to assemble. I had six chicken thighs, a bottle of olive oil, and a spice cabinet that looked sad and neglected. Let me tell you, the panic was real.
I remembered my sister mentioning something about air fryer chicken thighs at a family dinner last month. She’d made them for a game day party and apparently they disappeared in minutes. I’d nodded along, not really paying attention, because honestly, who makes chicken thighs for a party? That’s what I thought, anyway. But desperate times call for desperate measures, and I was out of options. I grabbed the chicken, threw together a spice mix from whatever I could find, and prayed to the kitchen gods.
The thing is, I didn’t expect much. I figured people would be polite, maybe take a piece to be nice, and then go back to the real food. But when I walked in with that platter of crispy air fryer chicken thighs, something shifted. People stopped mid-conversation. Someone actually said “what is that smell?” in a voice that sounded hungry. By the end of the night, my platter was empty, and three people had asked for the recipe. I was sheepish, honestly. I’d brought the simplest thing, the dish I threw together under pressure, and it had won the whole party.
That’s the thing about these crispy air fryer chicken thighs. They’re not supposed to be the star of the show. They’re supposed to be the easy, no-fuss option you bring when you’ve got nothing else. But they end up stealing the spotlight anyway. The skin gets this perfect crunch, the meat stays juicy and tender, and the seasoning creates this crust that makes people close their eyes when they take a bite. I’ve made them for every gathering since, and they never fail. Maybe you’ve been there—the panic of having nothing to bring, the relief of finding a recipe that actually works, the surprise when it turns out to be the best thing on the table. That’s this recipe. It’s the underdog that always wins.
Why You’ll Love This Recipe
I’ve tested this recipe more times than I care to admit. I’ve burned batches, under-seasoned batches, and once I even forgot to preheat the air fryer (don’t do that). But after all that trial and error, I can say with confidence that these crispy air fryer chicken thighs are the real deal. They’re the recipe I turn to when I need something reliable, impressive, and completely stress-free.
- Quick & Easy: From fridge to table in under 20 minutes. That’s faster than ordering takeout, and way more impressive. Perfect for those nights when guests show up unexpectedly or you just don’t feel like spending hours in the kitchen.
- Simple Ingredients: You probably have most of these in your pantry right now. Chicken thighs, olive oil, salt, pepper, garlic powder, paprika. That’s it. No fancy grocery trips, no obscure spices you’ll use once and forget about.
- Perfect for Parties: These chicken thighs are made for gatherings. They’re easy to scale up (just cook in batches), they stay crispy for a surprisingly long time, and they’re the kind of finger food that people gravitate toward. Trust me, your guests will thank you.
- Crowd-Pleaser: I’ve served these to kids, picky eaters, and serious foodies. Every single person has gone back for seconds. The combination of crispy skin and juicy meat is basically irresistible.
- Unbelievably Delicious: The texture is what gets people. That crackling skin, the tender meat underneath, the way the seasoning creates this savory crust that makes you want to eat just one more piece. It’s comfort food at its finest.
What makes this recipe different from all the other air fryer chicken recipes out there? It’s the technique. I’ve figured out the exact temperature and timing to get that perfect crunch without drying out the meat. I’ve also found the ideal seasoning blend that complements the natural richness of chicken thighs without overpowering it. This isn’t just another version—it’s the best version, honed through countless batches and feedback from friends, family, and neighbors. When you make these, you’re making the recipe I’ve perfected over years of hosting, potlucks, and dinner parties.
This recipe is the kind that makes you close your eyes after the first bite. It’s comfort food reimagined—healthier, faster, but with the same soul-soothing satisfaction. Perfect for impressing guests without stress, or turning a simple weeknight meal into something memorable. Honestly, it’s the recipe that made me believe in the power of the air fryer.
What Ingredients You Will Need
This recipe uses simple, wholesome ingredients to deliver bold flavor and satisfying texture without the fuss. Most of these are pantry staples, which means you can whip up a batch anytime the craving hits.
- Chicken Thighs (bone-in, skin-on): 6 pieces (about 2 pounds or 900g). Bone-in, skin-on thighs are the key to that perfect crispy skin and juicy meat. The bone helps keep the meat moist during cooking, and the skin renders beautifully in the air fryer. I recommend getting thighs from a trusted butcher or a brand like Bell & Evans for the best quality. Look for pieces that are roughly the same size for even cooking.
- Olive Oil: 2 tablespoons (30ml). Use a good quality extra virgin olive oil for the best flavor. The oil helps the seasoning stick to the chicken and promotes that golden-brown crispiness. You can also use avocado oil if you prefer a neutral flavor and higher smoke point.
- Salt: 1 teaspoon (5g). I prefer kosher salt for its clean taste and easy handling. Diamond Crystal is my go-to brand. The salt is crucial for drawing out moisture from the skin, which helps it get extra crispy.
- Black Pepper: 1/2 teaspoon (2g). Freshly ground is always best. It adds a subtle warmth that balances the other spices.
- Garlic Powder: 1 teaspoon (3g). Not garlic salt, garlic powder. It distributes evenly and adds that savory depth without the moisture of fresh garlic. I use McCormick or Simply Organic.
- Paprika: 1 teaspoon (3g). Smoked paprika adds a wonderful smoky flavor, but regular sweet paprika works too. If you want a bit of heat, try using hot paprika or adding a pinch of cayenne. I love using smoked Spanish paprika for that extra layer of complexity.
- Onion Powder: 1/2 teaspoon (2g). This adds a subtle sweetness and depth that rounds out the seasoning. Don’t skip it—it makes a difference.
- Dried Thyme: 1/2 teaspoon (1g). Thyme pairs beautifully with chicken and adds an herby note that cuts through the richness. You can use dried oregano or rosemary if that’s what you have.
- Optional – Cayenne Pepper: 1/4 teaspoon (0.5g). For those who like a little kick. Add more or less depending on your heat tolerance. I sometimes add a pinch to half the batch for a spicy version.
Substitution Guidance: If you’re feeding a crowd, you can easily double or triple this recipe. Just cook in batches to avoid overcrowding the air fryer basket. For a dairy-free option, this recipe is already dairy-free. If you need a lower-sodium version, reduce the salt to 1/2 teaspoon and use a salt-free seasoning blend. For a gluten-free option, this recipe is naturally gluten-free—just make sure your spices are certified gluten-free if you have celiac disease.
Ingredient Selection Tips: When buying chicken thighs, look for pieces that are plump and have a good amount of fat on the skin. The fat renders during cooking and contributes to that incredible crispiness. Avoid thighs that look watery or have a lot of liquid in the package—that’s a sign they’ve been processed with added water, which can affect texture. Also, try to get thighs that are roughly the same size so they cook evenly. If some are much larger than others, you may need to adjust cooking times.
Equipment Needed
You don’t need much for this recipe, which is part of its beauty. Here’s what you’ll need:
- Air Fryer: Any model will work, but I use a 5.8-quart Cosori and it’s been fantastic. The key is to not overcrowd the basket. If you have a smaller air fryer, just cook in batches. It’s worth the extra few minutes.
- Tongs: For flipping the chicken halfway through cooking. Silicone-tipped tongs are great because they won’t scratch the non-stick coating of your air fryer basket.
- Mixing Bowl: A medium-sized bowl for tossing the chicken with oil and seasonings. Glass or stainless steel works best.
- Paper Towels: For patting the chicken dry before seasoning. This step is crucial for achieving crispy skin, so don’t skip it.
- Instant-Read Thermometer: Optional but highly recommended. Chicken thighs are done when they reach an internal temperature of 165°F (74°C). A thermometer takes the guesswork out of cooking.
- Cutting Board: For resting the chicken after cooking. Letting it rest for a few minutes helps the juices redistribute.
- Serving Platter: For presenting your beautiful, crispy chicken thighs to your guests. A nice platter makes all the difference when you’re hosting.
Budget-Friendly Options: If you don’t have an air fryer, you can achieve similar results using a convection oven or a regular oven set to 425°F (220°C) with a wire rack placed over a baking sheet. The cooking time will be longer—about 25-30 minutes—and you may need to flip the chicken halfway through. I’ve done it this way and it still works, though the skin isn’t quite as crispy as the air fryer version. Also, if you’re new to air frying, you don’t need to spend a fortune on a fancy model. I started with a $40 air fryer from a discount store, and it worked perfectly for years.
Preparation Method
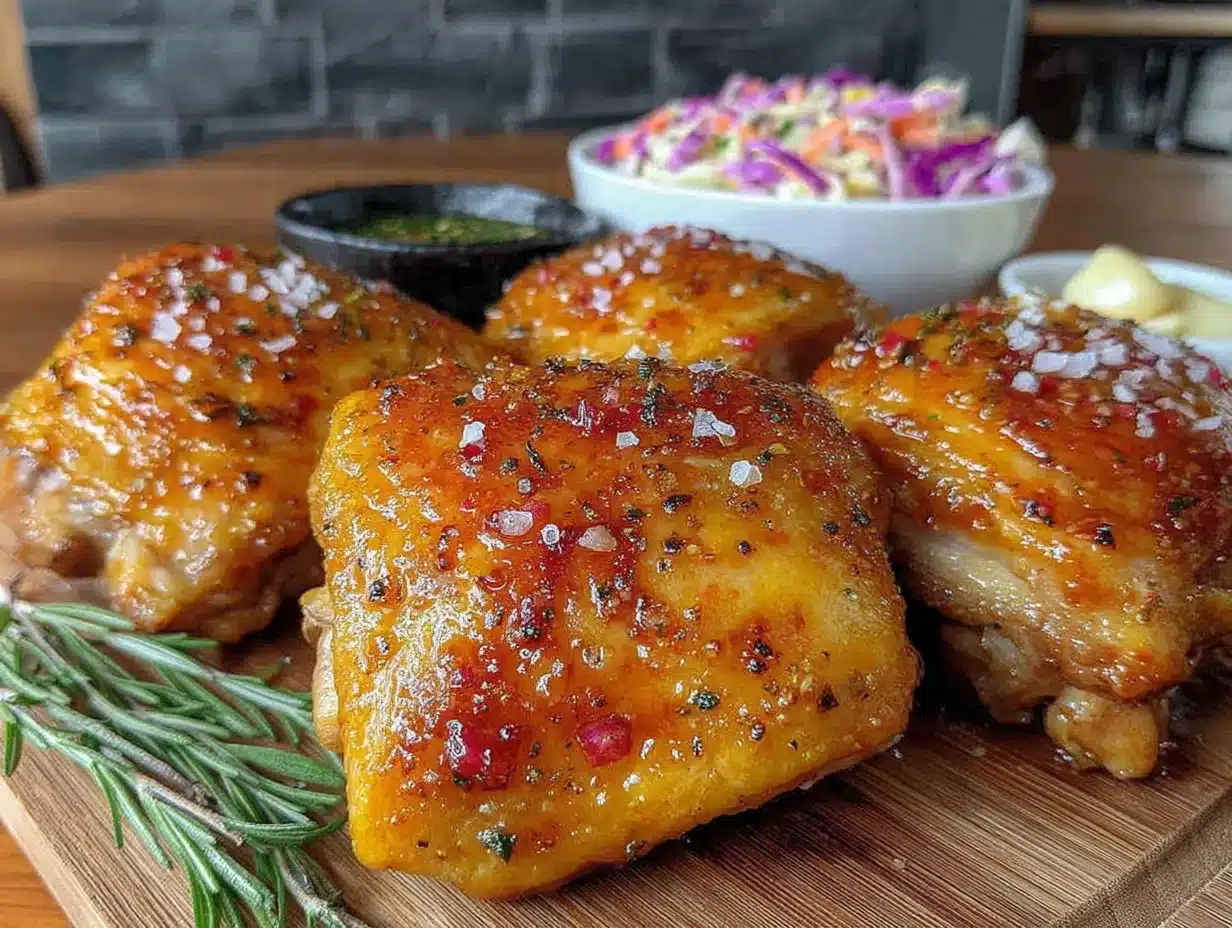
Follow these steps carefully, and you’ll have the crispiest, juiciest chicken thighs your guests have ever tasted. I’ve included sensory cues and troubleshooting tips to help you get perfect results every time.
- Prep the Chicken: Remove the chicken thighs from the refrigerator about 15 minutes before cooking. This helps them cook more evenly. Pat each thigh dry with paper towels—really get in there and absorb as much moisture as possible. The drier the skin, the crispier it will be. You should feel the skin become slightly tacky to the touch. If it feels slippery, you need more paper towels.
- Season the Chicken: In a medium mixing bowl, combine the olive oil, salt, black pepper, garlic powder, paprika, onion powder, dried thyme, and cayenne pepper if using. Mix well. Add the chicken thighs and toss until each piece is evenly coated. Use your hands to massage the seasoning into the skin—it’s the best way to ensure even coverage. The chicken should look generously coated, with the seasoning clinging to every surface.
- Preheat the Air Fryer: Preheat your air fryer to 400°F (200°C) for 3-5 minutes. Preheating is important because it creates an immediate blast of heat that helps the skin start crisping right away. If your air fryer doesn’t have a preheat function, just run it empty for 3 minutes at the cooking temperature.
- Arrange the Chicken: Place the chicken thighs in the air fryer basket in a single layer, skin-side down. Make sure they’re not touching—crowding the basket will trap steam and prevent crisping. If you need to cook in batches, that’s fine. The extra few minutes are worth it for that perfect texture. I usually fit 3-4 thighs in my 5.8-quart air fryer.
- Cook the First Side: Cook at 400°F (200°C) for 10 minutes. Don’t open the air fryer during this time—let the heat do its work. You should hear a gentle sizzling sound, which means the fat is rendering. If you don’t hear anything, your air fryer might not be hot enough, or the chicken might be too wet.
- Flip and Continue Cooking: After 10 minutes, carefully flip the chicken thighs using tongs. The skin should be starting to turn golden brown. Cook for another 8-10 minutes, or until the internal temperature reaches 165°F (74°C) when measured at the thickest part of the thigh (avoiding the bone). The skin should be deep golden brown and crispy to the touch. If you tap it with a fork, it should sound crackly.
- Rest the Chicken: Remove the chicken from the air fryer and transfer to a cutting board or serving platter. Let it rest for 5 minutes before serving. This allows the juices to redistribute throughout the meat, ensuring every bite is moist and flavorful. During this time, the skin will also crisp up even more as it cools slightly.
- Serve and Enjoy: Arrange the chicken thighs on a serving platter and watch them disappear. Garnish with fresh herbs like parsley or thyme if you’re feeling fancy, though honestly, they’re beautiful on their own. Serve warm or at room temperature—they’re delicious either way.
Pro Tip: If you’re making a large batch for a party, keep the cooked chicken warm in a 200°F (95°C) oven while you cook the remaining batches. Place them on a wire rack over a baking sheet so they don’t get soggy. They’ll stay crispy for up to 30 minutes this way.
Cooking Tips & Techniques
I’ve learned a lot through trial and error with this recipe. Here are my best tips for getting perfect results every time:
- Don’t Skip Drying the Chicken: This is the single most important step for crispy skin. Moisture is the enemy of crispiness. Pat those thighs dry until they feel almost tacky. I once skipped this step when I was in a rush, and the skin came out chewy and sad. Never again.
- Use a Meat Thermometer: Chicken thighs are forgiving, but they can still be overcooked. An instant-read thermometer takes the guesswork out of the process. Insert it into the thickest part of the thigh, avoiding the bone. 165°F (74°C) is the magic number. If you don’t have a thermometer, look for clear juices running from the meat and a firm texture when pressed.
- Don’t Overcrowd the Basket: This is another common mistake. If the chicken pieces are touching, they’ll steam instead of crisp. Leave at least 1/2 inch of space between each thigh. If you have a smaller air fryer, cook in batches. It’s worth the extra time.
- Let the Chicken Rest: I know it’s tempting to dig in right away, but resting is crucial. The juices need time to redistribute, and the skin needs a moment to set. Five minutes is all it takes, and the difference is noticeable.
- Season Generously: Chicken thighs can handle bold flavors. Don’t be shy with the seasoning. The skin is the best part, and it needs enough flavor to stand out. I’ve found that a heavy hand with the paprika and garlic powder makes all the difference.
- Preheat the Air Fryer: This is non-negotiable. A preheated air fryer creates that initial blast of heat that starts the crisping process immediately. Skipping preheating can result in soggy skin and uneven cooking.
- Use a Wire Rack for Holding: If you’re making a large batch, keep the cooked chicken on a wire rack over a baking sheet in a low oven. This prevents the bottom from getting soggy while you finish the rest. I learned this tip from a catering friend, and it’s a game-changer.
Common Mistakes to Avoid: One time, I forgot to flip the chicken halfway through cooking. The bottom was perfectly crispy, but the top was pale and soft. Always flip for even browning. Another time, I used skinless thighs because that’s what I had. They were still tasty, but they didn’t have that crackling texture that makes this recipe special. Stick with skin-on for the best results. And don’t be tempted to add too much oil—a little goes a long way, and excess oil can make the skin greasy instead of crispy.
Variations & Adaptations
This recipe is incredibly versatile. Here are some of my favorite variations:
- Spicy Buffalo Version: After cooking, toss the chicken thighs in your favorite buffalo sauce. Serve with ranch or blue cheese dressing for dipping. This is a huge hit at game day parties. I once brought these to a Super Bowl party, and they were gone before halftime.
- Honey Garlic Glaze: In the last 2 minutes of cooking, brush the chicken with a mixture of honey, soy sauce, and minced garlic. The glaze caramelizes beautifully and adds a sweet-savory finish. Be careful not to add it too early, or the sugar can burn.
- Herb and Lemon: Add the zest of one lemon and a tablespoon of fresh chopped rosemary or thyme to the seasoning mix. The bright citrus cuts through the richness of the chicken, and the herbs add a fresh, aromatic note. This version is perfect for spring and summer gatherings.
- Asian-Inspired: Swap the paprika and thyme for a mixture of soy sauce, ginger, garlic, and a touch of sesame oil. Marinate the chicken for 30 minutes before cooking, then pat dry and air fry as directed. The result is incredibly flavorful and pairs well with rice and steamed vegetables.
- Low-Carb/Keto-Friendly: This recipe is already low in carbs, but you can boost the fat content by adding a tablespoon of melted butter to the seasoning mix. It adds richness and helps the skin get even crispier. Serve with a side of roasted vegetables or a big green salad.
- Air Fryer Chicken Thighs with Vegetables: Add chopped vegetables like broccoli, bell peppers, or zucchini to the air fryer basket during the last 5 minutes of cooking. Toss them with a little oil and salt, and you’ve got a complete meal in one basket. Just make sure the vegetables are cut into even pieces so they cook uniformly.
Dietary Adaptations: For a dairy-free version, this recipe is already dairy-free. For a gluten-free version, it’s naturally gluten-free, but check your spice labels to be sure. For a lower-sodium version, reduce the salt to 1/2 teaspoon and use a salt-free seasoning blend. I’ve also made this with boneless, skinless thighs for a lighter option—just reduce the cooking time to 12-15 minutes total, flipping halfway through.
Serving & Storage Suggestions
These crispy air fryer chicken thighs are incredibly versatile when it comes to serving. Here’s how to make the most of them:
Serving Temperature: Serve warm or at room temperature. They’re delicious either way, which makes them perfect for parties and potlucks. If you’re serving them as part a buffet, they’ll stay crispy for about 30 minutes at room temperature. For a sit-down dinner, serve them straight from the air fryer for maximum crunch.
Presentation Tips: Arrange the chicken thighs on a large wooden board or platter. Garnish with fresh herbs like parsley, thyme, or rosemary for a pop of color. You can also sprinkle a little flaky sea salt over the top right before serving for an extra crunch and a touch of elegance. For a party, I like to serve them with small bowls of dipping sauces—ranch, honey mustard, and buffalo sauce are always popular.
Complementary Dishes: These chicken thighs pair beautifully with a wide range of sides. For a summer barbecue, serve them with coleslaw, corn on the cob, and baked beans. For a more formal dinner, try them with roasted potatoes, steamed green beans, and a simple arugula salad. They also work great as part of a larger spread—think mac and cheese, roasted vegetables, and crusty bread. If you’re hosting a party, consider serving them alongside my crispy garlic chicken for an impressive poultry duo.
Beverage Pairings: A crisp white wine like Sauvignon Blanc or a light beer like a pilsner pairs beautifully with the savory, crispy chicken. For non-alcoholic options, try iced tea with lemon or a sparkling water with a splash of cranberry juice.
Storage Instructions: Store leftover chicken thighs in an airtight container in the refrigerator for up to 4 days. The skin will lose some of its crispiness, but the meat will still be delicious. To reheat, place the chicken in the air fryer at 375°F (190°C) for 3-4 minutes, or until heated through and the skin is crispy again. You can also reheat in a 400°F (200°C) oven for 5-7 minutes. Avoid microwaving, as it will make the skin rubbery.
Freezing Instructions: These chicken thighs freeze beautifully. Let them cool completely, then place them in a single layer on a baking sheet and freeze for 1-2 hours. Once frozen, transfer to a freezer-safe bag or container. They’ll keep for up to 3 months. To reheat, place them directly from the freezer into the air fryer at 375°F (190°C) for 8-10 minutes, or until heated through and crispy. I’ve done this multiple times, and they taste just as good as fresh.
Flavor Development: Interestingly, these chicken thighs taste even better the next day. The flavors have time to meld and deepen, and the meat becomes even more tender. If you’re planning ahead, you can cook them a day in advance and reheat them just before serving. Your guests will never know they weren’t made fresh.
Nutritional Information & Benefits
Here’s the estimated nutritional information for one serving (one chicken thigh):
| Nutrient | Amount |
|---|---|
| Calories | 285 |
| Protein | 22g |
| Fat | 21g |
| Saturated Fat | 6g |
| Carbohydrates | 1g |
| Fiber | 0g |
| Sugar | 0g |
| Sodium | 450mg |
Health Benefits: Chicken thighs are a great source of high-quality protein, which is essential for muscle repair and growth. They also contain important vitamins and minerals, including B vitamins (especially niacin and B6), selenium, and phosphorus. The skin provides healthy fats that help keep you satisfied. Plus, using an air fryer significantly reduces the amount of oil needed compared to traditional frying, making this a healthier option for satisfying that crispy chicken craving.
Dietary Considerations: This recipe is naturally low-carb, keto-friendly, gluten-free, and dairy-free. It’s also suitable for paleo and whole30 diets. If you’re watching your sodium intake, you can reduce the salt to 1/2 teaspoon. For those with specific dietary needs, this recipe is incredibly adaptable—just adjust the seasoning to suit your preferences.
Personal Wellness Perspective: I love that this recipe lets me enjoy crispy, flavorful chicken without the guilt of deep frying. It’s a reminder that eating well doesn’t mean sacrificing taste. Whether I’m hosting a party or just making a quick weeknight dinner, these chicken thighs make me feel good about what I’m eating. And honestly, when something this delicious is also this good for you, it’s a win-win.
Conclusion
These crispy air fryer chicken thighs have become my go-to recipe for every gathering, and I think they’ll become yours too. They’re quick, easy, and incredibly impressive—the kind of dish that makes people ask for the recipe before they’ve even finished eating. Whether you’re hosting a dinner party, bringing a dish to a potluck, or just looking for a simple weeknight dinner, these chicken thighs deliver every time.
What I love most about this recipe is how adaptable it is. You can keep it simple with the basic seasoning, or you can experiment with different flavors and glazes. It’s a recipe that grows with you, that you can make your own. And honestly, that’s the best kind of recipe to have in your back pocket.
So go ahead—give these crispy air fryer chicken thighs a try. I promise you won’t be disappointed. And when your guests start asking for the recipe (because they will), just smile and tell them it’s your little secret. Or better yet, send them the link to this post. That’s what I do!
Have you tried this recipe? I’d love to hear how it turned out! Leave a comment below and let me know what variations you tried, what you served alongside, or just how quickly they disappeared. And if you’re looking for more party-perfect recipes, check out my easy appetizer recipes for more crowd-pleasing ideas. Happy cooking!
Frequently Asked Questions
Can I use boneless, skinless chicken thighs for this recipe?
Yes, you can, but the results will be different. Boneless, skinless thighs cook faster (about 12-15 minutes total) and won’t have that crispy skin that makes this recipe so special. They’ll still be tasty, just not as crispy. If you’re in a pinch, go for it, but for the best results, stick with bone-in, skin-on thighs.
How do I prevent the chicken from sticking to the air fryer basket?
Make sure your air fryer basket is clean and lightly coated with oil. I like to spray it with a little avocado oil spray before adding the chicken. Also, don’t move the chicken around too much during cooking—let it develop a crust before flipping. If you’re still having sticking issues, try using parchment paper liners made for air fryers, but make sure they don’t block the air circulation.
Can I make this recipe in advance for a party?
Absolutely! You can cook the chicken thighs up to 24 hours in advance. Let them cool completely, then store them in an airtight container in the refrigerator. When you’re ready to serve, reheat them in the air fryer at 375°F (190°C) for 3-4 minutes, or until heated through and crispy. They’ll taste just as good as fresh, and you’ll save yourself time on the day of the party.
What if I don’t have an air fryer?
No problem! You can achieve similar results using a convection oven or a regular oven set to 425°F (220°C). Place the chicken thighs on a wire rack over a baking sheet to allow air to circulate. Bake for 25-30 minutes, flipping halfway through, or until the internal temperature reaches 165°F (74°C). The skin won’t be quite as crispy as the air fryer version, but it’ll still be delicious.
How do I get the skin extra crispy?
The key to extra crispy skin is making sure the chicken is as dry as possible before seasoning. Pat it thoroughly with paper towels, and if you have time, let it sit uncovered in the refrigerator for an hour or two before cooking. This helps dry out the skin even more. Also, don’t skip the preheating step, and make sure you’re cooking at a high enough temperature (400°F/200°C). Finally, a light coating of baking powder mixed into the seasoning can help boost crispiness—just use about 1/2 teaspoon.
Pin This Recipe!

Crispy Air Fryer Chicken Thighs: Easy 20-Minute Party Recipe

Crispy, juicy air fryer chicken thighs with a perfect golden crust, ready in under 20 minutes. An easy, crowd-pleasing party recipe that’s simple to make with pantry staples.
- Prep Time: 5 minutes
- Cook Time: 18-20 minutes
- Total Time: 23-25 minutes
- Yield: 6 servings 1x
- Category: Main Course
- Cuisine: American
Ingredients
- 6 bone-in, skin-on chicken thighs (about 2 pounds or 900g)
- 2 tablespoons (30ml) olive oil
- 1 teaspoon (5g) kosher salt
- 1/2 teaspoon (2g) black pepper, freshly ground
- 1 teaspoon (3g) garlic powder
- 1 teaspoon (3g) paprika (smoked or sweet)
- 1/2 teaspoon (2g) onion powder
- 1/2 teaspoon (1g) dried thyme
- 1/4 teaspoon (0.5g) cayenne pepper (optional)
Instructions
- Remove chicken thighs from refrigerator about 15 minutes before cooking. Pat each thigh dry thoroughly with paper towels until skin feels tacky.
- In a medium mixing bowl, combine olive oil, salt, black pepper, garlic powder, paprika, onion powder, dried thyme, and cayenne pepper (if using). Mix well.
- Add chicken thighs to the bowl and toss until each piece is evenly coated. Use hands to massage seasoning into the skin.
- Preheat air fryer to 400°F (200°C) for 3-5 minutes.
- Place chicken thighs in the air fryer basket in a single layer, skin-side down, ensuring they are not touching. Cook in batches if necessary.
- Cook at 400°F (200°C) for 10 minutes without opening the air fryer.
- After 10 minutes, carefully flip chicken thighs using tongs. Cook for another 8-10 minutes, or until internal temperature reaches 165°F (74°C) at the thickest part (avoiding bone). Skin should be deep golden brown and crispy.
- Remove chicken from air fryer and transfer to a cutting board or serving platter. Let rest for 5 minutes before serving.
- Arrange on a serving platter and serve warm or at room temperature. Garnish with fresh herbs if desired.
Notes
For extra crispy skin, pat chicken very dry and consider letting it sit uncovered in the refrigerator for 1-2 hours before cooking. To keep cooked chicken warm while making batches, place on a wire rack over a baking sheet in a 200°F (95°C) oven for up to 30 minutes. Leftovers can be stored in an airtight container in the refrigerator for up to 4 days; reheat in air fryer at 375°F (190°C) for 3-4 minutes. Freeze cooled chicken in a single layer, then transfer to a freezer bag for up to 3 months; reheat from frozen at 375°F (190°C) for 8-10 minutes.
Nutrition
- Serving Size: 1 chicken thigh
- Calories: 285
- Sodium: 450
- Fat: 21
- Saturated Fat: 6
- Carbohydrates: 1
- Protein: 22
Keywords: air fryer chicken thighs, crispy chicken thighs, easy chicken recipe, party chicken, quick chicken dinner, bone-in chicken thighs, air fryer recipe


