Love this? Save it for later!
Share the inspiration with your friends
Last October, I walked into my kitchen at 9 PM on a Tuesday with a bag of marshmallows in one hand and a haunted look in my eyes. My daughter’s school Halloween party was the next morning, and I had promised “something homemade and cute” — words that haunt every parent who works full-time. The party sign-up sheet had glared at me for two weeks, and now the deadline was breathing down my neck. I stared at the pantry like it held the answers to the universe: rice cereal, butter, vanilla extract, and a bag of white chocolate chips I’d bought for a recipe I never made. That’s when it hit me — ghost-shaped rice cereal treats. No baking, no fancy molds, just my hands, some melted marshmallow, and a prayer that I wouldn’t burn the butter. Honestly, I was so tired I almost ordered cupcakes from the grocery store. But something in me said, “You’ve got this.” An hour later, I had a dozen little ghost-shaped treats cooling on parchment paper, and I felt like a kitchen wizard.
These Easy Halloween Rice Krispie Ghost Treats became my secret weapon that year. They were so simple that I actually made them again for the neighborhood costume party, and then again for my son’s classroom. The best part? You don’t need a ghost cookie cutter — just a little creativity and steady hands. I mean, if I can shape these after a long workday, you absolutely can too. Maybe you’ve been there — staring down a holiday event with zero time and a list of Pinterest recipes that require three hours and a pastry bag. Let me tell you, this recipe is your rescue. It’s the kind of thing that makes you look like a holiday hero when really, you just melted marshmallows and got lucky with the shapes.
These ghost treats have a special place in my heart because they proved that homemade doesn’t have to mean complicated. The first batch I made was a little uneven — some ghosts were chunky, some were lopsided, one looked suspiciously like a potato — but the kids devoured them anyway. That’s the magic of this recipe. It’s forgiving, it’s fast, and it brings that pure, sticky joy that only Rice Krispie treats can deliver. Every year since, these ghosts have shown up on my Halloween table, and they never last long. So grab your marshmallows and let’s make some ghosts that actually taste good.
Why You’ll Love This Recipe
Let me tell you why these ghost treats have earned permanent status in my Halloween rotation. I’ve tested this recipe through three different batches — one where I used generic cereal (don’t), one where I added too much vanilla (soggy mess), and one that came out absolutely perfect. So trust me when I say this version is the one.
- Quick & Easy: From start to finish, you’re looking at about 20 minutes of active work. The hardest part is waiting for them to cool. Perfect for those “I forgot the school party is tomorrow” moments.
- Simple Ingredients: You probably have everything in your pantry right now. Butter, marshmallows, Rice Krispies cereal, vanilla extract, and white chocolate chips. No special Halloween shopping required.
- Perfect for Halloween: These are great for classroom parties, trick-or-treat gatherings, or just making your kitchen feel festive. They’re also fantastic for Halloween movie nights.
- Crowd-Pleaser: I’ve watched kids grab these over store-bought candy. There’s something about the homemade factor that makes them irresistible. Adults love them too — they’re nostalgic with a spooky twist.
- Unbelievably Delicious: The combination of buttery marshmallow, crispy cereal, and creamy white chocolate is comfort food at its finest. The texture is soft, chewy, and just a little bit crunchy.
What makes this recipe different from the dozens of other Halloween treat recipes out there? It’s the shaping technique. Instead of using cookie cutters (which can be messy with sticky cereal mixture), I’ll show you how to shape the ghosts by hand using a simple plastic wrap method. No special equipment, no wasted cereal, and no frustration. Plus, the white chocolate dip gives them that ghostly white finish that looks professional without any effort. This isn’t just another version of Rice Krispie treats — it’s the easiest, most forgiving, and most adorable version you’ll ever make.
Honestly, this recipe is the kind that makes you close your eyes after the first bite. It’s comfort food reimagined for Halloween — faster, simpler, but with the same soul-soothing satisfaction. Perfect for impressing the PTA without stress, or turning a Tuesday night into something memorable.
What Ingredients You Will Need
This recipe uses simple, pantry-friendly ingredients to create something that looks like it took hours. Here’s what you’ll need and why each ingredient matters.
For the Rice Krispie Base
- 6 cups Rice Krispies cereal (or any crisp rice cereal — I recommend the name brand for best texture; generic brands can be too dense)
- 4 tablespoons unsalted butter (salted butter works too, just reduce any added salt. I use Land O’Lakes for consistent results)
- 1 package (10 oz) marshmallows (standard size, not mini — mini marshmallows melt faster but can be harder to measure by weight)
- 1 teaspoon vanilla extract (pure vanilla extract gives the best flavor — imitation works but the taste is noticeably different)
- Pinch of salt (optional, but it balances the sweetness beautifully)
For the Ghost Decorating
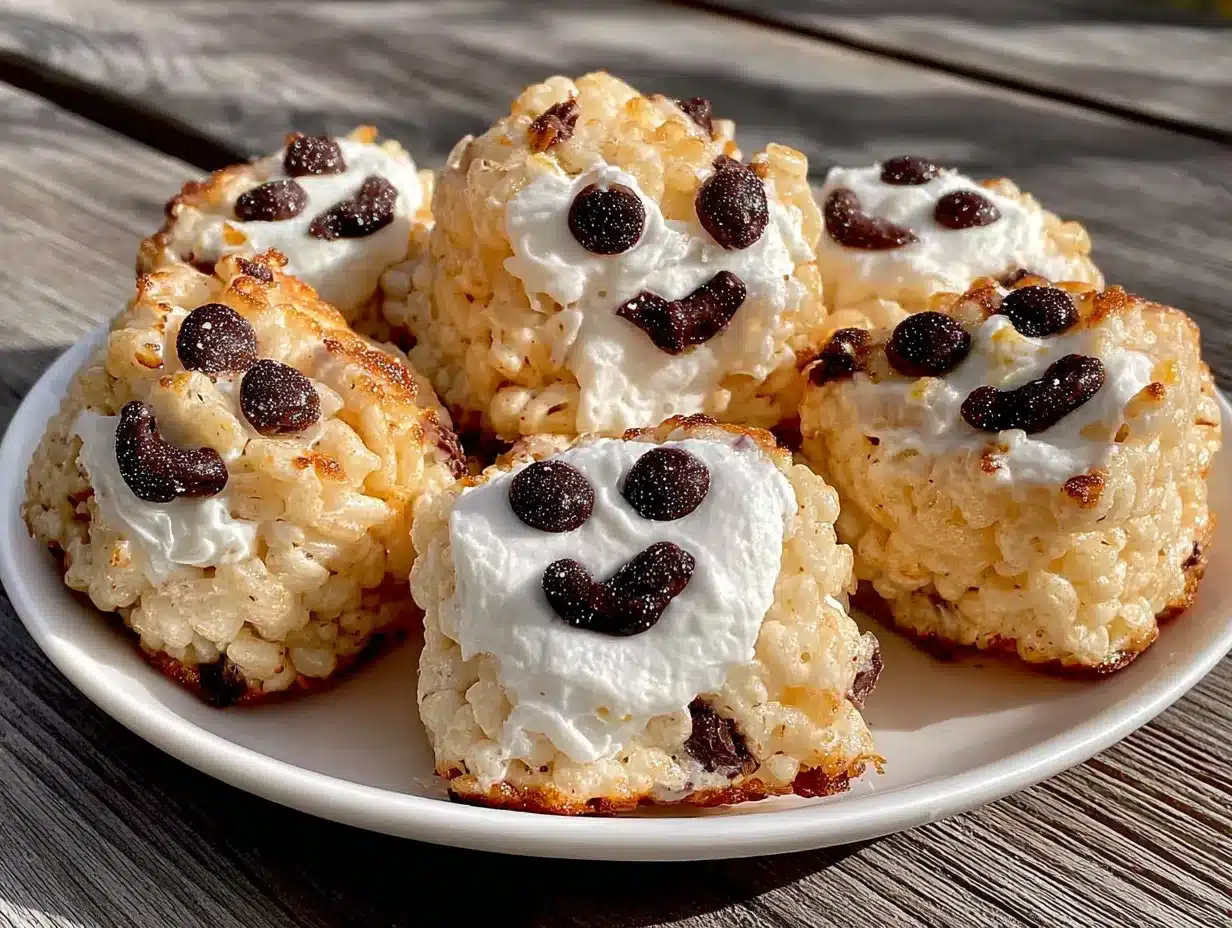
- 1 cup white chocolate chips (use good quality like Ghirardelli or Guittard — they melt smoother and taste better)
- 1 teaspoon coconut oil or vegetable shortening (this helps the white chocolate melt smoothly and gives it a nice shine. Coconut oil adds a subtle flavor I love)
- Black decorating gel or mini chocolate chips (for the ghost faces. I prefer decorating gel because it’s easier to control, but mini chips give a cute textured look)
- Parchment paper or silicone baking mat (for easy cleanup and preventing sticking)
Ingredient Selection Tips
When buying marshmallows, look for fresh ones — stale marshmallows won’t melt as smoothly and can make the treats grainy. I always check the expiration date at the store. For the cereal, the original Rice Krispies brand has that perfect snap that holds up to the marshmallow mixture. Store brands tend to get soggy faster. If you’re using white chocolate chips, avoid white melting wafers or candy melts — they have a waxy texture that doesn’t taste as good. Real white chocolate chips have cocoa butter and cream, which gives that rich, creamy flavor.
Substitutions
If you need a dairy-free version, use vegan butter and dairy-free white chocolate chips. For a gluten-free option, Rice Krispies are naturally gluten-free (check the label to be sure). You can also use brown rice cereal for a slightly nuttier flavor. If you don’t have white chocolate, you can skip the dip entirely and just add faces directly to the marshmallow treats — they’ll still look cute.
Equipment Needed
You don’t need fancy equipment for these ghost treats, which is part of why I love this recipe so much. Here’s what you’ll need:
- Large pot or saucepan (at least 4-quart capacity — you need room to stir everything together)
- Wooden spoon or silicone spatula (silicone is better because it doesn’t stick to the melted marshmallow)
- Large mixing bowl (for holding the cereal before mixing)
- 9×13 inch baking pan (for setting the treats before cutting — optional if you’re shaping by hand)
- Parchment paper (trust me, this is non-negotiable for easy cleanup)
- Plastic wrap (for shaping the ghosts without getting sticky hands)
- Small microwave-safe bowl (for melting the white chocolate)
- Piping bag or small zip-top bag (for the decorating gel or melted chocolate)
- Sharp knife or bench scraper (if you’re cutting squares instead of hand-shaping)
If you don’t have a microwave, you can melt the white chocolate in a double boiler on the stove. I’ve done it both ways, and honestly, the microwave is faster with less cleanup. Just use short bursts and stir often. For the shaping, I’ve used everything from a cookie scoop to my bare hands (lotion-free and buttered, of course). The plastic wrap method I’ll show you is by far the least messy approach I’ve found.
Preparation Method
Let me walk you through this step by step. I’ve made these treats so many times that I could do it in my sleep — and I almost have, honestly.
- Prepare your workspace. Line your 9×13 inch pan with parchment paper, leaving some overhang on the sides. This makes lifting the treats out so much easier. Lightly grease the parchment with butter or cooking spray. Set aside.
- Melt the butter. In your large pot, melt the 4 tablespoons of butter over medium-low heat. Don’t rush this step — if the butter burns, the whole batch will taste bitter. I learned this the hard way when I tried to multitask and scrolled through Instagram while the butter turned brown. Swirl the pan occasionally until the butter is fully melted and just starting to bubble.
- Add the marshmallows. Pour the entire bag of marshmallows into the melted butter. Stir constantly with your silicone spatula. The marshmallows will start to puff up and then collapse into a gooey mass. Keep stirring until they’re completely melted and smooth — about 3-4 minutes. The mixture should be glossy and stretchy.
- Add vanilla and salt. Remove the pot from the heat. Stir in the vanilla extract and a pinch of salt. The vanilla will sizzle a bit — that’s normal. Stir until everything is combined. The mixture should smell like butter and vanilla, not burnt sugar. If it smells too sweet, you’ve used too much vanilla. If it smells like caramel, your butter was too hot.
- Add the cereal. Pour the 6 cups of Rice Krispies into the pot. Fold the cereal into the marshmallow mixture gently but thoroughly. Use a folding motion — don’t stir too aggressively or you’ll crush the cereal. You want every piece coated but still intact. This takes about 2 minutes of patient folding. The mixture will be warm and sticky, and you’ll be tempted to use your hands — resist for now.
- Transfer to the pan. Scrape the mixture into your prepared pan. Use a piece of parchment paper or a greased spatula to press it down evenly. Don’t press too hard — you want the treats to be firm but not compressed. If you press too much, they’ll be hard instead of soft and chewy. Let them cool in the pan for about 10 minutes, or until they’re firm enough to handle but still warm.
- Shape the ghosts. Here’s the fun part. Tear off a sheet of plastic wrap and lightly grease it with butter or cooking spray. Grab a handful of the warm cereal mixture — about the size of a golf ball for a small ghost or a tennis ball for a larger one. Using the plastic wrap, shape the mixture into a rounded dome for the ghost body. Pinch one end to create a slight tail or point — that’s the bottom of the ghost. You want them to look organic, not perfect. If they look a little lumpy, that’s actually better — ghosts aren’t supposed to be symmetrical, right?
- Cool completely. Place the shaped ghosts on a parchment-lined baking sheet. Let them cool completely — about 20-30 minutes at room temperature, or 10 minutes in the fridge if you’re impatient. They need to be fully set before you add the white chocolate coating, or the chocolate will slide right off.
- Melt the white chocolate. Place the white chocolate chips and coconut oil in a microwave-safe bowl. Microwave in 20-second bursts, stirring after each burst. White chocolate burns easily, so don’t walk away. It usually takes 60-90 seconds total. The mixture should be smooth and pourable. If it’s too thick, add another 1/2 teaspoon of coconut oil.
- Dip the ghosts. Hold each cooled ghost by its base and dip the top half into the melted white chocolate. Let the excess drip off back into the bowl. Place the dipped ghost back on the parchment paper. Work quickly — the white chocolate will start to set as it cools. If it gets too thick, reheat it in the microwave for 10 seconds.
- Add the faces. While the white chocolate is still wet, add the ghost faces. Use black decorating gel to pipe two eyes and a small mouth. If you’re using mini chocolate chips, gently press them into the wet chocolate. You can make them happy, spooky, or silly — my daughter always makes one ghost with a surprised “O” mouth, and it cracks me up every time.
- Let them set. Allow the white chocolate to fully set — about 15 minutes at room temperature or 5 minutes in the fridge. The chocolate should be firm to the touch. Once set, your ghost treats are ready to serve!
Cooking Tips & Techniques
After making these treats more times than I can count, I’ve collected a few tricks that make the process smoother and the results better. Let me share what I’ve learned through trial and error.
Keep everything greased. This is the golden rule of Rice Krispie treats. Grease your spatula, your hands (if you’re shaping without plastic wrap), your pan, and your plastic wrap. The marshmallow mixture sticks to everything, and nothing ruins a batch faster than fighting with sticky tools. I keep a small bowl of melted butter nearby and dip my utensils in it as I work.
Work quickly but carefully. The marshmallow mixture starts to set as it cools, so you need to shape the ghosts while the mixture is still warm and pliable. But don’t rush so much that you burn your hands — the mixture is hot right after mixing. Let it cool for 5-10 minutes in the pan before handling. I’ve definitely made the mistake of grabbing it too soon and ended up with sticky, painful fingers.
Don’t overmix the cereal. When you fold the cereal into the marshmallow, stop as soon as everything is coated. Overmixing crushes the cereal and makes the treats dense and hard. You want those little crispy pockets throughout. I count my folds — about 15-20 gentle folds is usually perfect.
Test the white chocolate consistency. Before dipping all your ghosts, test one first. The white chocolate should be thin enough to coat the ghost smoothly but thick enough that it doesn’t run off completely. If it’s too thick, add more coconut oil. If it’s too thin, let it cool for a minute to thicken up. I learned this after my first batch had ghosts that looked like they were melting in the sun.
Use the freezer for quick setting. If you’re in a hurry (and let’s face it, who isn’t during Halloween season?), pop the dipped ghosts in the freezer for 5 minutes. The white chocolate sets perfectly and you can serve them immediately. Just don’t leave them in there too long, or condensation will form when you take them out.
Common mistake to avoid: Adding the faces too late. If you wait until the white chocolate is already set, the decorating gel won’t stick properly and the chocolate chips will just fall off. Add the faces while the chocolate is still wet — within 30 seconds of dipping. I’ve had ghosts that looked like they were crying because the chocolate chips slid down the side. Not cute.
Variations & Adaptations
One of the best things about this recipe is how easily it adapts to different tastes, dietary needs, and occasions. Here are some variations I’ve tried and loved.
Spooky Spider Variation
Instead of ghosts, shape the treats into round balls. After dipping in white chocolate, add eight pretzel stick legs (break them in half for shorter legs) and two candy eyes. My son loves these because they’re “scary but tasty.” You can also use black licorice strings for a more realistic spider look.
Pumpkin Patch Variation
Skip the white chocolate dip entirely. Shape the treats into small pumpkins by rolling them into balls and then pressing a slight indent on top with your finger. Use orange food coloring in the marshmallow mixture before adding the cereal. Add a small green candy or a piece of green licorice as the stem. These are perfect for non-spooky Halloween parties.
Gluten-Free Version
Rice Krispies are naturally gluten-free, but check the label to ensure they’re certified gluten-free. Some brands use malt flavoring that contains gluten. Use certified gluten-free marshmallows (most are, but check). For the white chocolate, look for gluten-free varieties. I’ve made this version for friends with celiac disease, and they couldn’t tell the difference.
Vegan Adaptation
Use vegan butter (I like Miyoko’s or Earth Balance) and vegan marshmallows (Dandies brand works beautifully). For the white chocolate, use a dairy-free white chocolate bar or chips. The texture is slightly different — a bit softer — but the taste is still amazing. I tested this version for a vegan potluck and it was gone in 10 minutes.
Flavor Twists
Add a few drops of peppermint extract along with the vanilla for a minty ghost that tastes like a Thin Mint. Or try orange extract for a creamsicle vibe. I once added a teaspoon of pumpkin pie spice to the marshmallow mixture and called them “Pumpkin Spice Ghosts” — they were a huge hit at my book club meeting.
No-Bake Alternative
If you don’t want to use the stove at all, you can melt the butter and marshmallows in the microwave. Use a large microwave-safe bowl, microwave the butter for 30 seconds, add the marshmallows, and microwave in 30-second bursts until melted. Stir in between each burst. Then proceed with the recipe as written. This method is slightly faster but requires more careful attention to avoid scorching.
Serving & Storage Suggestions
These ghost treats are best served at room temperature, but they’re also delicious straight from the fridge if you like a firmer texture. I usually arrange them on a platter lined with black or orange tissue paper for a festive look. For Halloween parties, I place them on a cake stand with some fake spider webs around the base — it looks spooky and cute at the same time.
Complementary dishes: These treats pair wonderfully with warm apple cider, hot chocolate, or a pumpkin spice latte. For a dessert table, serve them alongside caramel apples, pumpkin cookies, or chocolate-dipped pretzels. They also make great favors — wrap each ghost in a small cellophane bag tied with orange ribbon.
Storage instructions: Store the ghost treats in an airtight container at room temperature for up to 5 days. Layer them between sheets of parchment paper to prevent sticking. Do not refrigerate them for long-term storage — the refrigerator can make them hard and dry. If you live in a humid climate, add a piece of bread to the container to absorb excess moisture (replace the bread every day).
Freezer instructions: These treats freeze beautifully! Place them in a single layer on a baking sheet and freeze until solid (about 1 hour). Transfer to a freezer-safe container or zip-top bag, separating layers with parchment paper. They’ll keep for up to 3 months. To thaw, leave them at room temperature for about 30 minutes. The texture will be slightly softer than fresh, but still delicious.
Reheating tips: If your treats have been stored for a few days and seem a bit dry, microwave them for 5-10 seconds. This softens them right up. Be careful not to overheat or the white chocolate will melt and make a mess. I’ve definitely had a ghost that looked like it melted into a puddle after 15 seconds too long in the microwave.
Flavor development: These treats are actually best the day after you make them. The flavors meld together overnight, and the texture becomes perfectly chewy. If you can resist eating them all on day one, you’re in for a treat on day two. The white chocolate also sets more firmly overnight, making the ghosts look even more polished.
Nutritional Information & Benefits
Let’s be honest — these are a treat, not a health food. But here’s the nutritional breakdown per ghost (based on 12 servings) so you can enjoy them mindfully.
| Nutrient | Amount Per Serving |
|---|---|
| Calories | 185 |
| Total Fat | 8g |
| Saturated Fat | 5g |
| Carbohydrates | 28g |
| Sugar | 16g |
| Protein | 2g |
| Sodium | 135mg |
Health highlights: Rice Krispies are fortified with iron and B vitamins, so there’s a tiny nutritional boost hidden in all that sweetness. Marshmallows contain gelatin, which provides collagen — though you’d need to eat a lot of ghosts to get any real benefit. The butter adds a small amount of vitamin A. Honestly, the biggest benefit here is the joy factor — these treats bring smiles to faces, and that counts for something.
Dietary considerations: This recipe contains dairy (butter, white chocolate) and gluten (check your cereal). For allergen-free versions, see the variations section above. If you’re watching your sugar intake, consider making smaller ghosts (using a tablespoon scoop instead of a handful). The treats are not suitable for vegans unless modified, and they contain no nuts unless you add them.
My personal perspective: I believe in balance. These treats are for celebrations, not everyday snacking. When I make them for Halloween, I enjoy two or three and then share the rest. They’re a reminder that food can be fun, festive, and purely indulgent without guilt. Life is short — eat the ghost-shaped marshmallow treat.
Conclusion
These Easy Halloween Rice Krispie Ghost Treats have saved me more times than I can count — from last-minute school parties to surprise Halloween gatherings. They’re proof that you don’t need fancy skills or expensive equipment to create something that looks impressive and tastes amazing. The combination of buttery marshmallow, crispy cereal, and creamy white chocolate is pure comfort, and the ghost shapes add that festive touch that makes Halloween special.
I hope you’ll try making these with your family. Let the kids help shape the ghosts — their imperfect, lopsided creations will be the ones you remember most. My daughter’s first ghost looked more like a blob with eyes, but she was so proud of it that we kept it on the counter for a week. That’s the kind of memory these treats create.
If you make these ghost treats, I’d love to hear about it. Drop a comment below and tell me how your ghosts turned out — did they look spooky or silly? Did your kids help? Did you try any of the variations? Share your photos on Pinterest and tag me so I can see your creations. And if you have a favorite Halloween tradition involving food, tell me about that too. I’m always looking for new ideas to try.
Now go make some ghosts. Your kitchen is about to get deliciously spooky.
Frequently Asked Questions
Can I use marshmallow fluff instead of marshmallows?
I don’t recommend it. Marshmallow fluff has a different consistency — it’s more aerated and contains corn syrup and stabilizers that change the texture of the treats. The treats will be softer and less structured, making them harder to shape into ghosts. Stick with regular marshmallows for the best results.
How do I keep the treats from sticking to my hands when shaping?
Use the plastic wrap method I described in the instructions — it’s a game-changer. If you prefer shaping with your hands, generously grease them with butter or cooking spray. Keep a small bowl of melted butter nearby and reapply as needed. Also, make sure the mixture has cooled enough to handle (about 10 minutes in the pan) but is still warm enough to be pliable.
Can I make these treats ahead of time?
Absolutely! You can make the full recipe (including the white chocolate dip and faces) up to 3 days in advance. Store them in an airtight container at room temperature. If you want to prep even further, make the base treats without the white chocolate, freeze them for up to 3 months, then thaw and add the white chocolate and faces the day you need them.
My white chocolate seized up and became lumpy. What went wrong?
White chocolate is sensitive to heat and moisture. If even a drop of water gets into the melting chocolate, it can seize and become grainy. Make sure your bowl and utensils are completely dry. Also, don’t overheat the chocolate — use short microwave bursts and stir frequently. If it does seize, you can try adding a teaspoon of coconut oil or vegetable shortening and stirring vigorously, but sometimes it’s better to start fresh.
Can I use food coloring to make colored ghosts?
Yes! For colored ghosts, add food coloring to the marshmallow mixture before adding the cereal. Gel food coloring works best because it doesn’t add extra liquid. Purple ghosts, green ghosts, or even rainbow ghosts are fun for Halloween. Just keep in mind that the white chocolate dip will cover most of the color, so you’ll only see the color on the bottom half of the ghost. For fully colored ghosts, skip the white chocolate dip and use colored candy melts instead.
Pin This Recipe!
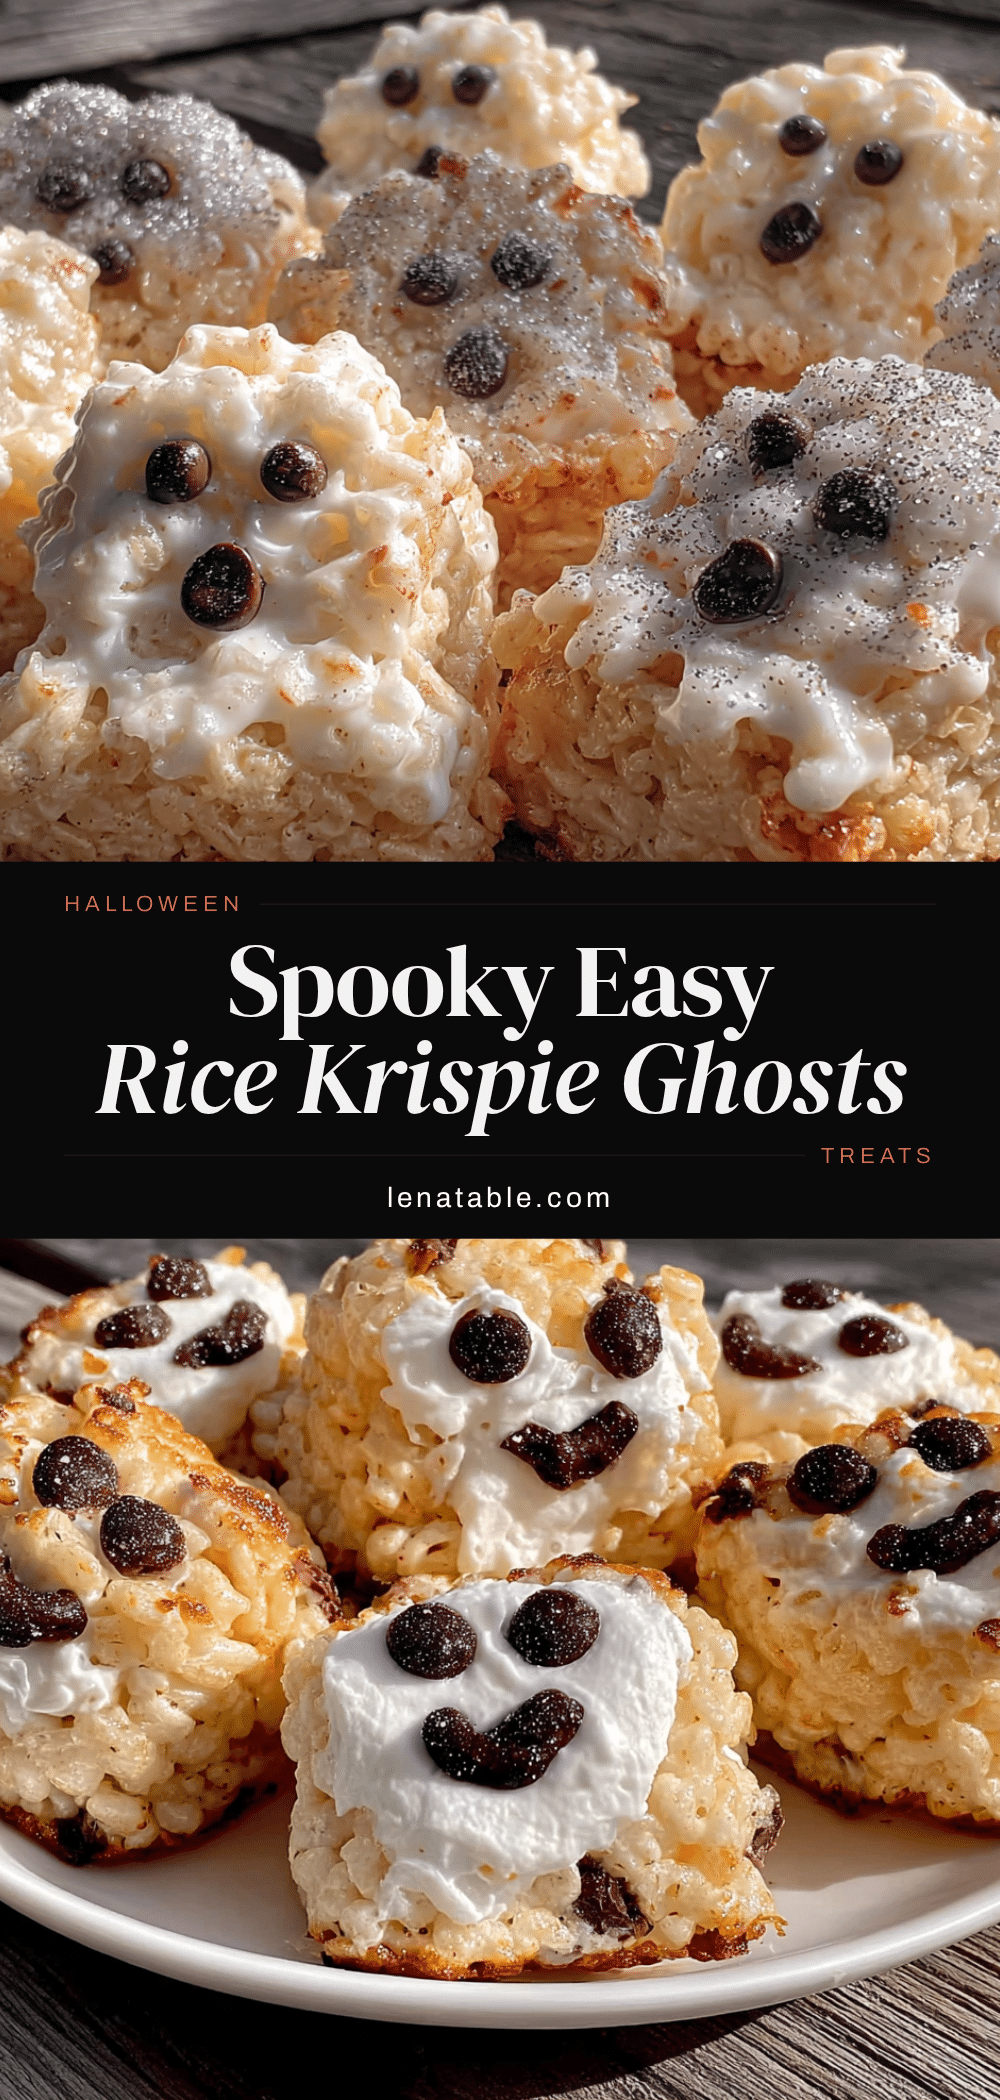
Easy Halloween Ghost Rice Krispie Treats Recipe
These no-bake ghost-shaped Rice Krispie treats are dipped in white chocolate and decorated with cute faces. Made with simple pantry ingredients, they’re perfect for last-minute Halloween parties, classroom celebrations, or spooky movie nights.
- Prep Time: 20 minutes
- Cook Time: 10 minutes
- Total Time: 30 minutes
- Yield: 12 servings 1x
- Category: Dessert
- Cuisine: American
Ingredients
- 6 cups Rice Krispies cereal
- 4 tablespoons unsalted butter
- 1 package (10 oz) marshmallows
- 1 teaspoon vanilla extract
- Pinch of salt
- 1 cup white chocolate chips
- 1 teaspoon coconut oil or vegetable shortening
- Black decorating gel or mini chocolate chips
- Parchment paper or silicone baking mat
Instructions
- Prepare your workspace. Line your 9×13 inch pan with parchment paper, leaving some overhang on the sides. Lightly grease the parchment with butter or cooking spray. Set aside.
- Melt the butter. In your large pot, melt the 4 tablespoons of butter over medium-low heat. Swirl the pan occasionally until the butter is fully melted and just starting to bubble.
- Add the marshmallows. Pour the entire bag of marshmallows into the melted butter. Stir constantly with your silicone spatula until they’re completely melted and smooth — about 3-4 minutes. The mixture should be glossy and stretchy.
- Add vanilla and salt. Remove the pot from the heat. Stir in the vanilla extract and a pinch of salt. Stir until everything is combined.
- Add the cereal. Pour the 6 cups of Rice Krispies into the pot. Fold the cereal into the marshmallow mixture gently but thoroughly. Use a folding motion — don’t stir too aggressively or you’ll crush the cereal. This takes about 2 minutes of patient folding.
- Transfer to the pan. Scrape the mixture into your prepared pan. Use a piece of parchment paper or a greased spatula to press it down evenly. Don’t press too hard. Let them cool in the pan for about 10 minutes, or until they’re firm enough to handle but still warm.
- Shape the ghosts. Tear off a sheet of plastic wrap and lightly grease it with butter or cooking spray. Grab a handful of the warm cereal mixture — about the size of a golf ball for a small ghost or a tennis ball for a larger one. Using the plastic wrap, shape the mixture into a rounded dome for the ghost body. Pinch one end to create a slight tail or point — that’s the bottom of the ghost.
- Cool completely. Place the shaped ghosts on a parchment-lined baking sheet. Let them cool completely — about 20-30 minutes at room temperature, or 10 minutes in the fridge.
- Melt the white chocolate. Place the white chocolate chips and coconut oil in a microwave-safe bowl. Microwave in 20-second bursts, stirring after each burst. It usually takes 60-90 seconds total. The mixture should be smooth and pourable.
- Dip the ghosts. Hold each cooled ghost by its base and dip the top half into the melted white chocolate. Let the excess drip off back into the bowl. Place the dipped ghost back on the parchment paper.
- Add the faces. While the white chocolate is still wet, add the ghost faces. Use black decorating gel to pipe two eyes and a small mouth. If you’re using mini chocolate chips, gently press them into the wet chocolate.
- Let them set. Allow the white chocolate to fully set — about 15 minutes at room temperature or 5 minutes in the fridge. The chocolate should be firm to the touch. Once set, your ghost treats are ready to serve!
Notes
Keep everything greased to prevent sticking. Work quickly but carefully as the marshmallow mixture sets fast. Don’t overmix the cereal to keep treats soft and chewy. Add faces while white chocolate is still wet. For best texture, enjoy the day after making. Store in airtight container at room temperature for up to 5 days. Freeze for up to 3 months.
Nutrition
- Serving Size: 1 ghost treat
- Calories: 185
- Sugar: 16
- Sodium: 135
- Fat: 8
- Saturated Fat: 5
- Carbohydrates: 28
- Protein: 2
Keywords: Halloween treats, Rice Krispie treats, ghost treats, no-bake dessert, easy Halloween recipe, kids Halloween treats, white chocolate ghosts


