Love this? Save it for later!
Share the inspiration with your friends
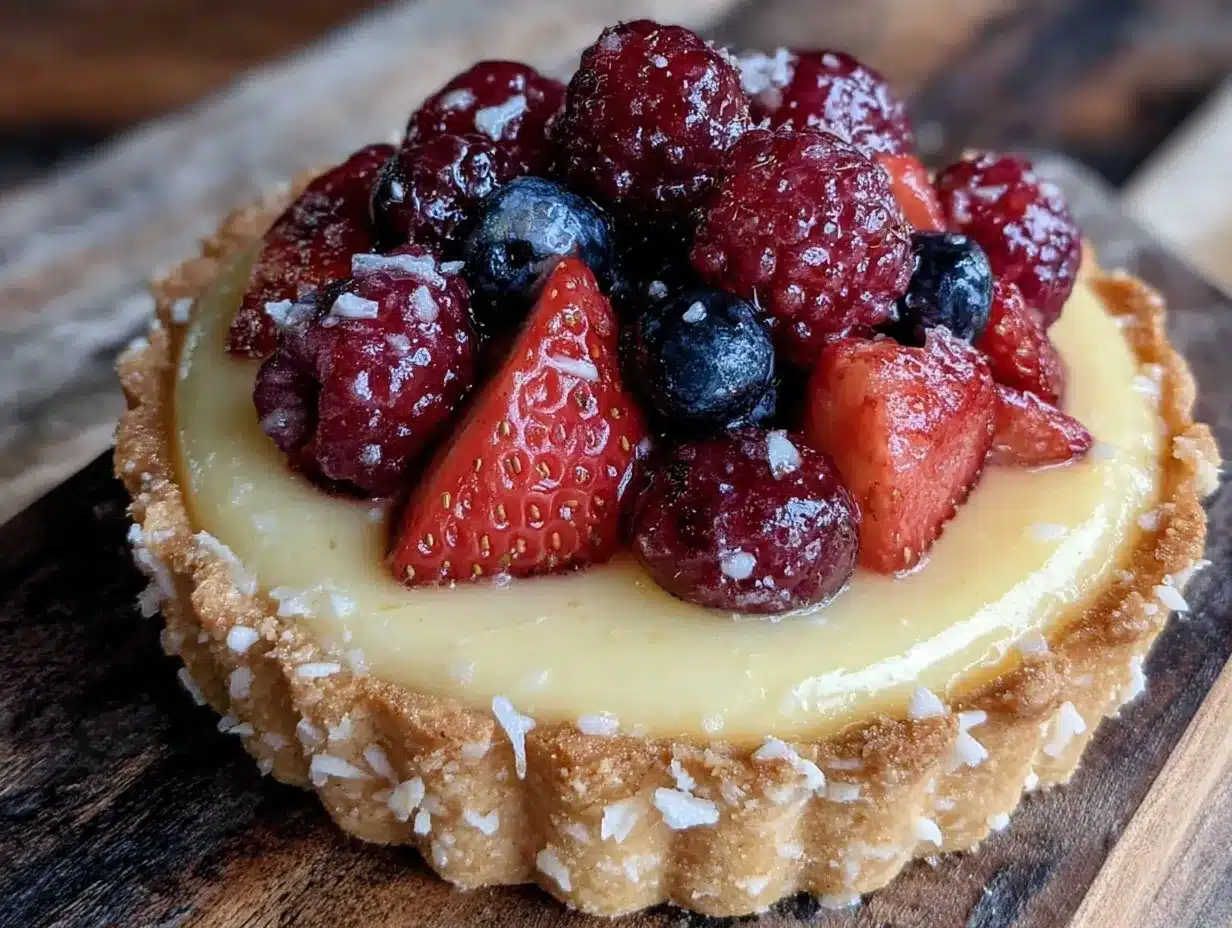
“You have to try the lemon tart,” the vendor insisted, waving a small, sun-drenched pastry toward me at the bustling Saturday market. It was one of those moments when the noise of the crowd, the clinking of jars, and the chatter all faded into the background. The tart was a revelation—bright, tangy lemon curd nestled under a jewel-toned mosaic of berries, all resting on a crisp, buttery crust. I wasn’t exactly looking for dessert that day—I mean, I was there for the heirloom tomatoes—but honestly, that fresh lemon curd fruit tart with its berry mosaic pulled me right in.
That afternoon, I scribbled down the vendor’s tips on a napkin amid the hum of the market, juggling bags and a distracted toddler. It wasn’t perfect—some ingredients were missing, and I forgot to bring my stand mixer—but with a little improvising, the tart came together in my own kitchen. The burst of citrus paired with the sweet berries reminded me of those endless summer evenings when the air smells like honeysuckle and everything tastes a little sweeter.
Maybe you’ve been there—caught off guard by a simple dessert that sticks with you, demanding to be recreated. This fresh lemon curd fruit tart isn’t just another pretty face on the dessert table; it’s a little celebration of summer’s best flavors, and honestly, it’s become my go-to when I want to impress without stress. Let me tell you, the way the tart shell cracks under your fork before melting into that creamy lemon curd and fresh berries is pure joy. This recipe stayed with me because it’s easy, fresh, and feels like a sunny day on a plate—something I can’t wait to share with you.
Why You’ll Love This Fresh Lemon Curd Fruit Tart Recipe
I’ve made plenty of lemon tarts in my years of baking, but this fresh lemon curd fruit tart with berry mosaic stands out for several reasons. After testing it repeatedly—sometimes with too much sugar, sometimes too little—I landed on the perfect balance of tart and sweet that feels light and refreshing rather than heavy. The recipe has been family-approved (even by the pickiest of eaters) and chef-tested in my kitchen, so it’s reliable for your next gathering.
- Quick & Easy: The lemon curd comes together in under 15 minutes, and the tart shell can be prepped ahead, making this perfect for busy weekends or last-minute dessert cravings.
- Simple Ingredients: No obscure ingredients here—just pantry staples and fresh berries you can find year-round or swap seasonally.
- Perfect for Summer Entertaining: Whether it’s a picnic, brunch, or a casual dinner party, this tart brings a bright and beautiful centerpiece to the table.
- Crowd-Pleaser: Kids love the tangy sweetness, adults appreciate the balance, and everyone marvels at the colorful berry mosaic on top.
- Unbelievably Delicious: The creamy lemon curd combined with the crisp crust and juicy berries creates a texture and flavor combo that’s truly irresistible.
What makes this recipe different? It’s the little touches: using freshly grated lemon zest for depth, folding in just enough butter to make the curd silky, and arranging the berries in a way that feels both artful and inviting. It’s not just a tart; it’s a conversation starter. Honestly, this recipe has helped me turn simple ingredients into a dessert that makes people pause and savor. And I’m betting it’ll do the same for you.
What Ingredients You Will Need for Fresh Lemon Curd Fruit Tart with Berry Mosaic
This recipe uses simple, wholesome ingredients to deliver bold flavor and a satisfying texture without the fuss. Most ingredients are pantry staples, while the fresh berries make the tart sing—feel free to use whatever’s best in season or what you love most.
- For the Tart Crust:
- All-purpose flour – 1 1/4 cups (150g), sifted
- Powdered sugar – 1/4 cup (30g), for a delicate sweetness
- Unsalted butter – 1/2 cup (115g), cold and cubed (I prefer Plugrá for great baking results)
- Large egg yolk – 1, room temperature
- Vanilla extract – 1/2 teaspoon
- Salt – a pinch
- For the Fresh Lemon Curd:
- Fresh lemon juice – 1/2 cup (120ml), from about 3 lemons (always freshly squeezed!)
- Lemon zest – 1 tablespoon, finely grated (adds a bright, aromatic kick)
- Granulated sugar – 3/4 cup (150g)
- Large eggs – 3, room temperature
- Unsalted butter – 6 tablespoons (85g), cut into small pieces
- Salt – a small pinch
- For the Berry Mosaic Topping:
- Fresh strawberries – 1 cup (sliced)
- Fresh blueberries – 1 cup
- Fresh raspberries – 3/4 cup
- Fresh blackberries – 3/4 cup
- Optional: a light dusting of powdered sugar for garnish
Pro tip: If fresh berries aren’t available, frozen berries can work but thaw and drain them well to avoid sogginess. Also, if you’re gluten-free, try swapping the all-purpose flour with a high-quality almond flour blend—just keep the crust chilled and handle gently.
Equipment Needed
- 9-inch (23 cm) tart pan with removable bottom – makes unmolding the tart easy and clean. If you don’t have one, a regular pie dish works but the edges won’t be as crisp or decorative.
- Mixing bowls – at least two, one for the crust and one for the lemon curd.
- Electric mixer or stand mixer – helpful for making the crust dough smooth, but you can also mix by hand with a pastry cutter or fork.
- Whisk – essential for stirring the lemon curd so it doesn’t curdle.
- Saucepan – for gently cooking the lemon curd.
- Zester or microplane – to get that fresh lemon zest without the bitter pith.
- Fine mesh sieve (optional) – helps make the lemon curd extra silky by straining out any cooked egg bits.
- Measuring cups and spoons – precise measurements keep this tart consistent.
If you’re on a budget, using a sturdy pie plate and mixing by hand can totally work. Just be patient with the dough to keep it buttery and flaky. I used to make tarts without a tart pan for years—it’s more rustic but still delicious!
Preparation Method
- Make the Tart Crust: In a large bowl, whisk together the all-purpose flour, powdered sugar, and a pinch of salt. Add the cold, cubed butter. Using a pastry cutter or your fingertips, quickly rub the butter into the flour mixture until it resembles coarse crumbs with some pea-sized pieces remaining. This texture helps create a flaky crust.
- Whisk the egg yolk and vanilla extract together, then add to the flour mixture. Use a fork to gently combine until the dough starts to come together. If it feels too dry, add 1 teaspoon of cold water at a time, but be careful not to overwork it.
- Turn the dough out onto a lightly floured surface and quickly knead it just once or twice to bring it together. Flatten into a disk, wrap in plastic wrap, and chill for at least 30 minutes (up to 2 hours). This rest time is key for a tender crust.
- Preheat your oven to 350°F (175°C). Roll out the chilled dough on a floured surface to fit your 9-inch tart pan. Press the dough gently into the pan, trimming any excess edges. Prick the bottom with a fork to prevent bubbling.
- Line the crust with parchment paper and fill with pie weights or dried beans. Bake blind for 15 minutes, remove the weights and parchment, then bake another 10 minutes or until golden brown. Let cool completely on a wire rack.
- Prepare the Lemon Curd: While the crust bakes, whisk together the eggs, sugar, lemon juice, lemon zest, and a pinch of salt in a medium saucepan. Cook over low heat, stirring constantly with a wooden spoon or whisk, until the curd thickens enough to coat the back of the spoon (about 8-10 minutes). Be patient and stir continuously to avoid scrambling the eggs.
- Remove from heat and whisk in the butter pieces until fully melted and smooth. For extra smoothness, strain the curd through a fine mesh sieve into a bowl. Cover with plastic wrap pressed directly onto the surface to prevent a skin from forming, and chill until ready to assemble.
- Assemble the Tart: Pour the chilled lemon curd into the cooled tart shell, spreading evenly with a spatula. Arrange the fresh berries on top in a mosaic pattern—mix colors and shapes for a pretty effect. Add a light dusting of powdered sugar if you like.
- Chill the assembled tart for at least 1 hour to let flavors meld and the curd set before serving.
Tip: If your lemon curd seems too runny, it might need a little extra cooking time before removing from heat. Also, don’t skip chilling the tart—it really makes slicing easier and flavors taste brighter.
Cooking Tips & Techniques
Making a fresh lemon curd fruit tart might sound fancy, but a few tricks make all the difference. First, always use fresh lemons—not bottled juice. The difference in flavor is night and day, and zest adds that extra zing you’ll want.
When cooking the lemon curd, low and slow is your friend. Stirring constantly prevents the eggs from curdling. If you see any lumps, strain it. I once ignored this step and ended up with a lumpy curd that no one wanted to eat—lesson learned!
Don’t rush chilling the tart shell or lemon curd. The crust needs to cool so it stays crisp, and the curd firms up enough to slice cleanly. I usually make the crust the day before to save time.
When arranging your berry mosaic, try balancing colors and sizes—you want it to look as good as it tastes. I find mixing raspberries, blueberries, strawberries, and blackberries creates a perfect harmony of sweet and tart.
Lastly, if you want a glossier finish on the berries, brush them lightly with a warmed apricot jam or a simple syrup before serving. It’s a little extra effort but makes a big impression.
Variations & Adaptations
- Dairy-Free Version: Use coconut oil or a vegan butter substitute in the crust and lemon curd. Swap butter in the curd for coconut cream for a rich, tropical twist.
- Seasonal Fruit Swap: In fall or winter, swap berries for pomegranate seeds, sliced pears, or even roasted figs based on what’s fresh.
- Gluten-Free Crust: Use a blend of almond flour and gluten-free all-purpose flour, and chill the dough longer to keep it from crumbling. Press it into the pan rather than rolling out.
- Extra Creamy Filling: Fold in a little mascarpone or cream cheese into the lemon curd once it’s cooled for a tangy, creamy filling.
- My Personal Twist: I sometimes add a few chopped fresh mint leaves to the berry mosaic for a refreshing herbal note that pairs beautifully with the lemon curd.
Serving & Storage Suggestions
This fresh lemon curd fruit tart is best served chilled or at cool room temperature, allowing the flavors to shine. Serving with a dollop of lightly whipped cream or a scoop of vanilla bean ice cream makes it even more indulgent.
Pair your tart with a crisp glass of sparkling water with a lemon wedge or a mild white wine like a Pinot Grigio for a lovely brunch or light dessert accompaniment.
Store leftovers covered in the refrigerator for up to 3 days. The crust will soften slightly over time, but the tart remains delicious. If you want to keep it longer, slice and freeze pieces individually wrapped—defrost in the fridge before serving.
Reheat gently in a warm oven (about 275°F/135°C) for 5-7 minutes if you prefer it slightly warm, but honestly, this tart really shines cold. And like many fruit desserts, the flavors deepen and become more harmonious after a day in the fridge.
Nutritional Information & Benefits
Per serving (based on 8 servings): Approximately 280 calories, 15g fat, 30g carbohydrates, 3g protein.
This tart packs a vitamin C punch thanks to fresh lemons and berries, which support immune health and add antioxidants. The berries also provide fiber, aiding digestion.
Using real butter and eggs means you get natural fats and proteins, but you can lighten this recipe by swapping some butter for applesauce in the crust or cutting sugar slightly.
For those watching gluten, the crust can be easily adapted. The recipe contains common allergens like eggs, dairy, and wheat, so be mindful if serving guests with sensitivities.
Conclusion
This fresh lemon curd fruit tart with berry mosaic is one of those recipes that’s simple enough to make any day but special enough to bring out when you want to impress. It’s bright, fresh, and colorful—the kind of dessert that makes you smile before the first bite.
Feel free to customize the berries or try one of the variations to suit your taste or dietary needs. I keep coming back to this recipe because it’s reliable, tasty, and always a hit—plus, it reminds me of that sunny market day and the joy of unexpected discoveries in the kitchen.
If you try it, I’d love to hear how your tart turns out or what fun twists you add. Don’t hesitate to share your thoughts or your own berry mosaic creations in the comments below. Happy baking and happy savoring!
Frequently Asked Questions About Fresh Lemon Curd Fruit Tart with Berry Mosaic
Can I make the lemon curd ahead of time?
Absolutely! Lemon curd actually tastes better after chilling for a few hours or overnight. Just store it in an airtight container in the refrigerator for up to 5 days.
What if I don’t have a tart pan with a removable bottom?
You can use a regular pie dish, but be gentle when serving as it’s harder to slice neatly. Alternatively, line the tart pan with parchment paper strips to help lift the tart out.
How do I prevent the crust from getting soggy?
Blind baking the crust and letting it cool fully before adding lemon curd helps keep it crisp. You can also brush the crust with a thin layer of melted white chocolate or egg white before filling to create a moisture barrier.
Can I use frozen berries for the topping?
Yes, but thaw and drain them well to avoid excess moisture which can make the tart soggy. Pat them dry gently before arranging.
Is there a way to make the tart vegan?
Yes, replace butter with coconut oil or vegan butter, use a flax egg instead of regular eggs, and swap the lemon curd with a vegan lemon pudding or curd alternative. The crust can be made with dairy-free margarine.
And by the way, if you enjoy fresh fruit tarts, you might really appreciate the way crispy garlic chicken balances bold flavors with simple ingredients, or the delicate sweetness found in a classic vanilla bean custard—both favorites in my kitchen for different occasions.
Pin This Recipe!

Fresh Lemon Curd Fruit Tart Recipe Easy Perfect Berry Mosaic Dessert

A bright, tangy lemon curd nestled under a jewel-toned mosaic of fresh berries on a crisp, buttery crust. This easy and refreshing tart is perfect for summer entertaining and impresses without stress.
- Prep Time: 45 minutes
- Cook Time: 25 minutes
- Total Time: 1 hour 10 minutes
- Yield: 8 servings 1x
- Category: Dessert
- Cuisine: American
Ingredients
- 1 1/4 cups all-purpose flour (150g), sifted
- 1/4 cup powdered sugar (30g)
- 1/2 cup unsalted butter (115g), cold and cubed
- 1 large egg yolk, room temperature
- 1/2 teaspoon vanilla extract
- Pinch of salt
- 1/2 cup fresh lemon juice (120ml), from about 3 lemons
- 1 tablespoon lemon zest, finely grated
- 3/4 cup granulated sugar (150g)
- 3 large eggs, room temperature
- 6 tablespoons unsalted butter (85g), cut into small pieces
- Small pinch of salt
- 1 cup fresh strawberries, sliced
- 1 cup fresh blueberries
- 3/4 cup fresh raspberries
- 3/4 cup fresh blackberries
- Optional: powdered sugar for garnish
Instructions
- Make the Tart Crust: In a large bowl, whisk together the all-purpose flour, powdered sugar, and a pinch of salt. Add the cold, cubed butter. Using a pastry cutter or your fingertips, rub the butter into the flour mixture until it resembles coarse crumbs with some pea-sized pieces remaining.
- Whisk the egg yolk and vanilla extract together, then add to the flour mixture. Use a fork to gently combine until the dough starts to come together. If too dry, add 1 teaspoon cold water at a time, but do not overwork.
- Turn dough onto a lightly floured surface and knead once or twice to bring together. Flatten into a disk, wrap in plastic wrap, and chill for at least 30 minutes (up to 2 hours).
- Preheat oven to 350°F (175°C). Roll out chilled dough to fit a 9-inch tart pan. Press dough into pan, trim excess, and prick bottom with fork.
- Line crust with parchment paper and fill with pie weights or dried beans. Bake blind for 15 minutes, remove weights and parchment, then bake another 10 minutes until golden. Cool completely on wire rack.
- Prepare Lemon Curd: Whisk eggs, sugar, lemon juice, lemon zest, and a pinch of salt in a medium saucepan. Cook over low heat, stirring constantly, until curd thickens and coats back of spoon (8-10 minutes).
- Remove from heat and whisk in butter pieces until melted and smooth. Strain through fine mesh sieve if desired. Cover with plastic wrap pressed on surface and chill until ready to assemble.
- Assemble Tart: Pour chilled lemon curd into cooled tart shell and spread evenly. Arrange fresh berries on top in a mosaic pattern. Dust lightly with powdered sugar if desired.
- Chill assembled tart for at least 1 hour before serving to let flavors meld and curd set.
Notes
Use fresh lemons for best flavor and freshly grated zest for depth. Stir lemon curd constantly over low heat to avoid curdling. Chill tart shell and lemon curd thoroughly before assembling to keep crust crisp and curd set. Frozen berries can be used if thawed and drained well. For a glossier berry finish, brush with warmed apricot jam or simple syrup before serving. Blind bake crust to prevent sogginess. Variations include dairy-free, gluten-free, and seasonal fruit swaps.
Nutrition
- Serving Size: 1 slice (1/8 of tart
- Calories: 280
- Sugar: 20
- Sodium: 120
- Fat: 15
- Saturated Fat: 9
- Carbohydrates: 30
- Fiber: 4
- Protein: 3
Keywords: lemon curd tart, berry tart, fresh fruit tart, summer dessert, easy lemon tart, berry mosaic dessert


