Love this? Save it for later!
Share the inspiration with your friends
My neighbor wasn’t trying to impress anyone. I’d stopped by to return a borrowed ladder, and the smell hit me before I even knocked on her door. It was like walking into a Christmas market in the middle of a regular Tuesday afternoon. She opened the door with flour on her cheek and said, “Oh, those are just the oranges I’m drying for my sister.” Just the oranges. Like it was nothing. Like she hadn’t transformed her entire kitchen into something that smelled like a holiday candle you’d pay thirty bucks for.
I stood there for a minute, honestly a little stunned. The ladder was still in my hands. She went back to slicing another orange like this was the most normal thing in the world. “They’re so easy,” she said, waving her knife toward the oven. “You just slice ’em thin and forget about ’em for a few hours.” Forget about ’em. I mean, I could barely forget about the smell, let alone the fact that she was making something so beautiful on a random Tuesday.
That afternoon changed how I think about homemade gifts forever. You know that feeling when you want to give someone something thoughtful but you don’t have a ton of money or time? These homemade oven-dried orange slices are the answer. They look fancy, they smell incredible, and they cost almost nothing to make. Plus, they last for months if you store them right. I’ve been making them every holiday season since that day, and honestly, they’re the gift people actually use—in cocktails, on gift tags, in wreaths, you name it.
Let me tell you, there’s something special about handing someone a jar of these beauties. They think you spent hours. They think you’re some kind of kitchen wizard. And all you did was slice some oranges and let your oven do the work. That’s my favorite kind of recipe—one that makes you look like a hero with almost no effort. So grab some oranges, crank that oven low, and let’s make some magic together.
Why You’ll Love This Recipe
I’ve tested this recipe more times than I care to admit. I’ve burned batches, I’ve under-dried them, I’ve sliced them too thick and too thin. But after all those trials, I’ve got it down to a science. Here’s why these homemade oven-dried orange slices are worth every minute:
- Budget-Friendly Gifting: A bag of oranges costs a few bucks. A jar of dried oranges at a boutique store? Twenty dollars, easy. You’re saving money and giving something handmade.
- Incredibly Simple: Three ingredients. One oven. No fancy equipment. If you can slice an orange, you can make these.
- Long Shelf Life: These keep for months in an airtight container. You can make them weeks before the holidays and not worry about them going bad.
- So Many Uses: Cocktails, tea, decorating gifts, making wreaths, potpourri, snacking. They’re the gift that keeps on giving.
- Kid-Friendly Project: My kids love helping arrange the slices on the baking sheets. It’s a great way to spend an afternoon together.
- Zero Guilt: No added sugar, no preservatives, nothing artificial. Just pure, concentrated orange goodness.
What makes this recipe different from all the other drying methods out there? It’s the temperature and timing. I’ve found that 200°F is the sweet spot—hot enough to dry them out completely, but low enough that they don’t burn or turn bitter. Plus, I’ll share my trick for getting perfectly uniform slices every time. No special mandoline required.
This is the recipe you turn to when you want to give something from the heart without breaking the bank. It’s comfort gifting, if that’s a thing. And honestly, watching someone’s face light up when they open a jar of these? That’s worth more than any store-bought present.
What Ingredients You Will Need
This recipe uses the simplest ingredients imaginable. I mean, it’s basically just oranges and patience. But the quality of your oranges really does matter here, so let’s talk about what to look for.
For the Orange Slices
- 4-5 medium navel oranges (or any seedless variety; I prefer navel for their sweetness and uniform shape)
- Optional: 1 tablespoon granulated sugar (for a light sparkle; completely optional and not traditional)
That’s it. Seriously. You don’t need anything else. But let me break down why the type of orange matters.
Navel oranges are my go-to. They’re seedless, which means no picking out tiny seeds from your dried slices. They’re also consistently sweet and have a nice thick rind that dries beautifully. Blood oranges work great too, especially if you want that dramatic red color. Cara cara oranges are lovely for a pinkish hue. Just avoid oranges that are too thin-skinned, like some valencia varieties, because they can turn out papery and fragile.
I recommend organic oranges if you can swing it. Since you’re eating the peel, you want to avoid any wax or pesticide residue. I’ve used both organic and conventional, and honestly, the organic ones do taste cleaner. But if conventional is what you’ve got, just scrub them really well with a vegetable brush and warm water. That’ll remove most of the wax and dirt.
Freshness matters. Look for oranges that feel heavy for their size—that means they’re juicy. Avoid any that have soft spots or feel lightweight. The fresher the orange, the better the final result. I’ve made the mistake of using oranges that were sitting in my fruit bowl for two weeks, and they dried unevenly and lost some of their bright flavor.
About the sugar: I rarely use it. The natural sweetness of the oranges concentrates as they dry, so they’re plenty sweet on their own. But if you’re making these for a gift and want them to look extra fancy, a light dusting of sugar before baking gives them a beautiful sparkle. Just don’t overdo it—you want the orange flavor to shine, not be buried in sugar.
That’s the whole ingredient list. No fancy syrups, no complicated spice blends. Just oranges and maybe a pinch of sugar if you’re feeling fancy. Simple, honest, and beautiful.
Equipment Needed

You don’t need a lot of fancy tools for this recipe. That’s part of the beauty. But having the right equipment makes the job so much easier.
- Sharp chef’s knife or mandoline slicer: A sharp knife is non-negotiable. Dull knives crush the orange flesh and make uneven slices. A mandoline gives you perfectly uniform slices, which means even drying. I use a Benriner mandoline for the thinnest, most consistent slices, but a good knife works fine.
- Cutting board: Any sturdy cutting board works. I prefer a large wooden one because it doesn’t slip around.
- Baking sheets: Two or three rimmed baking sheets. You want enough space to lay the slices in a single layer without overlapping.
- Parchment paper or silicone baking mats: Parchment paper is essential. Without it, the slices will stick to the pan. Silicone mats work great too and are reusable.
- Paper towels: For patting the slices dry before baking. This helps them dry faster and more evenly.
- Wire cooling rack: Optional but helpful for cooling the slices after they come out of the oven.
- Airtight container or mason jars: For storing the finished slices. I love using glass jars for gifting.
Budget-friendly tip: If you don’t have a mandoline, don’t worry. A sharp knife and a steady hand will get you beautiful results. I made my first dozen batches with just a knife and a cutting board. It takes a little longer, but it’s totally doable.
Preparation Method
Alright, let’s get to the good part. Here’s exactly how to make perfect homemade oven-dried orange slices, step by step.
- Preheat your oven to 200°F (93°C). This is important—don’t be tempted to crank it higher. Low and slow is the secret to evenly dried slices that don’t burn. Line your baking sheets with parchment paper.
- Wash and dry your oranges thoroughly. Scrub them under warm water with a vegetable brush to remove any wax or dirt. Pat them completely dry with a clean towel. Any moisture on the skin can cause steaming instead of drying.
- Slice the oranges evenly. This is the most important step. Cut off the very top and bottom of each orange (just a thin slice) to create a flat surface. Then slice crosswise into rounds about ¼-inch (6mm) thick. Too thin and they’ll be fragile and burn easily. Too thick and they’ll take forever to dry. I aim for about ¼ inch—think the thickness of a quarter. Use a gentle sawing motion with your knife to avoid crushing the flesh.
- Blot the slices with paper towels. Lay the slices on a layer of paper towels and gently press another layer on top to absorb excess juice. This step is crucial—less moisture means faster, more even drying. You’ll be surprised how much juice comes off.
- Arrange slices on baking sheets. Place them in a single layer, not touching each other. Leave a little space between each slice for air circulation. If you overcrowd them, they’ll steam instead of dry. I usually fit about 12-15 slices per standard baking sheet.
- Bake for 2½ to 3 hours. Place the baking sheets on the middle and lower racks of your oven. Halfway through, rotate the sheets and flip each slice over with a spatula. This ensures even drying. The slices are done when they feel dry to the touch but still slightly pliable—they should bend without cracking. If they snap, they’re overdone.
- Cool completely on a wire rack. Transfer the slices to a wire rack and let them cool for at least 30 minutes. They’ll continue to crisp up slightly as they cool. Don’t skip this step—warm slices are deceptive and can feel softer than they actually are.
- Check for doneness. Once cool, the slices should be leathery and slightly translucent around the edges. The centers should be dry but not brittle. If any slices still feel moist in the center, return them to the oven for another 15-20 minutes.
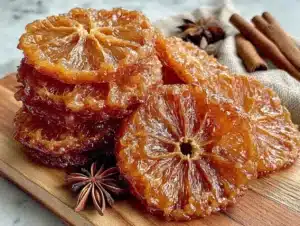
Sensory cues to watch for: Your kitchen will smell like heaven—warm, sweet, citrusy. The slices will shrink slightly and the edges will curl up a bit. The color deepens to a beautiful amber, and the rind becomes slightly translucent. When you pick one up, it should feel light and dry, not heavy or sticky.
My personal tip: I always set a timer for 2 hours and then check every 15 minutes after that. Every oven runs differently, and humidity levels affect drying time. It’s better to check too often than to burn a batch. Trust me, I’ve learned that lesson the hard way.
Cooking Tips & Techniques
After countless batches, I’ve learned a few tricks that make all the difference. Let me share what I wish someone had told me when I started.
Uniform thickness is everything. I cannot stress this enough. Slices that vary in thickness will dry at different rates. The thin ones will burn while the thick ones are still wet. If you’re using a knife, take your time. If you’re using a mandoline, set it to ¼ inch and don’t rush. I’ve ruined more batches than I’d like to admit because I got impatient and made uneven cuts.
Don’t skip the blotting step. I know it seems fussy, but blotting removes surface moisture that would otherwise create steam in the oven. Steam equals soggy slices. Soggy slices equals sad dried oranges. I lay mine on paper towels for about 10 minutes, flipping once, before they go in the oven.
Rotate your pans. Ovens have hot spots. The front might be cooler than the back, or the top rack might be hotter than the bottom. Rotating the pans and flipping the slices halfway through ensures even drying. I set a timer for 1 hour 15 minutes, then do the rotation. It’s an easy habit that saves you from uneven results.
My biggest failure: The first time I made these, I cranked the oven to 350°F because I was in a hurry. Big mistake. The edges burned black within 20 minutes, and the centers were still raw. I ended up with a smoky kitchen and a pile of ruined oranges. Low and slow is not optional—it’s the whole point.
Timing strategy: I like to make these when I’m home for the afternoon doing other things. They’re not labor-intensive, but you need to be around to check on them. Pop them in the oven, then fold laundry, read a book, or make lunch. The passive time is what makes this recipe so great.
Consistency secret: If you want perfectly round slices, use a round cookie cutter to trim the edges after drying. This is totally optional, but it gives a polished look that’s gorgeous for gifting. I do this when I’m making them for Christmas presents.
Variations & Adaptations
Once you’ve mastered the basic recipe, there are so many ways to customize it. Here are some of my favorites.
Citrus Medley
Don’t stop at oranges. Grapefruits, lemons, and limes all dry beautifully. A mix of citrus colors—deep orange, sunny yellow, pale green—makes a stunning gift jar. Just note that thinner-skinned citrus like lemons will dry faster, so check them earlier.
Spiced Orange Slices
Before baking, brush the slices with a light mixture of honey and water, then sprinkle with cinnamon, cloves, or star anise powder. This gives them a holiday spice flavor that’s incredible in tea or mulled wine. I made a batch with cinnamon and clove last December, and they disappeared within a week.
Herb-Infused Version
Lay fresh rosemary or thyme sprigs on the baking sheet alongside the oranges. The herbs infuse the slices with a subtle savory note that’s wonderful in cocktails. Just remove the herbs before storing the slices.
Dietary Adaptations
These are naturally gluten-free, vegan, and paleo-friendly. No modifications needed. If you’re watching sugar, skip the optional sugar dusting—the natural sweetness is plenty.
Different Drying Methods
No oven? No problem. A dehydrator works beautifully at 135°F for 6-8 hours. You can even dry them in a sunny window if you live in a dry climate, though it takes several days. I’ve tried all three methods, and the oven is my favorite for speed and convenience.
Serving & Storage Suggestions
These orange slices are incredibly versatile. Here’s how to use and store them.
Serving temperature: Room temperature is perfect. They’re not meant to be served hot or cold. Just pull them out of the jar and use them as needed.
Gift presentation ideas: Layer them in a mason jar with a ribbon tied around the lid. Or string them on twine to make a rustic garland. I’ve also glued magnets to the back for a DIY fridge magnet set. The possibilities are endless.
Storage instructions: Keep dried orange slices in an airtight container at room temperature. They’ll last 6-12 months if stored properly. Avoid humidity—don’t store them near the stove or dishwasher. I use glass mason jars with tight-fitting lids.
Reheating: There’s no need to reheat them. If they’ve absorbed a bit of moisture and gone soft, pop them in a 200°F oven for 10-15 minutes to crisp them back up.
Flavor development: The flavor actually improves over the first week. The oils in the peel continue to concentrate, making them more aromatic. I always make mine at least a week before gifting.
Creative uses: Drop a slice in hot tea or mulled wine. Use as a garnish for cocktails. Add to bath salts for a spa gift. Crush and mix into sugar scrubs. Or simply enjoy them as a chewy, healthy snack.
Nutritional Information & Benefits
These orange slices are a surprisingly healthy treat. Here’s the breakdown.
Per slice (approximate): 15 calories, 0g fat, 4g carbohydrates, 3g sugar, 0g protein. These numbers are for unsweetened slices. Adding sugar will increase the carb count slightly.
Health benefits: Oranges are packed with vitamin C, which supports immune health. The drying process concentrates these nutrients, so you get a potent dose in each slice. The peel contains flavonoids that have anti-inflammatory properties. Plus, there’s no added sugar, no preservatives, and no artificial anything.
Dietary considerations: These are naturally gluten-free, vegan, paleo, and Whole30-compliant (without sugar). They’re also nut-free and dairy-free, making them safe for most allergy-friendly households.
Potential allergens: None, unless you have a citrus allergy. Always check with gift recipients if they have any food sensitivities.
My wellness perspective: I love that these are a treat you can feel good about. They satisfy that craving for something sweet without the guilt. Plus, the act of making them is meditative—slicing, arranging, waiting. It’s a slow-food moment in a fast-food world.
Conclusion
These homemade oven-dried orange slices are proof that the best gifts don’t come from a store. They come from your kitchen, made with your hands, infused with the smell of citrus and patience. They’re simple enough for a Tuesday afternoon but beautiful enough for Christmas morning.
I love how this recipe lets you be creative. Mix up the citrus, add some spices, package them in a pretty jar. Make them your own. That’s the beauty of handmade gifts—they carry a piece of you in every slice.
So grab some oranges, preheat that oven, and give it a try. I promise you’ll be amazed at what comes out of your oven. And when you hand that jar to someone you love, watch their face. That moment is worth every minute.
I’d love to hear how yours turn out! Drop a comment below and tell me what citrus combinations you tried or how you packaged them. Share this recipe with a friend who loves homemade gifts. And if you make a batch, tag me on social media—I want to see your beautiful creations. Happy drying, friends!
Frequently Asked Questions
Can I use a dehydrator instead of an oven?
Absolutely! A dehydrator works great. Set it to 135°F and dry for 6-8 hours, checking periodically. The results are similar, though the oven gives a slightly more concentrated flavor.
How do I keep the slices from sticking to the pan?
Use parchment paper or a silicone baking mat. Don’t skip this step—without it, the natural sugars in the oranges will stick to the pan and make a mess. Parchment paper makes cleanup a breeze.
Can I eat the peel?
Yes! The peel becomes chewy and sweet when dried. It’s perfectly edible and actually contains most of the flavor and nutrients. Just make sure to wash the oranges thoroughly before slicing.
Why are my slices still soft after 3 hours?
Your slices might be too thick, or your oven might run cool. Check your slice thickness—aim for ¼ inch. Also, humidity plays a big role. On humid days, they’ll take longer. Just keep drying and check every 15 minutes.
How long do these last in a jar?
Stored properly in an airtight container at room temperature, they’ll last 6-12 months. Keep them away from direct sunlight and moisture. If they soften over time, pop them in a 200°F oven for 10 minutes to crisp them back up.
Pin This Recipe!

Homemade Oven-Dried Orange Slices: Easy DIY Gift Idea

Learn how to make beautiful, fragrant oven-dried orange slices with just one ingredient. Perfect for homemade gifts, cocktail garnishes, and holiday decorations.
- Prep Time: 15 minutes
- Cook Time: 2 hours 30 minutes
- Total Time: 2 hours 45 minutes
- Yield: 4 servings 1x
- Category: Snack
- Cuisine: American
Ingredients
- 4–5 medium navel oranges (or any seedless variety)
- 1 tablespoon granulated sugar (optional, for sparkle)
Instructions
- Preheat your oven to 200°F (93°C). Line baking sheets with parchment paper.
- Wash and dry oranges thoroughly. Scrub under warm water with a vegetable brush to remove wax or dirt. Pat completely dry.
- Slice off the very top and bottom of each orange to create a flat surface. Slice crosswise into rounds about ¼-inch (6mm) thick.
- Blot the slices with paper towels to absorb excess juice.
- Arrange slices in a single layer on baking sheets, not touching each other.
- Bake for 2½ to 3 hours. Halfway through, rotate the sheets and flip each slice over.
- Cool completely on a wire rack for at least 30 minutes.
- Check for doneness: slices should be leathery and slightly translucent around the edges. If any still feel moist, return to oven for 15-20 minutes.
Notes
Uniform thickness is crucial for even drying. Don’t skip blotting step. Rotate pans halfway through. Low and slow (200°F) is essential to prevent burning. Slices will continue to crisp as they cool. Store in airtight container for 6-12 months.
Nutrition
- Serving Size: 1 slice
- Calories: 15
- Sugar: 3
- Carbohydrates: 4
Keywords: dried orange slices, homemade gift, citrus, oven-dried, easy recipe, holiday gift, cocktail garnish