Love this? Save it for later!
Share the inspiration with your friends
My brother had sworn off buffalo chicken dip for seven years. Seven years. Ever since the Super Bowl incident of 2017—where a vat of the stuff sat out too long and someone dropped a tortilla chip in it, sending a tidal wave of greasy orange goo across his white couch—he refused to even look at it. “That stuff is a mess,” he’d say, crossing his arms like I was trying to poison him. I didn’t argue. Honestly, most versions are a mess. Gloppy, heavy, and somehow both too rich and too bland at the same time.
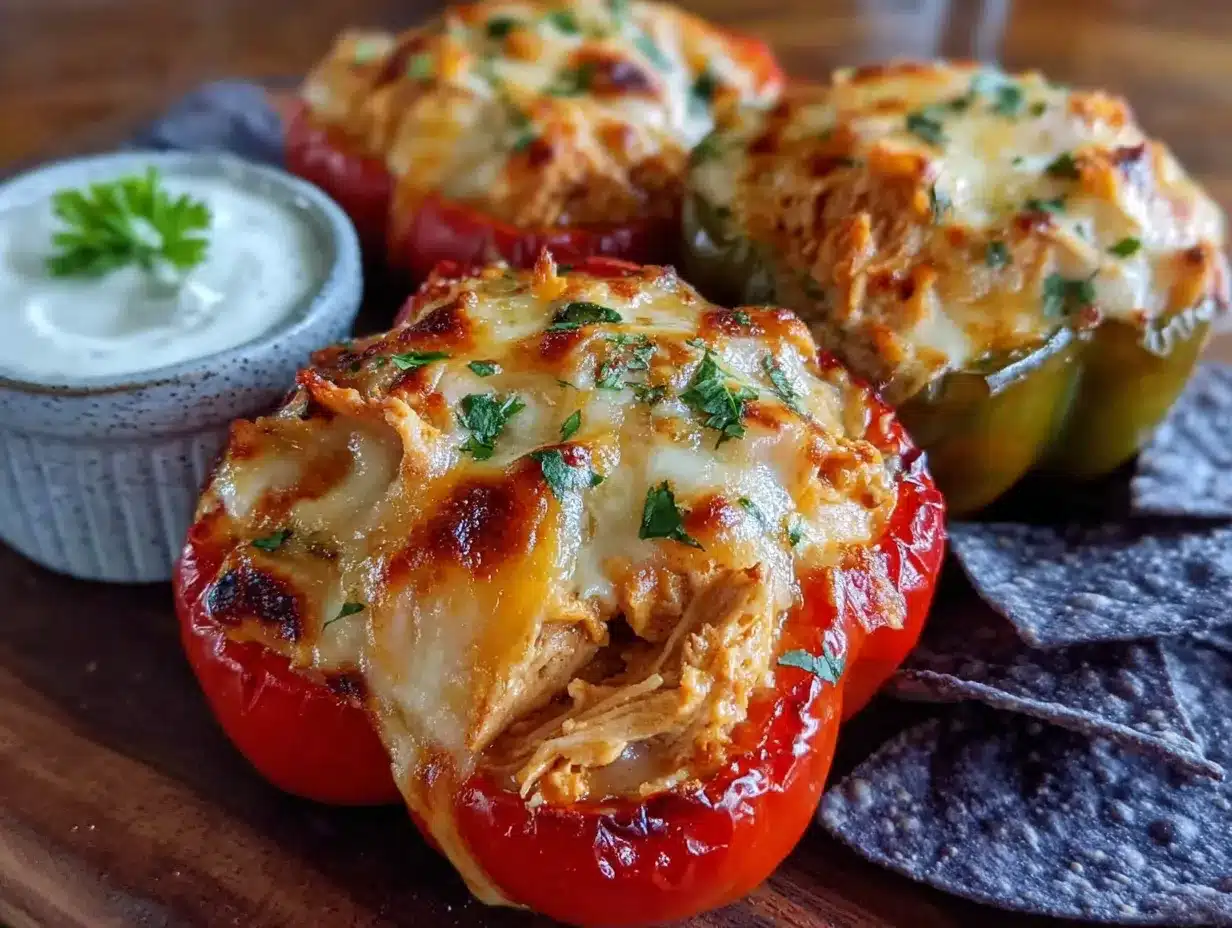
Then last Tuesday, I made these Lighter Buffalo Chicken Dip Stuffed Peppers just for myself. I had a few mini sweet peppers left from a salad kick, some leftover rotisserie chicken, and a half-eaten block of cream cheese that was staring at me from the fridge. The idea felt obvious in hindsight—stuff the dip into the pepper, bake it until bubbly, and skip the chips entirely. I wasn’t trying to prove anything. I just wanted lunch that didn’t leave me in a food coma.
I pulled them out of the oven, the cheese browned and the peppers slightly charred at the edges. I set the tray on the counter to cool, turned around to wash a spoon, and when I turned back, my brother was standing there. He had one in his hand, steam curling up, and he was already halfway through a bite. “These are actually good,” he said, with this confused, almost annoyed look on his face. “Like, really good.” He ate four more standing at the counter. I didn’t say a word. Some victories don’t need a speech.
That’s the thing about these peppers—they sneak up on you. They’re lighter, sure, but that’s not the point. The point is they taste like the game-day classic you remember, only sharper and cleaner, with a little crunch from the pepper and zero regret. Maybe you’ve been there—someone in your life who swore off a dish forever, only to get caught red-handed with a fork. Or maybe you’re just looking for an appetizer that doesn’t weigh you down. Either way, these peppers are worth keeping around.
Why You’ll Love This Recipe
Let me be honest with you—I’ve tested this recipe six times to get it just right. The first batch was too watery. The second had too much cream cheese. The third? The peppers came out soggy. But by round four, something clicked. The filling held together, the peppers stayed firm, and the whole thing tasted like the buffalo chicken dip you actually want to eat. So trust me when I say these are worth making.
- Quick & Easy: From start to finish, these come together in about 30 minutes. Perfect for last-minute guests or a Tuesday night craving that won’t wait.
- Simple Ingredients: You probably have most of this in your kitchen right now. No fancy grocery runs, no weird specialty items.
- Perfect for Game Day or Meal Prep: They work as a party appetizer, a lunchbox surprise, or a light dinner alongside a salad. Versatile doesn’t even cover it.
- Crowd-Pleaser: My brother ate four standing up. My neighbor, who “doesn’t do spicy,” asked for the recipe. Even picky eaters get hooked.
- Unbelievably Delicious: The peppers add a sweetness that balances the heat, and the filling stays creamy without being heavy. It’s comfort food that doesn’t sit in your stomach like a brick.
What makes this version different from every other buffalo chicken dip out there? It’s the ratio. Less cream cheese, more Greek yogurt, and a splash of ranch seasoning that ties everything together without drowning it. The peppers act as both the vessel and the vegetable, so you get a serving of produce without even trying. It’s not just a healthier version—it’s the version I’d choose even if calories didn’t exist.
This recipe is the kind that makes you close your eyes after the first bite. Not because it’s fancy, but because it’s exactly what you wanted. Comfort food reimagined—lighter, faster, but with the same soul-soothing satisfaction. Perfect for impressing guests without stress, or turning a simple weeknight into something memorable.
What Ingredients You Will Need
This recipe uses simple, wholesome ingredients to deliver bold flavor and satisfying texture without the fuss. Most of these are pantry staples or easy to find at any grocery store.
For the Filling
- 2 cups cooked shredded chicken (rotisserie chicken works great; about one small rotisserie bird or two large breasts)
- 4 oz reduced-fat cream cheese, softened (I use Philadelphia 1/3 less fat; full-fat also works if you prefer richer texture)
- 1/2 cup plain Greek yogurt (2% or full-fat works best; avoid non-fat as it can make the filling watery)
- 1/3 cup buffalo wing sauce (Frank’s RedHot is my go-to; adjust based on your heat tolerance)
- 1/2 cup shredded sharp cheddar cheese (cabot or Tillamook are excellent for flavor)
- 1/4 cup crumbled blue cheese (optional but recommended; adds that classic tangy note)
- 1 tablespoon ranch seasoning mix (store-bought or homemade; I prefer Hidden Valley for consistency)
- 1/4 teaspoon garlic powder
- 1/4 teaspoon onion powder
- Salt and black pepper to taste
For the Peppers
- 12 mini sweet peppers (about 6-8 ounces; look for firm, brightly colored ones with no wrinkles)
- 1 tablespoon olive oil (for brushing the peppers before baking)
For Topping
- 2 tablespoons shredded sharp cheddar cheese (for that golden, bubbly finish)
- 1 tablespoon crumbled blue cheese (optional, for garnish)
- 1 green onion, thinly sliced (for freshness and color)
- Fresh parsley or chives, chopped (optional, for extra color)
Ingredient Tips: When picking mini sweet peppers, look for ones that are all roughly the same size so they cook evenly. If you can’t find mini peppers, you can use halved bell peppers—just adjust the baking time by about 5 minutes. For the chicken, I often use leftover grilled chicken or even canned chicken in a pinch (just drain it well). The ranch seasoning is non-negotiable in my book—it balances the heat and adds that familiar flavor we all love.
Substitution Guidance: To make this dairy-free, use dairy-free cream cheese and yogurt alternatives, plus a vegan cheddar shred. For a gluten-free version, check your buffalo sauce and ranch seasoning labels—most are naturally gluten-free, but it’s worth verifying. If you want to skip the blue cheese, just add an extra tablespoon of cheddar and a splash of vinegar for tang.
Equipment Needed
You don’t need a fancy kitchen to pull these off. Here’s what I use:
- Baking sheet or shallow baking dish (a rimmed baking sheet works best; I use a 9×13-inch dish when making a double batch)
- Parchment paper or aluminum foil (for easy cleanup—trust me on this one)
- Mixing bowl (medium-sized, for combining the filling)
- Small offset spatula or butter knife (for stuffing the peppers without making a mess)
- Sharp knife and cutting board (for halving the peppers and slicing green onions)
- Measuring cups and spoons (I prefer metal ones for accuracy)
- Pastry brush (for brushing the peppers with olive oil; a paper towel works in a pinch)
If you don’t have a pastry brush, just drizzle the oil over the peppers and use your hands to coat them—it’s less elegant but works fine. I’ve also used a silicone muffin pan to hold the peppers upright when I’m making a large batch, which keeps them from tipping over. For maintenance, hand-wash your baking sheet if it’s non-stick—dishwasher detergent can wear down the coating over time.
Preparation Method
Let’s get cooking. This recipe moves fast, so I like to have everything prepped before I start. Read through once, then dive in.
- Preheat your oven to 375°F (190°C). Line a baking sheet with parchment paper or foil for easy cleanup. Trust me, you’ll thank yourself later.
- Prepare the peppers. Rinse the mini sweet peppers and pat them dry. Slice each pepper in half lengthwise from top to bottom. Use a small spoon to scrape out the seeds and any white membranes. Don’t worry about being perfect—just get the seeds out. Place the pepper halves cut-side up on the prepared baking sheet. Brush the insides and edges lightly with olive oil. This helps them soften without drying out.
- Make the filling. In a medium mixing bowl, combine the softened cream cheese and Greek yogurt. Mix until smooth and well combined—a fork works fine, but a rubber spatula makes it easier. Add the buffalo wing sauce, ranch seasoning, garlic powder, and onion powder. Stir until everything is evenly distributed. The mixture should look creamy and slightly orange.
- Add the chicken and cheese. Fold in the shredded chicken, 1/2 cup shredded cheddar, and 1/4 cup crumbled blue cheese (if using). Stir until the chicken is fully coated. Taste the filling—yes, raw, it’s fine—and adjust seasoning if needed. I usually add a pinch of salt and a few cracks of black pepper. If you want more heat, add an extra tablespoon of buffalo sauce.
- Stuff the peppers. Using a small spoon or offset spatula, fill each pepper half with the chicken mixture. Don’t overstuff—leave a little room at the top, about 1/4 inch. The filling will puff up slightly as it bakes. I use about 1.5 tablespoons per pepper half, depending on size. Press the filling gently to make sure it’s snug inside.
- Top with cheese. Sprinkle the remaining 2 tablespoons of shredded cheddar over the stuffed peppers. If you reserved extra blue cheese, add that too. This creates that irresistible golden crust.
- Bake. Place the baking sheet in the preheated oven and bake for 15-18 minutes. At 15 minutes, check them—the peppers should be tender but still hold their shape, and the cheese should be melted and bubbly. If you want a browner top, switch the oven to broil for the last 1-2 minutes. Watch closely—broiling goes from golden to burnt in seconds.
- Rest and garnish. Remove from the oven and let the peppers rest on the baking sheet for 5 minutes. This allows the filling to set so it doesn’t ooze out when you pick them up. Sprinkle with sliced green onions and fresh parsley or chives. Serve warm.
Sensory cues: At step 6, the peppers should feel slightly firm but not rock-hard. At step 7, you’ll smell the buffalo sauce and cheese melding together—that’s your cue they’re almost done. The peppers will look slightly wrinkled and the edges will be lightly charred. That’s a good thing—it adds flavor.
Time estimate: Prep takes about 10 minutes, baking takes 15-18 minutes, and resting takes 5 minutes. Total active time is about 30 minutes. Perfect for a weeknight or a last-minute party.
Troubleshooting tip: If your filling seems too dry before baking, add a tablespoon of buffalo sauce or a splash of milk. If it’s too wet, add an extra tablespoon of shredded cheese or a bit more chicken. The filling should be scoopable but not runny.
Cooking Tips & Techniques
I learned a few things the hard way so you don’t have to. Here’s what I wish someone had told me.
Don’t skip softening the cream cheese. I made that mistake once—cold cream cheese straight from the fridge. The filling looked like cottage cheese with lumps. Let it sit on the counter for 20 minutes before you start, or microwave it in 10-second bursts until it’s soft but not melted. Smooth filling makes everything better.
Use room temperature yogurt too. Same logic. Cold yogurt can seize up the cream cheese and make the filling grainy. Take both out at the same time and let them sit together.
Don’t overbake. The peppers go from perfectly tender to mushy in about 3 minutes. Start checking at 15 minutes. You want the peppers to still have a little bite—like al dente pasta. If you’re making these ahead, underbake by 2 minutes and finish them when you’re ready to serve.
Line your pan. I forgot once. The buffalo sauce caramelizes and creates a sticky mess that takes forever to scrub. Parchment paper or foil saves you 10 minutes of scrubbing. You’re welcome.
Multitask strategically. While the peppers bake, clean up your workspace and slice the green onions. This recipe moves fast, so having everything prepped before you start makes it feel effortless.
Let them rest. I know it’s hard to wait, but those 5 minutes of resting are crucial. The filling sets, the peppers firm up, and the flavors meld together. If you skip this step, you’ll end up with a mess on your plate. Patience pays off.
Variations & Adaptations
One of the best things about this recipe is how easily it adapts. Here are a few ways I’ve tweaked it depending on my mood or what’s in the fridge.
Spicy Buffalo Ranch: If you love heat, double the buffalo sauce and add a pinch of cayenne pepper to the filling. I did this for a game day party and my brother-in-law—who claims to eat ghost peppers for fun—gave it a thumbs up. Just warn your guests if you go this route.
Smoky Chipotle Twist: Swap the buffalo sauce for chipotle peppers in adobo sauce. Use 2-3 chipotle peppers (minced) plus 2 tablespoons of the adobo sauce. It’s smokier and earthier, with a deeper heat. I tried this on a whim and now it’s my second-favorite version.
Vegetarian Option: Replace the chicken with 1 can of drained and rinsed black beans plus 1 cup of cooked quinoa. The texture is different—heartier and more substantial—but the flavor still works beautifully. I’ve also used crumbled firm tofu for a lighter option.
Keto-Friendly Adaptation: Use full-fat cream cheese and Greek yogurt, skip the peppers (or use zucchini boats instead), and add extra cheese. This version is lower in carbs but still satisfying. My keto friend swears by it.
Bacon Lover’s Version: Cook 4 strips of bacon until crispy, crumble them, and mix half into the filling. Sprinkle the rest on top before baking. I did this for a potluck and the dish was empty in 20 minutes. Bacon makes everything better—science.
Dairy-Free Adaptation: Use dairy-free cream cheese (Kite Hill makes a good one), plain coconut yogurt, and vegan cheddar shreds. The flavor is slightly different—coconut yogurt adds a hint of sweetness—but it’s still delicious. My sister, who’s lactose intolerant, ate half the batch.
Serving & Storage Suggestions
These peppers are best served warm, right out of the oven. The contrast between the tender pepper and the creamy filling is at its peak when they’re fresh. Arrange them on a platter with the cut-side up, garnished with green onions and a light sprinkle of fresh parsley. For a party, I like to serve them alongside celery sticks, carrot sticks, and a small bowl of extra ranch or blue cheese dressing for dipping.
What to serve with them: These peppers pair beautifully with a crisp green salad dressed with a simple vinaigrette. The acidity cuts through the richness. For a heartier meal, serve them with cauliflower rice or roasted sweet potatoes. I’ve also brought them to potlucks alongside a veggie tray and some pita chips.
Storage instructions: Let any leftover peppers cool completely, then transfer them to an airtight container. They’ll keep in the refrigerator for up to 4 days. The peppers will soften slightly as they sit, but the flavor actually gets better—the buffalo sauce and ranch seasoning meld together overnight.
Reheating methods: The best way to reheat these is in the oven or air fryer. Preheat to 350°F (175°C) and bake for 5-7 minutes, or until warmed through. The microwave works in a pinch (30-45 seconds), but the peppers will be softer. If you’re meal-prepping, I recommend reheating in the oven for best texture.
Freezing instructions: You can freeze these before or after baking. To freeze unbaked, stuff the peppers and place them on a baking sheet in the freezer until solid (about 2 hours), then transfer to a freezer bag. Bake from frozen, adding 5-7 minutes to the cooking time. To freeze baked, let them cool completely, then freeze in a single layer on a baking sheet before transferring to a bag. Reheat directly from frozen at 350°F for 10-12 minutes.
Flavor development note: Like most dips and casseroles, these peppers taste even better the next day. The flavors have time to meld and deepen. If you’re making them for a party, consider assembling them the night before and baking just before serving. Your future self will thank you.
Nutritional Information & Benefits
Here’s the thing—I’m not a nutritionist, but I’ve run these numbers through my tracking app and they check out. Per serving (2 pepper halves), here’s what you’re looking at:
- Calories: Approximately 180-200
- Protein: 18-20g
- Fat: 10-12g
- Carbohydrates: 6-8g
- Fiber: 2-3g
- Sugar: 3-4g (naturally occurring from the peppers)
Health benefits of key ingredients: Mini sweet peppers are packed with vitamin C—one serving provides about 150% of your daily needs. They’re also a good source of vitamin A and antioxidants. The Greek yogurt adds protein and probiotics, while the chicken provides lean protein that keeps you full. Using reduced-fat cream cheese and Greek yogurt cuts the saturated fat compared to traditional buffalo chicken dip without sacrificing creaminess.
Dietary considerations: This recipe is naturally gluten-free (check your buffalo sauce and ranch seasoning labels to be sure). It’s also lower in carbs than traditional buffalo chicken dip served with chips or bread. If you’re watching your sodium, use low-sodium buffalo sauce and skip the added salt in the filling. The blue cheese is optional, so you can easily make this recipe without it for those who avoid mold-ripened cheeses.
Allergen note: This recipe contains dairy (cream cheese, yogurt, cheddar, blue cheese). For a dairy-free version, see the variations section above. It does not contain nuts, eggs, or soy in its standard form.
My personal wellness perspective: I love that these peppers let me enjoy game-day flavors without the post-dip sluggishness. They’re satisfying enough to feel like a treat but light enough that I don’t regret them later. That’s the sweet spot for me—food that feels indulgent but leaves me feeling good.
Conclusion
There’s a reason I keep coming back to this recipe. It’s not just that it’s lighter or faster or easier—though it is all those things. It’s that these Lighter Buffalo Chicken Dip Stuffed Peppers have a way of surprising people. My brother, who swore off buffalo chicken dip for seven years, now asks me to make them every time he visits. My neighbor, who claimed she didn’t like spicy food, asked for the recipe twice. Even my mom, who’s notoriously hard to impress, said they were “restaurant quality.” And she never says that.
I want you to make these your own. Maybe you add extra blue cheese because you love that funky tang. Maybe you swap the peppers for zucchini boats because that’s what you have on hand. Maybe you double the buffalo sauce because you like things hot. That’s the beauty of this recipe—it’s a canvas, not a prison. Start with the base, then tweak it until it feels like yours.
I’d love to hear how they turn out. Drop a comment below and tell me your favorite variation, or tag me in your photos if you share them online. There’s something special about knowing a recipe I love is being made in someone else’s kitchen—maybe even becoming a tradition in theirs. So go ahead, give these peppers a try. I think you’ll be surprised by how good they are. And if you catch someone eating them standing at the counter, just smile. Some victories don’t need a speech.
Frequently Asked Questions
Can I make these ahead of time?
Absolutely. Assemble the peppers up to 24 hours in advance, cover them tightly, and refrigerate. When you’re ready to bake, add about 5 minutes to the cooking time since they’ll be starting from cold. I’ve done this for parties and it makes entertaining so much easier.
Can I use full-fat cream cheese instead of reduced-fat?
Yes, you can. The texture will be slightly richer and creamier. I’ve tested both versions and they both work well. If you use full-fat, you might want to add an extra tablespoon of Greek yogurt to keep the filling from being too heavy.
How spicy are these peppers?
They have a mild to medium heat level—think buffalo wings with ranch dressing. The peppers themselves are sweet, which balances the heat. If you’re sensitive to spice, use a mild buffalo sauce or reduce the amount by half. If you love heat, double the buffalo sauce and add cayenne.
Can I use bell peppers instead of mini sweet peppers?
Yes, but you’ll need to adjust the cooking time. Use 3-4 large bell peppers, halved and seeded. Bake for 20-25 minutes instead of 15-18. The filling-to-pepper ratio will be different—you might need to double the filling recipe to fill all the halves.
How do I keep the peppers from getting soggy?
Don’t skip the olive oil brushing—it creates a barrier that helps the peppers stay firm. Also, make sure your filling isn’t too wet. If your Greek yogurt seems watery, drain it through a cheesecloth or paper towel for 10 minutes before mixing. And whatever you do, don’t overbake. Check them at 15 minutes.
Pin This Recipe!

Lighter Buffalo Chicken Dip Stuffed Peppers

These Lighter Buffalo Chicken Dip Stuffed Peppers are a healthier twist on the classic game-day dip, featuring creamy buffalo chicken filling stuffed into sweet mini peppers and baked until bubbly. Perfect as an appetizer or light meal, they’re quick, easy, and packed with flavor.
- Prep Time: 10 minutes
- Cook Time: 18 minutes
- Total Time: 28 minutes
- Yield: 6 servings 1x
- Category: Appetizer
- Cuisine: American
Ingredients
- 2 cups cooked shredded chicken (rotisserie chicken works great)
- 4 oz reduced-fat cream cheese, softened
- 1/2 cup plain Greek yogurt (2% or full-fat)
- 1/3 cup buffalo wing sauce (Frank’s RedHot recommended)
- 1/2 cup shredded sharp cheddar cheese
- 1/4 cup crumbled blue cheese (optional)
- 1 tablespoon ranch seasoning mix
- 1/4 teaspoon garlic powder
- 1/4 teaspoon onion powder
- Salt and black pepper to taste
- 12 mini sweet peppers (about 6–8 ounces)
- 1 tablespoon olive oil
- 2 tablespoons shredded sharp cheddar cheese (for topping)
- 1 tablespoon crumbled blue cheese (optional, for garnish)
- 1 green onion, thinly sliced
- Fresh parsley or chives, chopped (optional)
Instructions
- Preheat your oven to 375°F (190°C). Line a baking sheet with parchment paper or foil.
- Rinse the mini sweet peppers and pat them dry. Slice each pepper in half lengthwise and scrape out the seeds and membranes. Place pepper halves cut-side up on the prepared baking sheet. Brush the insides and edges lightly with olive oil.
- In a medium mixing bowl, combine the softened cream cheese and Greek yogurt. Mix until smooth. Add the buffalo wing sauce, ranch seasoning, garlic powder, and onion powder. Stir until evenly distributed.
- Fold in the shredded chicken, 1/2 cup shredded cheddar, and 1/4 cup crumbled blue cheese (if using). Stir until the chicken is fully coated. Taste and adjust seasoning with salt and pepper if needed.
- Using a small spoon or offset spatula, fill each pepper half with the chicken mixture, leaving about 1/4 inch at the top. Use about 1.5 tablespoons per pepper half.
- Sprinkle the remaining 2 tablespoons of shredded cheddar over the stuffed peppers. Add reserved blue cheese if desired.
- Bake for 15-18 minutes, until the peppers are tender but still hold their shape and the cheese is melted and bubbly. For a browner top, broil for the last 1-2 minutes.
- Remove from the oven and let the peppers rest on the baking sheet for 5 minutes. Sprinkle with sliced green onions and fresh parsley or chives. Serve warm.
Notes
Don’t skip softening the cream cheese to avoid lumps. Use room temperature yogurt for a smooth filling. Check peppers at 15 minutes to avoid overbaking. Let them rest for 5 minutes after baking to set the filling. For meal prep, assemble up to 24 hours ahead and refrigerate; add 5 minutes to baking time.
Nutrition
- Serving Size: 2 pepper halves
- Calories: 190
- Sugar: 4
- Sodium: 480
- Fat: 11
- Saturated Fat: 5
- Carbohydrates: 7
- Fiber: 2
- Protein: 19
Keywords: buffalo chicken dip, stuffed peppers, healthy appetizer, game day, low carb, gluten-free, easy appetizer


