Love this? Save it for later!
Share the inspiration with your friends
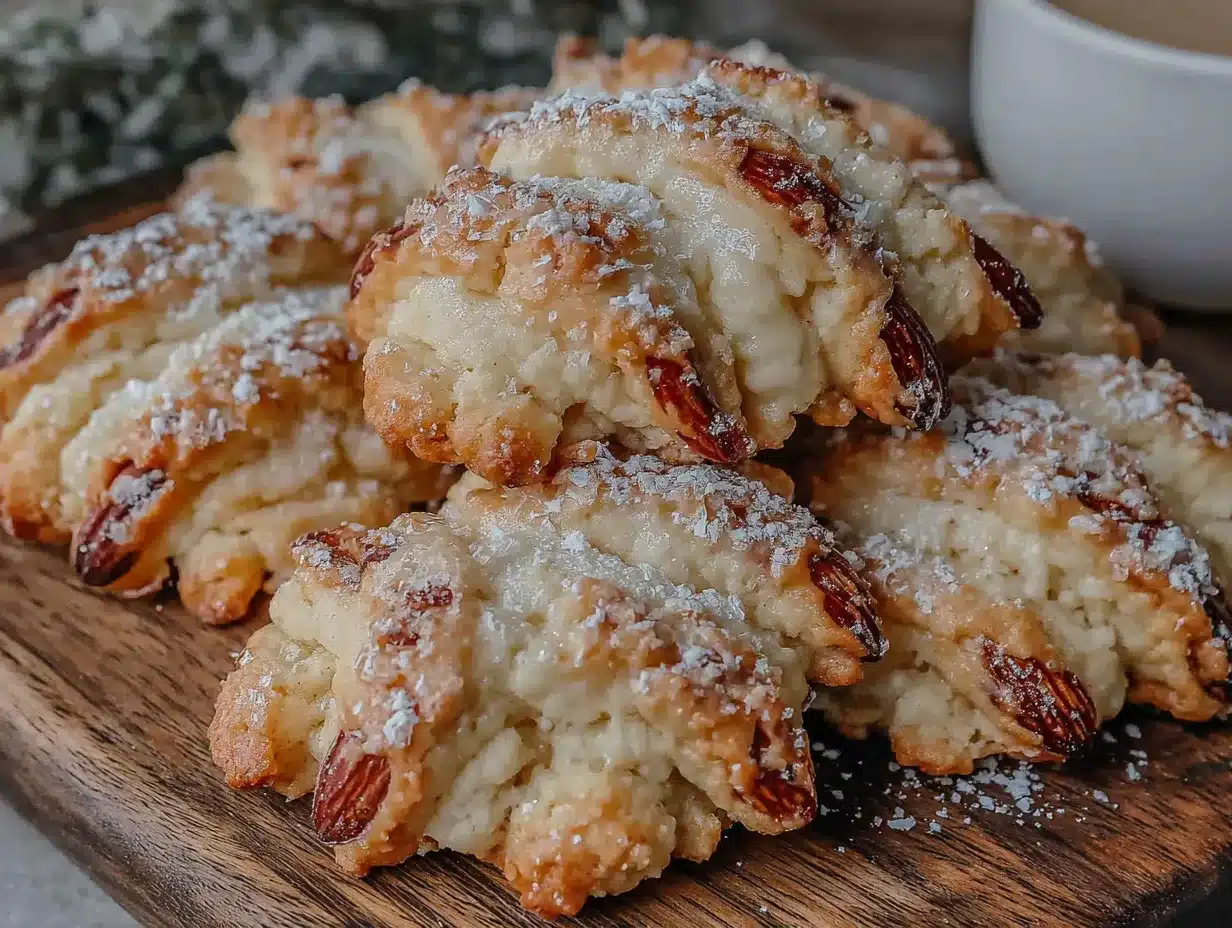
There used to be a tiny bakery tucked behind a vintage bookstore on the corner of Elm and 3rd in my old neighborhood that made the most unsettlingly perfect witch finger cookies. When they closed their doors three years ago—a “For Lease” sign taped to the dusty window—I honestly felt a little pang of grief. Those cookies were my Halloween tradition. After twelve tries—and I mean twelve, including one batch that looked more like arthritic sausages than elegant witch fingers—I finally cracked the code. The almond nail was the missing piece all along. Let me tell you, the first time I bit into my homemade version and got that same buttery crumble followed by the sweet crunch of almond, I actually texted my sister a photo with the caption “We’re back.” There’s something deeply satisfying about recreating a lost food memory, especially when it involves something this delightfully creepy.
These witch finger cookies are exactly what you need for your Halloween spread this year. They’re spooky enough to impress at a party but simple enough that you can whip up a batch on a Tuesday night after work. I mean, who has time for elaborate baking projects when you’re already juggling costumes and candy shopping? Not me. These come together with basic pantry ingredients, and the almond nails give them that signature look that makes people do a double-take. Honestly, watching someone’s face go from confusion to recognition when they realize what they’re holding? That’s the good stuff. Maybe you’ve been there—looking for that one Halloween treat that’s both impressive and actually doable without losing your mind.
Why You’ll Love This Recipe
Look, I’ve tested this recipe more times than I care to admit. My kitchen counter has seen flour explosions, almond slices flying across the room, and one particularly memorable incident where my husband walked in and genuinely thought I was making some kind of crime scene evidence. But after all that trial and error, I can confidently say this version works every single time.
- Quick & Easy: From start to finish, these come together in about 40 minutes. That’s less time than it takes to find parking at the Halloween store.
- Simple Ingredients: Butter, sugar, flour, eggs, vanilla, and almonds. That’s it. No weird specialty items you’ll never use again.
- Perfect for Halloween Parties: These are the talk of any gathering. Kids love them, adults get a kick out of them, and everyone wants the recipe.
- Crowd-Pleaser: I’ve brought these to office parties, family gatherings, and neighborhood get-togethers. They disappear every single time.
- Unbelievably Delicious: Here’s the thing—they’re not just a gimmick. The buttery shortbread texture with that almond finish is genuinely addictive. You’ll find yourself eating the “fingers” that broke during baking.
What makes this recipe different from the dozens of other witch finger recipes out there? It’s the texture. Most versions turn out either too crumbly (fingers falling apart before they even cool) or too tough (biting into them feels like a workout). This one hits that perfect shortbread sweet spot—firm enough to hold their shape but tender enough to melt in your mouth. Plus, the almond nail technique I developed stays put instead of sliding off like some other methods I’ve tried. Let’s just say I learned that lesson the hard way.
This recipe isn’t just good—it’s the kind that makes you close your eyes after the first bite. It’s Halloween fun meets genuine baking satisfaction. Perfect for impressing guests without stress, or turning a simple October evening into something memorable.
What Ingredients You Will Need
This recipe uses simple, wholesome ingredients to deliver that perfect buttery shortbread texture with just the right amount of creepy charm. Most of these are probably already in your kitchen, which is exactly how I like to keep things.
For the Cookie Dough
- 1 cup unsalted butter, softened (I prefer Kerrygold for the richness, but any good butter works)
- 1 cup powdered sugar (this gives the cookies that melt-in-your-mouth texture, not granulated!)
- 1 large egg (room temperature, please—cold egg will make the dough stiff and hard to work with)
- 1 teaspoon vanilla extract (pure vanilla, not imitation—you’ll taste the difference)
- ½ teaspoon almond extract (this is what gives the cookies that subtle marzipan-like flavor)
- 2 ¾ cups all-purpose flour (spoon and level it—don’t scoop directly from the bag)
- 1 teaspoon baking powder (check the expiration date, old baking powder won’t give the right lift)
- ½ teaspoon salt (fine sea salt works best, balances the sweetness perfectly)
For the Fingers and Nails
- 1 large egg white, lightly beaten (this is your “glue” for the almonds)
- 30-36 whole blanched almonds (blanched means the brown skin is already removed—this is important for the nail look)
- Red food coloring (gel works better than liquid, gives that deeper blood-red tone)
- Green food coloring (optional, but adds a lovely witchy undertone)
- Seedless raspberry jam or red gel icing (for the “blood” at the cuticle area—I’ve used both and prefer the jam for the glossy look)
One thing I learned the hard way—don’t skip the almond extract. The first batch I made without it tasted fine, but they were just… cookies. The almond extract gives that slightly eerie, almost medicinal undertone that makes these feel authentically witchy. It’s subtle but essential.
For the almonds, look for whole blanched almonds in the baking aisle. If you can only find slivered almonds, you can technically use those, but they look less like real fingernails. I’ve also tried this with sliced almonds, and honestly, they’re too thin and break too easily. Stick with whole blanched almonds if you can.
Equipment Needed
You don’t need anything fancy here, which is exactly how I like my Halloween baking. Here’s what you’ll need:
- Large mixing bowl (any bowl works, but a wide one makes creaming the butter easier)
- Electric hand mixer or stand mixer (you can do this by hand with a wooden spoon, but your arm will hate you)
- Baking sheets (two standard sheets work perfectly for this batch size)
- Parchment paper or silicone baking mats (parchment is cheaper, silicone is reusable—both prevent sticking)
- Small bowl for the egg wash (a cereal bowl works fine)
- Pastry brush (for applying the egg wash to the almonds—a silicone one cleans up easier)
- Sharp knife or bench scraper (for scoring the “knuckle” lines—a butter knife works in a pinch)
- Small offset spatula (for transferring the delicate cookies—I broke so many before I started using one)
- Cooling rack (absolutely necessary for getting that perfect texture, don’t skip this)
Budget-friendly tip: If you don’t have a pastry brush, you can use a clean finger to dab the egg wash onto the almonds. It’s not as precise, but it works. And if you don’t have a cooling rack, you can let the cookies cool on the baking sheet for 5 minutes, then carefully transfer them to a plate. Just be gentle—they’re fragile when warm.
Preparation Method
Alright, let’s make some witch fingers. I’ve broken this down into clear steps so you don’t end up with a kitchen disaster like my first attempt. Trust me on this.
- Cream the butter and sugar together. In your large mixing bowl, beat the softened butter and powdered sugar together until light and fluffy—about 2-3 minutes with an electric mixer. You want it pale and airy. Don’t rush this step, it’s what gives the cookies their tender texture. Scrape down the sides of the bowl halfway through.
- Add the wet ingredients. Beat in the egg, vanilla extract, and almond extract until everything is well combined. The mixture might look slightly separated at this point—that’s totally normal. Don’t panic. It comes together once you add the flour.
- Mix the dry ingredients separately. In a separate bowl, whisk together the flour, baking powder, and salt. This ensures the baking powder is evenly distributed. I learned this one the hard way after biting into a cookie that had a concentrated pocket of baking powder. Not a pleasant experience.
- Combine wet and dry ingredients. Gradually add the flour mixture to the butter mixture, mixing on low speed until just combined. Stop when you no longer see streaks of flour. Overmixing will make the cookies tough, and nobody wants a tough witch finger. The dough should be soft but not sticky—if it feels too sticky, add another tablespoon of flour.
- Chill the dough. Wrap the dough in plastic wrap and refrigerate for at least 30 minutes. This is crucial. I skipped this step once, and my “fingers” spread into sad, flat blobs that looked more like pancakes than witch fingers. Chilling firms up the butter and makes the dough much easier to shape. You can chill it for up to 24 hours if you want to prep ahead.
- Preheat your oven. Set your oven to 325°F (165°C). Line your baking sheets with parchment paper or silicone mats.
- Shape the fingers. Here’s where the fun begins. Take a small piece of dough—about 1 tablespoon worth—and roll it into a log shape about 3 inches long. Gently taper one end to look like a fingertip, and make the other end slightly wider to look like where the finger would connect to the hand. Place it on the prepared baking sheet. Repeat with the remaining dough, spacing the fingers about 2 inches apart. You should get about 30-36 fingers total.
- Create the knuckle details. Using the back of a sharp knife or a bench scraper, gently press lines across each finger to create knuckle creases. Make about 2-3 lines per finger, depending on how long they are. Don’t press too hard—you want indentations, not cuts. If the dough starts to stick to the knife, dip it in a little flour.
- Attach the almond nails. Here’s the trick that took me way too many attempts to figure out. Brush the rounded end of each blanched almond with the beaten egg white. Press the almond firmly onto the tapered end of each finger, pointed side facing outward. The egg white acts as glue—without it, the almonds will fall off during baking. Press gently but firmly. You want the almond to look like it’s growing out of the finger.
- Add the creepy details. Using a small brush or a toothpick, dab a tiny amount of red food coloring at the base of each almond nail to look like blood or cuticle irritation. If you’re using green food coloring, you can add a subtle green tint to the dough before shaping—just knead in a few drops. I usually leave the dough natural and let the red do the talking.
- Bake the cookies. Bake for 12-15 minutes, or until the cookies are just set and the edges are barely starting to turn golden. The bottoms should be lightly browned. Don’t overbake—they continue to firm up as they cool. The cookies should still look pale on top.
- Cool completely. Let the cookies cool on the baking sheet for 5 minutes, then carefully transfer them to a wire rack to cool completely. This is where patience pays off. If you try to move them too soon, the fingers will break. Ask me how I know.
- Final touches. Once completely cool, add a tiny dab of red jam or gel icing at the base of each almond nail to enhance the “bloody cuticle” effect. This step is optional but really sells the look. I like to arrange them on a platter with some fingers slightly curled or overlapping for maximum creepy effect.
Cooking Tips & Techniques
Let me save you from the mistakes I made. The first time I attempted witch finger cookies, I used slivered almonds instead of whole blanched ones. They looked like someone had glued tiny toenail clippings onto sausages. Not the vibe I was going for. Whole blanched almonds are non-negotiable for that realistic nail look.
Temperature matters more than you think. If your butter is too cold, the dough will be stiff and crack when you try to shape the fingers. If it’s too warm, the fingers will spread into blobs. Room temperature butter should give slightly when you press it—like a stress ball that’s been sitting on your desk for an hour.
Here’s a trick I figured out after batch number seven: wet your hands slightly when shaping the fingers. The dough is less likely to crack, and you’ll get smoother, more realistic shapes. Just a tiny bit of water on your palms—not enough to make the dough sticky.
For the knuckle lines, use a bench scraper or the back of a butter knife. A sharp knife can cut through the dough, which creates weak points where the fingers might break. You want gentle pressure that creates an indentation without cutting.
One more thing—don’t overcrowd the baking sheets. These cookies need room to bake evenly. If they’re too close together, they’ll steam instead of bake, and you’ll lose that nice shortbread texture. I do 12 per sheet maximum, and I rotate the sheets halfway through baking for even browning.
I once forgot to chill the dough and ended up with fingers that looked like they’d been through a washing machine. They spread, lost their shape, and the almonds slid off during baking. It was a disaster. Chilling is not optional—it’s the difference between creepy witch fingers and sad cookie blobs.
Variations & Adaptations
One of the best things about this recipe is how easily you can adapt it. Here are some variations I’ve tried over the years:
Gluten-Free Version: Swap the all-purpose flour for a 1:1 gluten-free baking flour blend. I’ve used Bob’s Red Mill and King Arthur’s gluten-free blends with great success. Just add an extra tablespoon of flour if the dough feels too sticky. The texture will be slightly more crumbly, but they still look fantastic.
Vegan Witch Fingers: Use vegan butter (I like Miyoko’s for baking) and substitute the egg with a flax egg (1 tablespoon ground flaxseed mixed with 3 tablespoons water, let sit for 5 minutes). For the egg wash on the almonds, use a tiny bit of maple syrup or agave—it works as glue and adds a subtle sweetness.
Chocolate Witch Fingers: Replace ¼ cup of the flour with unsweetened cocoa powder. You’ll get dark, earthy fingers that look even more sinister. The chocolate version pairs beautifully with the almond nails—it’s like a chocolate-covered almond in cookie form.
Spiced Witch Fingers: Add 1 teaspoon of cinnamon and ½ teaspoon of nutmeg to the dry ingredients. This gives the cookies a warm, autumnal flavor that’s perfect for Halloween. I made these for a fall harvest party, and they were a hit—even with people who claimed they “don’t do Halloween.”
Color Variations: Instead of the natural pale color, you can tint the dough with food coloring. Green is the obvious choice, but I’ve also done purple (a few drops of red and blue) and even a pale gray (a tiny bit of black food coloring). Just be careful—a little goes a long way, and you don’t want to stain your hands or your counter.
My personal favorite variation is the chocolate version with a pinch of cayenne pepper added. The heat sneaks up on you, which feels very on-brand for a witch’s finger. Just don’t go overboard—a tiny pinch is enough.
Serving & Storage Suggestions
These cookies are best served at room temperature, arranged on a platter in a way that maximizes the creepy factor. I like to scatter them on a black or dark purple platter, with some fingers pointing in different directions and a few slightly overlapping. For extra drama, arrange them around a small bowl of “blood” (raspberry jam thinned with a little water) for dipping.
They pair beautifully with a warm cup of spiced apple cider or a pumpkin spice latte. If you’re serving adults, a glass of dark red wine or a smoky mezcal cocktail complements the almond flavor nicely. For kids, serve them with a glass of milk or apple juice—the sweetness balances the buttery shortbread perfectly.
Storage: Store the cookies in an airtight container at room temperature for up to 5 days. Layer them between sheets of parchment paper to prevent the almonds from breaking off. Don’t refrigerate them—the moisture will make the cookies soft and the almonds will lose their crunch.
Freezing: You can freeze the unbaked shaped cookies for up to 3 months. Place them on a baking sheet in the freezer until solid, then transfer to a freezer bag. When you’re ready to bake, add the almonds and egg wash, then bake straight from frozen—just add 2-3 minutes to the baking time. I do this every October so I can pull out a batch whenever Halloween cravings hit.
One thing I love about these cookies is that the flavors actually develop over time. Day two is even better than day one—the almond flavor deepens and the texture becomes perfectly tender. If you can resist eating them all on day one, you’re a stronger person than me.
Nutritional Information & Benefits
Let’s be real—these are cookies, not health food. But here’s the breakdown if you’re curious:
Per cookie (based on 36 cookies): Approximately 120 calories, 7g fat, 14g carbohydrates, 2g protein, 8g sugar. These are estimates and will vary based on your specific ingredients.
The almonds actually bring some nutritional value to the table. They’re packed with vitamin E, magnesium, and healthy monounsaturated fats. Almonds are also a good source of protein and fiber, which helps balance out the sugar rush from the cookie. I tell myself that makes these practically health food. (It doesn’t, but let me have this.)
These cookies are naturally vegetarian and can easily be made vegan or gluten-free with the substitutions I mentioned earlier. They do contain dairy, eggs, gluten, and nuts, so they’re not suitable for people with those allergies. If you’re baking for a group, I always recommend making a note of the allergens on the serving platter—nobody wants an unexpected trip to the emergency room.
From a wellness perspective, I believe in balance. Halloween comes once a year, and these cookies are part of the fun. Enjoy them, share them, and don’t stress about the nutritional breakdown. Life’s too short to count calories on a holiday.
Conclusion
These witch finger cookies are everything I want in a Halloween treat—they’re spooky, delicious, and surprisingly easy to make. After twelve attempts and countless batches, I can honestly say this version is the one. The buttery shortbread, the sweet almond nails, the perfect balance of creepy and delicious—it’s all here.
I love that these cookies bring people together. Every time I make them, someone asks for the recipe. They spark conversations, they make people laugh, and they create those little moments of joy that Halloween is really about. Plus, they taste amazing, which is the most important part.
I’d love to hear how yours turn out! Did you add your own twist? Did the kids love them? Did your coworkers freak out when you brought them to the office? Drop a comment below and let me know. And if you’re looking for more Halloween inspiration, check out my spiderweb dip recipe for a savory option that pairs perfectly with these cookies. Happy baking, and Happy Halloween!
Frequently Asked Questions
Can I make these cookies ahead of time?
Absolutely! You can make the dough up to 24 hours in advance and keep it wrapped in the refrigerator. You can also freeze the shaped cookies (without the almonds) for up to 3 months. Just add the almonds and egg wash right before baking.
My almonds keep falling off during baking. What am I doing wrong?
This usually happens when the egg wash isn’t applied generously enough, or the almonds aren’t pressed firmly onto the dough. Make sure you’re brushing the entire bottom surface of the almond with beaten egg white, and press it gently but firmly onto the tapered end of the finger. Chilling the shaped cookies for 10 minutes before baking also helps the almonds stay put.
Can I use almond flour instead of all-purpose flour?
I wouldn’t recommend it for this recipe. Almond flour doesn’t have the same structure as all-purpose flour, so the cookies would spread too much and lose their finger shape. If you need a gluten-free option, use a 1:1 gluten-free baking flour blend instead.
How do I get the red coloring to look like blood?
Use gel food coloring instead of liquid—it’s more concentrated and gives a deeper, richer red. Apply it with a toothpick or a small brush at the base of the almond nail. For an even more realistic effect, mix a tiny drop of blue food coloring with the red to create a darker, more venous shade.
My cookies turned out too hard. What went wrong?
Overbaking is the most common culprit. These cookies should be just set when you take them out of the oven—the edges should be barely golden. They continue to firm up as they cool. If they’re still hard after cooling, try reducing the baking time by 2-3 minutes next time. Also, make sure you’re measuring your flour correctly—too much flour makes cookies dense and hard.
Pin This Recipe!

Easy Witch Finger Cookies
These spooky witch finger cookies are the perfect Halloween treat—buttery shortbread with almond nails that look delightfully creepy. Easy to make with simple ingredients, they’re sure to be the talk of any party.
- Prep Time: 20 minutes
- Cook Time: 15 minutes
- Total Time: 40 minutes
- Yield: 30-36 cookies 1x
- Category: Dessert
- Cuisine: American
Ingredients
- 1 cup unsalted butter, softened
- 1 cup powdered sugar
- 1 large egg, room temperature
- 1 teaspoon vanilla extract
- ½ teaspoon almond extract
- 2 ¾ cups all-purpose flour
- 1 teaspoon baking powder
- ½ teaspoon fine sea salt
- 1 large egg white, lightly beaten
- 30–36 whole blanched almonds
- Red food coloring (gel preferred)
- Green food coloring (optional)
- Seedless raspberry jam or red gel icing
Instructions
- Cream the butter and sugar together. In a large mixing bowl, beat the softened butter and powdered sugar together until light and fluffy—about 2-3 minutes with an electric mixer. Scrape down the sides halfway through.
- Add the wet ingredients. Beat in the egg, vanilla extract, and almond extract until well combined.
- Mix the dry ingredients separately. In a separate bowl, whisk together the flour, baking powder, and salt.
- Combine wet and dry ingredients. Gradually add the flour mixture to the butter mixture, mixing on low speed until just combined. The dough should be soft but not sticky.
- Chill the dough. Wrap in plastic wrap and refrigerate for at least 30 minutes (up to 24 hours).
- Preheat oven to 325°F (165°C). Line baking sheets with parchment paper or silicone mats.
- Shape the fingers. Take about 1 tablespoon of dough and roll into a 3-inch log. Taper one end to look like a fingertip, widen the other end. Place on prepared baking sheet, spacing 2 inches apart. Repeat for 30-36 fingers.
- Create knuckle details. Using the back of a sharp knife or bench scraper, gently press 2-3 lines across each finger to create knuckle creases.
- Attach the almond nails. Brush the rounded end of each blanched almond with beaten egg white. Press firmly onto the tapered end of each finger, pointed side outward.
- Add creepy details. Using a small brush or toothpick, dab a tiny amount of red food coloring at the base of each almond nail.
- Bake for 12-15 minutes, until just set and edges are barely golden. Cool on baking sheet for 5 minutes, then transfer to a wire rack to cool completely.
- Final touches. Once cool, add a tiny dab of red jam or gel icing at the base of each almond nail for a bloody cuticle effect.
Notes
Chill the dough for at least 30 minutes to prevent spreading. Use whole blanched almonds for realistic nails. Wet hands slightly when shaping to prevent cracking. Don’t overbake—cookies continue to firm up as they cool. Store in an airtight container at room temperature for up to 5 days. Freeze unbaked shaped cookies for up to 3 months.
Nutrition
- Serving Size: 1 cookie
- Calories: 120
- Sugar: 8
- Sodium: 60
- Fat: 7
- Saturated Fat: 4
- Carbohydrates: 14
- Fiber: 0.5
- Protein: 2
Keywords: witch finger cookies, Halloween cookies, shortbread cookies, spooky treats, Halloween baking, almond cookies


